R151F MANUAL TRANSMISSION / TRANSAXLE MANUAL TRANSMISSION UNIT REASSEMBLY
PROCEDURE

 1.INSTALL STRAIGHT PIN AND RING PIN
- NOTICE:
-
It is not necessary to remove a straight pin and ring pin unless it is being replaced.
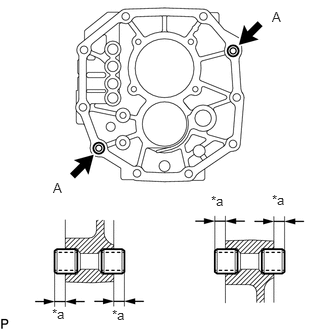
| *a | Protrusion Height |
Using a plastic-faced hammer, tap 4 new ring pins into the intermediate plate.
- Specified Condition:
Item Specified Condition A 5.5 to 7.5 mm (0.217 to 0.295 in.)
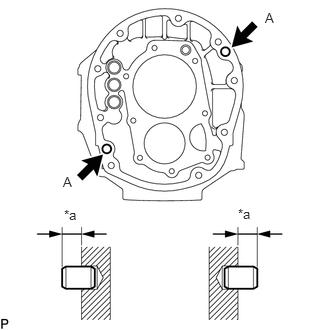
| *a | Protrusion Height |
Using a plastic-faced hammer, tap 2 new straight pins into the manual transmission case.
- Specified Condition:
Item Specified Condition A 9.0 to 11.0 mm (0.355 to 0.433 in.)
33321
2.INSTALL OUTPUT SHAFT
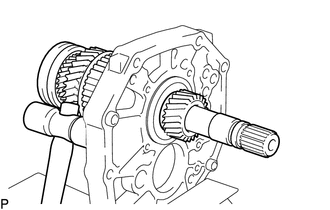
Apply gear oil to the sliding part of the output shaft.
Using a plastic-faced hammer, install the output shaft by tapping the intermediate plate.
33321B
3.INSTALL OUTPUT SHAFT BEARING SHAFT SNAP RING
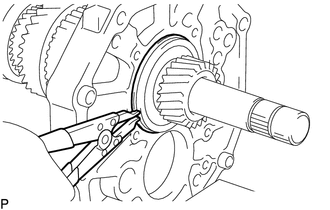
Using a snap ring expander, install a new output shaft bearing shaft snap ring to the output shaft.
33368
4.INSPECT NO. 2 SYNCHRONIZER RING
33311
5.INSTALL INPUT SHAFT
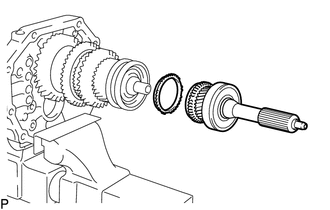
Apply gear oil to the input shaft and No. 2 synchronizer ring, and install them to the output shaft.
- NOTICE:
- ·
When installing the input shaft to the output shaft, align the protrusion of the No. 2 synchronizer ring with the cutout of the transmission clutch hub.
·Check that the input shaft rotates slightly.
33421
6.INSTALL COUNTER GEAR
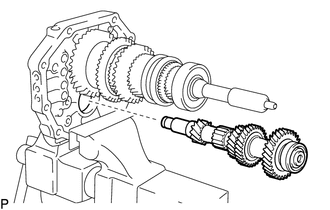
Temporarily install the counter gear to the intermediate plate.
33411P
7.INSTALL COUNTER SHAFT REAR BEARING
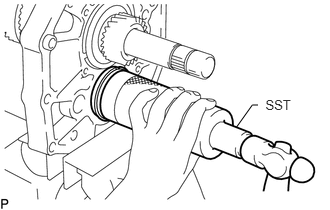
Using SST and a hammer, tap in a new counter shaft rear bearing to the intermediate plate.
- SST
- 09316-60011 (09316-00011)
- HINT:
-
Install the counter shaft rear bearing while tapping the tip of the counter gear with a plastic-faced hammer so that the counter gear does not hit the side wall of the output shaft gear by being pushed forward.
Using a snap ring expander, install the snap ring.
33402
8.INSTALL REVERSE IDLER GEAR SUB-ASSEMBLY
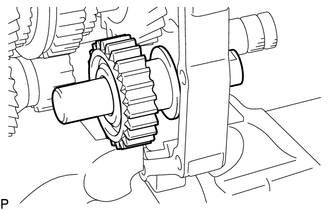
Apply gear oil to each sliding part of the reverse idler gear sub-assembly and the reverse idler gear shaft, and install the reverse idler gear sub-assembly and reverse idler shaft to the intermediate plate.
- NOTICE:
-
Install the reverse idler shaft with its groove facing the rear side, and install it from the rear side.
33151
9.INSTALL OUTPUT SHAFT REAR BEARING RETAINER
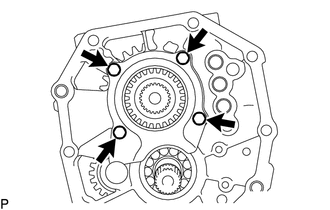
Insert the output shaft rear bearing retainer into the groove of the reverse idler gear shaft and install it with the 4 bolts.
- Torque:
- 18 N*m (184 kgf*cm, 13 ft.*lbf)
33349C
10.INSTALL 5TH GEAR THRUST WASHER PIN
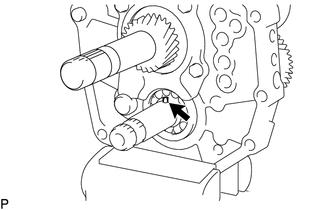
Apply MP grease to the 5th gear thrust washer pin, and install it to the counter gear.
33349
11.INSTALL 5TH GEAR THRUST WASHER
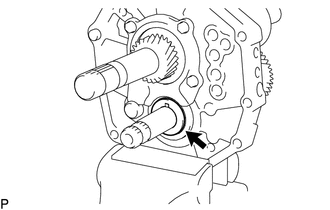
Apply gear oil to the 5th gear thrust washer, and install it to the counter gear.
- NOTICE:
-
Install the 5th gear thrust washer so that its chamfer side faces forward.
33394B
12.INSTALL NO. 3 SYNCHROMESH SHIFTING KEY
Apply gear oil to the sliding part of the No. 3 transmission hub sleeve, and install the No. 3 transmission hub sleeve to the countershaft 5th gear.
- NOTICE:
-
Make sure that the No. 3 transmission hub sleeve and countershaft 5th gear are installed facing the correct direction.
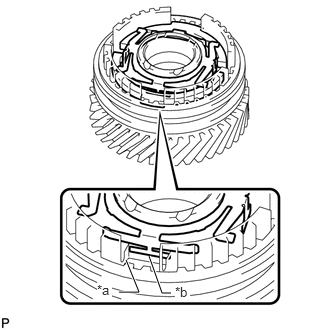
| *a | Cutout |
| *b | Protrusion |
Install the 2 No. 3 synchromesh shifting keys and No. 3 synchromesh shifting key spring to the countershaft 5th gear as shown in the illustration.
- HINT:
-
When installing the No. 3 synchromesh shifting key spring, make sure the protrusion fits into the cutout.
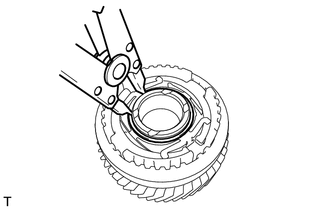
Using a snap ring expander, install a new shaft snap ring to the countershaft 5th gear.
33428B
13.INSTALL COUNTER 5TH GEAR BEARING
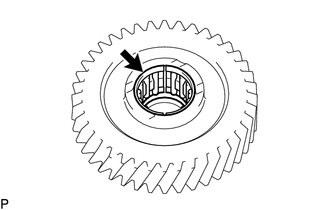
Apply gear oil to the counter 5th gear bearing and install it to the countershaft 5th gear.
33428
14.INSTALL COUNTERSHAFT 5TH GEAR
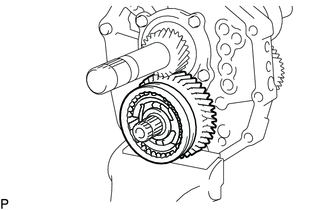
Apply gear oil to the countershaft 5th gear and No. 3 transmission hub sleeve, and install them to the countershaft.
33384A
15.INSTALL NO. 3 SYNCHRONIZER RING
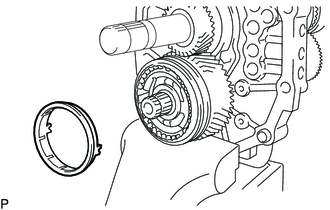
Apply gear oil to the No. 3 synchronizer ring, and install it to the countershaft 5th gear.
- NOTICE:
-
Install the No. 3 synchronizer ring so that its protrusion fits between the 2 No. 3 synchromesh shifting keys.
33318
16.INSTALL NO. 5 GEAR SPLINE PIECE
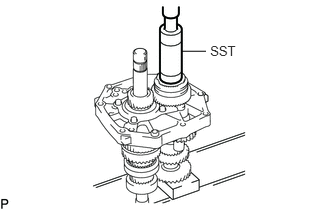
Using SST and a press, press in the No. 5 gear spline piece to the countershaft 5th gear.
- SST
- 09316-60011 (09316-00011)
- NOTICE:
-
Check that the gear rotates freely.
33421R
17.INSTALL COUNTER SHAFT REAR SNAP RING
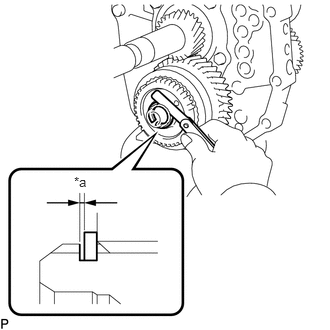
| *a | Thrust Clearance |
Select a new snap ring so that the thrust clearance between the No. 5 gear spline piece and snap ring is within the specification.
- Standard clearance:
0.10 mm (0.00393 in.) or less
- Snap Ring Thickness:
Thickness 2.80 to 2.85 mm (0.111 to 0.112 in.) 2.85 to 2.90 mm (0.113 to 0.114 in.) 2.90 to 2.95 mm (0.115 to 0.116 in.) 2.95 to 3.00 mm (0.117 to 0.118 in.) 3.00 to 3.05 mm (0.119 to 0.120 in.) 3.05 to 3.10 mm (0.121 to 0.122 in.) 3.10 to 3.15 mm (0.123 to 0.124 in.)
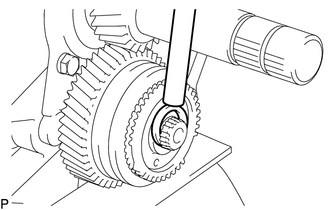
Using a brass bar and hammer, install the counter shaft rear snap ring.
18.INSPECT COUNTERSHAFT 5TH GEAR THRUST CLEARANCE
19.INSPECT COUNTERSHAFT 5TH GEAR RADIAL CLEARANCE
33321A
20.INSTALL OUTPUT SHAFT REAR BEARING
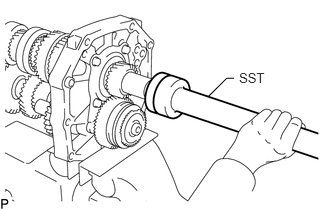
Using SST and a press, press in the spacer and a new output shaft rear bearing to the output shaft.
- SST
- 09309-35010
Select a new shaft snap ring so that the thrust clearance between the output shaft rear bearing and shaft snap ring is within the specification.
- Standard clearance:
0.10 mm (0.00393 in.) or less
- Snap Ring Thickness:
Thickness Thickness 2.65 to 2.70 mm (0.105 to 0.106 in.) 3.10 to 3.15 mm (0.122 to 0.124 in.) 2.70 to 2.75 mm (0.107 to 0.108 in.) 3.15 to 3.20 mm (0.124 to 0.126 in.) 2.75 to 2.80 mm (0.109 to 0.110 in.) 3.20 to 3.25 mm (0.126 to 0.128 in.) 2.80 to 2.85 mm (0.111 to 0.112 in.) 3.25 to 3.30 mm (0.128 to 0.129 in.) 2.85 to 2.90 mm (0.113 to 0.114 in.) 3.30 to 3.35 mm (0.130 to 0.131 in.) 2.90 to 2.95 mm (0.115 to 0.116 in.) 3.35 to 3.40 mm (0.132 to 0.133 in.) 2.95 to 3.00 mm (0.117 to 0.118 in.) 3.40 to 3.45 mm (0.134 to 0.135 in.) 3.00 to 3.05 mm (0.119 to 0.120 in.) 3.45 to 3.50 mm (0.136 to 0.137 in.) 3.05 to 3.10 mm (0.121 to 0.122 in.) -
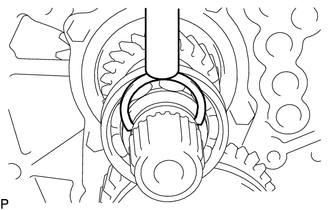
Using a brass bar and hammer, install the shaft snap ring to the output shaft.
33228
21.INSTALL REVERSE SHIFT ARM BRACKET
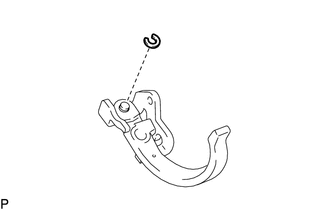
Install the reverse shift arm to the reverse shift arm bracket with a new snap ring.
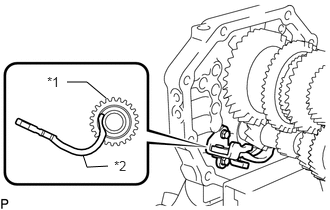
| *1 | Reverse Idler Gear |
| *2 | Reverse Shift Arm |
Insert the tip of the reverse shift arm into the reverse idler gear sub-assembly.
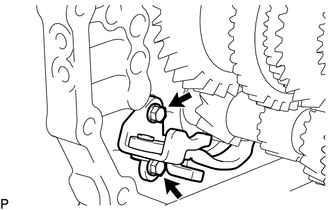
Install the reverse shift arm bracket with the 2 bolts.
- Torque:
- 18 N*m (184 kgf*cm, 13 ft.*lbf)
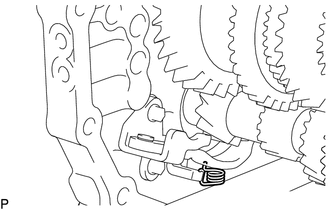
Install the torsion spring to the reverse shift arm bracket.
- NOTICE:
-
Make sure that the torsion spring is securely installed to the reverse shift arm.
33211
22.INSTALL REVERSE SHIFT FORK
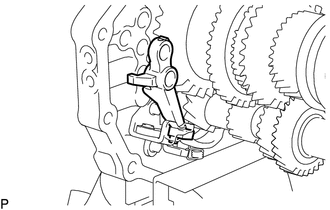
Install the reverse shift fork to the reverse shift arm.
33241
23.INSTALL NO. 3 GEAR SHIFT FORK SHAFT
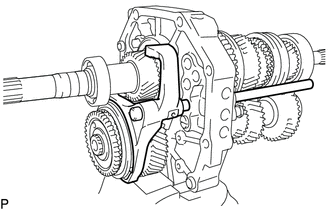
Install the No. 3 gear shift fork to the No. 3 transmission hub sleeve and No. 3 gear shift fork shaft to the intermediate plate from the front side.
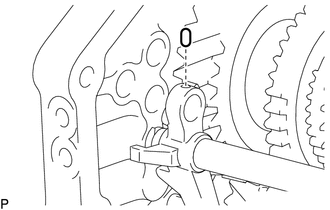
Install the No. 1 shift interlock roller to the reverse shift fork.
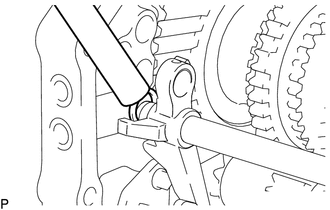
Using a brass bar and hammer, install a new shift fork shaft snap ring to the No. 3 gear shift fork shaft.
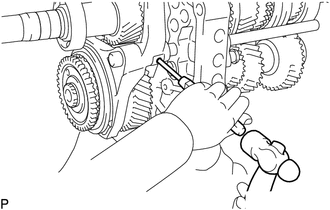
Using a 5 mm pin punch and hammer, install a new shift fork set slotted spring pin to the No. 3 gear shift fork.
33242
24.INSTALL NO. 1 GEAR SHIFT FORK SHAFT
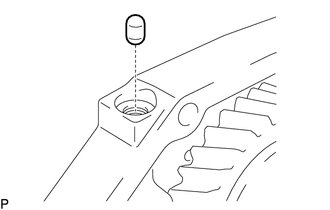
Install the No. 1 shift interlock roller to the intermediate plate.
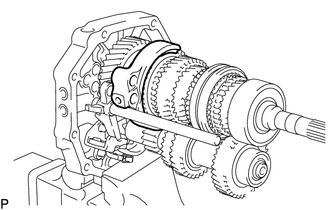
Install the No. 1 gear shift fork to the reverse gear.
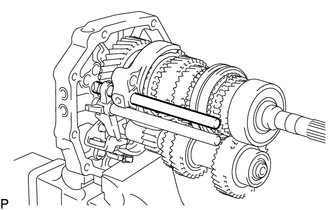
Install the No. 1 gear shift fork shaft to the intermediate plate from the rear side.
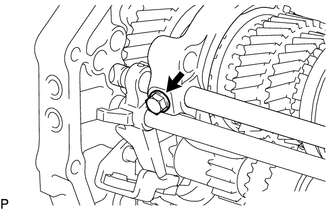
Install a new bolt to the No. 1 gear shift fork shaft.
- Torque:
- 19.5 N*m (199 kgf*cm, 14 ft.*lbf)
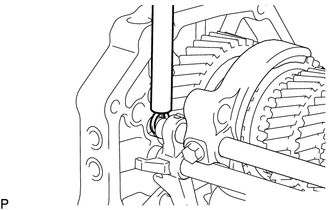
Using a brass bar and hammer, install a new shift fork shaft snap ring to the No. 1 gear shift fork shaft.
33243A
25.INSTALL NO. 2 GEAR SHIFT FORK SHAFT
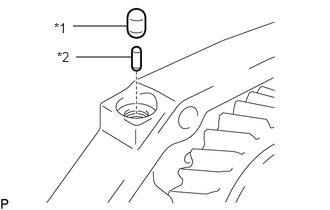
| *1 | No. 1 Shift Interlock Roller |
| *2 | Shift Interlock Pin |
Install the shift interlock pin and No. 1 shift interlock roller to the intermediate plate.
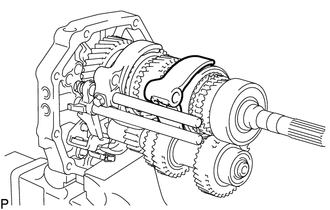
Install the No. 2 gear shift fork to the No. 2 transmission hub sleeve.
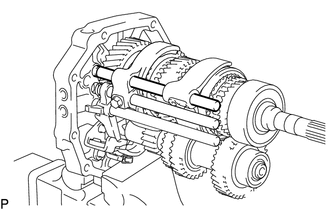
Apply gear oil to the No. 2 gear shift fork shaft, and install the No. 2 gear shift fork shaft to the intermediate plate from the rear side.
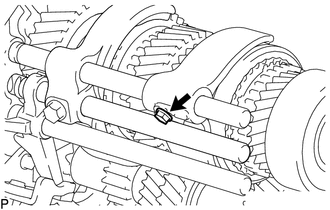
Install a new bolt to the No. 2 gear shift fork.
- Torque:
- 19.5 N*m (199 kgf*cm, 14 ft.*lbf)
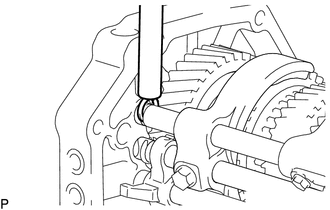
Using a brass bar and hammer, install a new shift fork shaft snap ring to the No. 2 gear shift fork shaft.
26.INSTALL SHIFT DETENT BALL PLUG
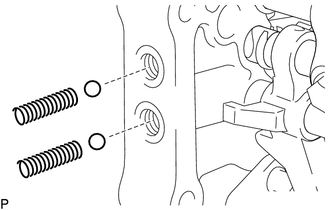
Install the 2 shift detent ball compression springs and 2 shift detent balls to the intermediate plate.
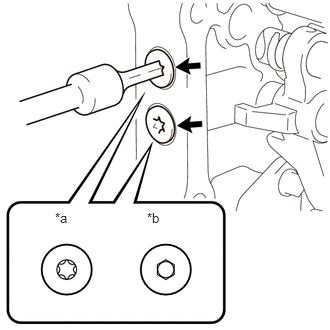
| *a | for Type A |
| *b | for Type B |
Install 2 new shift detent ball plugs to the intermediate plate.
for Type A:
Using a T40 ''TORX'' socket wrench, install 2 new shift detent ball plugs to the intermediate plate.
- Torque:
- 18.5 N*m (189 kgf*cm, 14 ft.*lbf)
for Type B
Using a 6 mm hexagon socket wrench, install 2 new shift detent ball plugs to the intermediate plate.
- Torque:
- 18.5 N*m (189 kgf*cm, 14 ft.*lbf)
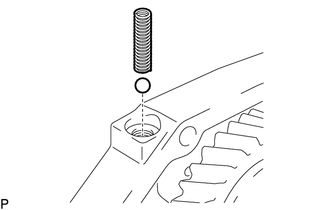
Install the shift detent ball and shift detent ball compression spring to the intermediate plate.
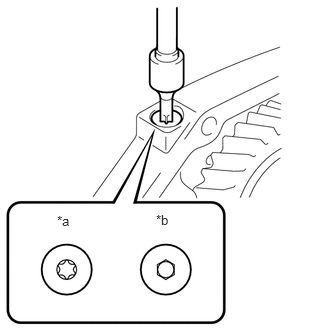
| *a | for Type A |
| *b | for Type B |
Install a new shift detent ball plug to the intermediate plate.
for Type A:
Using a T40 ''TORX'' socket wrench, install a new shift detent ball plug to the intermediate plate.
- Torque:
- 18.5 N*m (189 kgf*cm, 14 ft.*lbf)
for Type B:
Using a 6 mm hexagon socket wrench, install a new shift detent ball plug to the intermediate plate.
- Torque:
- 18.5 N*m (189 kgf*cm, 14 ft.*lbf)
33449B
27.INSTALL TRANSMISSION MAGNET
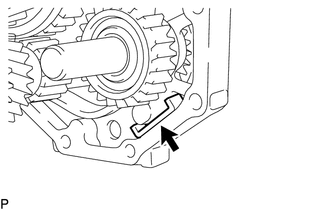
Clean the transmission magnet, and install it to the intermediate plate.
33111
28.INSTALL MANUAL TRANSMISSION CASE
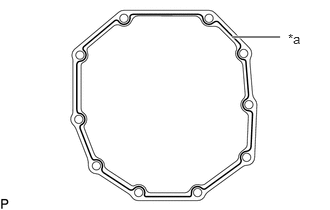
| *a | Seal Packing |
Apply seal packing to the manual transmission case as shown in the illustration.
- Seal packing:
Toyota Genuine Seal Packing 1281, Three Bond 1281 or equivalent
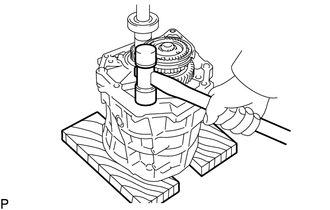
Using a plastic-faced hammer, tap the manual transmission case to attach it to the intermediate plate.
33411Q
29.INSTALL COUNTER GEAR FRONT BEARING SNAP RING
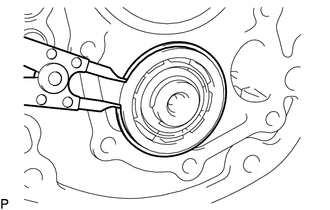
Using a snap ring expander, install the counter gear front bearing snap ring to the manual transmission case.
33311G
30.INSTALL FRONT BEARING SHAFT SNAP RING
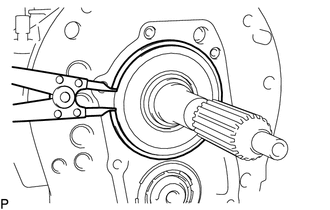
Using a snap ring expander, install the front bearing shaft snap ring to the manual transmission case.
33131A
31.INSTALL TRANSMISSION FRONT BEARING RETAINER OIL SEAL
33131
32.INSTALL FRONT BEARING RETAINER
Clean and degrease the contact surface of the front bearing retainer and manual transmission case.
Clean and degrease the 8 bolts and the installation holes in the manual transmission case.
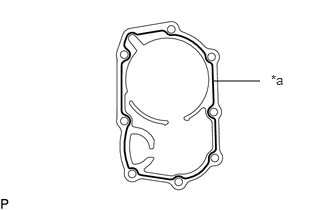
| *a | Seal Packing |
Apply seal packing to the front bearing retainer as shown in the illustration.
- Seal packing:
Toyota Genuine Seal Packing 1281, Three Bond 1281 or equivalent
- NOTICE:
- ·
Assemble the parts within 10 minutes of application. Otherwise, the seal packing material must be removed and reapplied.
·Apply seal packing in a continuous line (width 1.2 mm (0.0472 in.)) a long the sealing surface of the manual transmission case
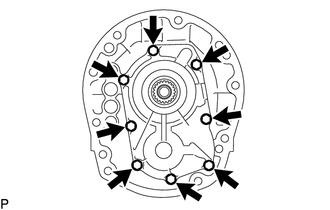
Install the front bearing retainer to the manual transmission case with 8 new bolts.
- Torque:
- 16.5 N*m (168 kgf*cm, 12 ft.*lbf)
Check that the input shaft and output shaft rotate smoothly.
36117A
33.INSTALL TRANSFER ADAPTER OIL SEAL
33283F
34.INSTALL REVERSE RESTRICT PIN
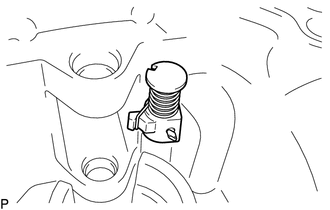
Install the reverse restrict pin to the transfer adapter sub-assembly.
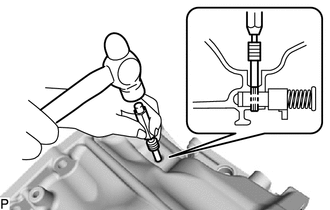
Using a 5 mm pin punch and hammer, tap in the slotted pin to the transfer adapter sub-assembly.
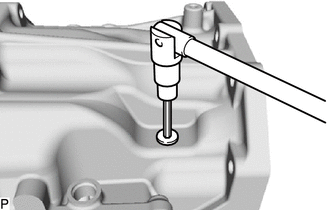
Using a T40 ''TORX'' socket wrench, install a new plug to the transfer adapter sub-assembly.
- Torque:
- 18.5 N*m (189 kgf*cm, 14 ft.*lbf)
33124E
35.INSTALL TRANSFER OIL RECEIVER PIPE
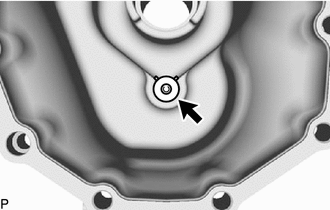
Install the transfer oil receiver pipe to the transfer adapter sub-assembly.
33251
36.INSTALL SHIFT AND SELECT LEVER
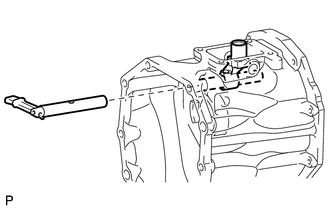
Install the shift and select lever shaft and shift lever housing to the transfer adapter sub-assembly.
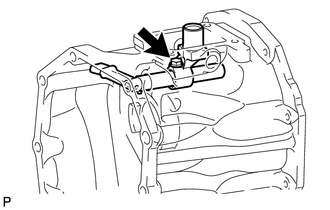
Install a new bolt to the transfer adapter sub-assembly.
- Torque:
- 33.3 N*m (340 kgf*cm, 25 ft.*lbf)
36107A
37.INSTALL TRANSFER ADAPTER SUB-ASSEMBLY
| *a | Seal Packing |
Apply seal packing to the transfer adapter sub-assembly as shown in the illustration.
- Seal packing:
Toyota Genuine Seal Packing 1281, Three Bond 1281 or equivalent
Using a plastic-faced hammer, tap the transfer adapter sub-assembly to attach it to the manual transmission case.
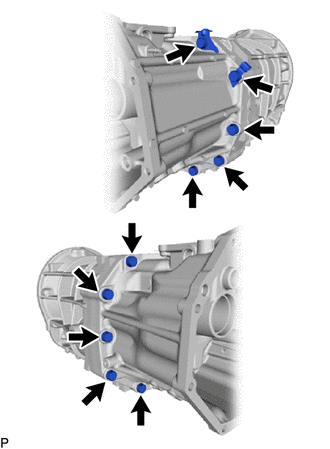
Install the transfer adapter sub-assembly to the manual transmission case with the 10 bolts and 2 wire harness brackets.
- Torque:
- 37 N*m (377 kgf*cm, 27 ft.*lbf)
33506F
38.INSTALL FLOOR SHIFT CONTROL SHIFT LEVER RETAINER SUB-ASSEMBLY
Install a new control shift lever retainer gasket and the floor shift control shift lever retainer sub-assembly.
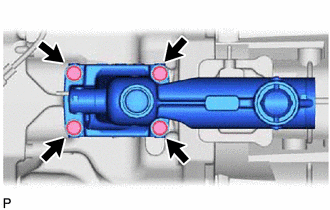
Install the 4 bolts.
- Torque:
- 18 N*m (184 kgf*cm, 13 ft.*lbf)
33280
39.INSTALL REVERSE RESTRICT PIN ASSEMBLY
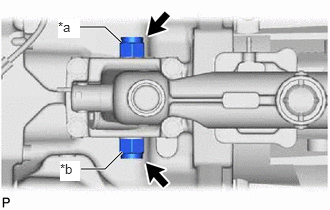
| *a | Gray |
| *b | Purple |
Install the 2 reverse restrict pin assemblies.
- Torque:
- 37 N*m (377 kgf*cm, 27 ft.*lbf)
84210
40.INSTALL BACK-UP LIGHT SWITCH ASSEMBLY
31111
41.INSTALL CLUTCH HOUSING
Clean the threads of the bolts and the manual transmission case with non-residue solvent.
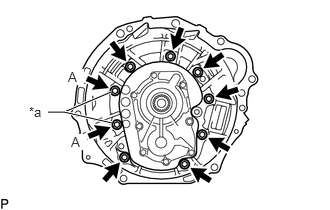
| *a | Precoated Bolt |
Install the clutch housing to the manual transmission case with the 7 bolts.
- Torque:
- 36 N*m (367 kgf*cm, 27 ft.*lbf)
Install 2 new bolts (labeled A).
- Torque:
- 36 N*m (367 kgf*cm, 27 ft.*lbf)
31236B
42.INSTALL RELEASE FORK SUPPORT
31230
43.INSTALL CLUTCH RELEASE BEARING ASSEMBLY
31126
44.INSTALL CLUTCH RELEASE FORK BOOT
33104
45.INSTALL DRAIN PLUG SUB-ASSEMBLY
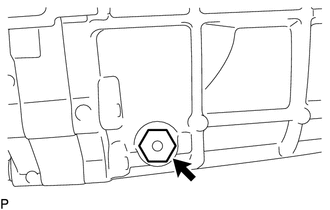
Install a new gasket and the drain plug sub-assembly to the manual transmission case.
- Torque:
- 37 N*m (377 kgf*cm, 27 ft.*lbf)
33101A
46.INSTALL MANUAL TRANSMISSION FILLER PLUG
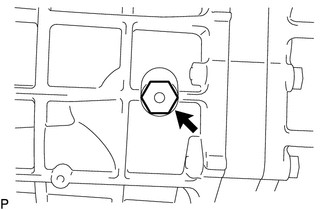
Install a new gasket and the manual transmission filler plug to the manual transmission case.
- Torque:
- 37 N*m (377 kgf*cm, 27 ft.*lbf)