1KD-FTV ENGINE MECHANICAL CYLINDER HEAD REASSEMBLY
CAUTION / NOTICE / HINT
- HINT:
- ·
Thoroughly clean all parts to be assembled.
·Before installing the parts, apply fresh engine oil to all sliding and rotating surfaces.
·Replace all gaskets and oil seals with new ones.
PROCEDURE

 1.INSTALL STUD BOLT
- HINT:
-
If a stud bolt is deformed or its threads are damaged, replace it.
Install the stud bolts to the cylinder head sub-assembly.
- Torque:
- for stud bolt A and D : 5.0 N*m (51 kgf*cm, 44 in.*lbf)
- for stud bolt B : 7.0 N*m (71 kgf*cm, 62 in.*lbf)
- for stud bolt C : 15 N*m (153 kgf*cm, 11 ft.*lbf)
- for stud bolt E : 20 N*m (204 kgf*cm, 15 ft.*lbf)
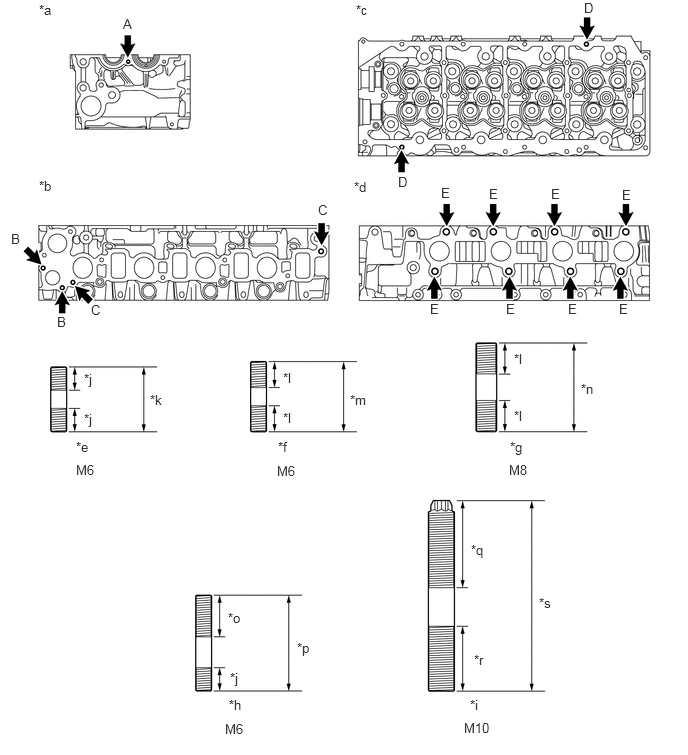
| *a | Front Side | *b | Intake Manifold Side |
| *c | Cylinder Head Cover Side | *d | Exhaust Manifold Side |
| *e | Stud Bolt A | *f | Stud Bolt B |
| *g | Stud Bolt C | *h | Stud Bolt D |
| *i | Stud Bolt E | *j | 9.0 mm (0.354 in.) |
| *k | 25 mm (0.984 in.) | *l | 12 mm (0.472 in.) |
| *m | 28 mm (1.10 in.) | *n | 34 mm (1.34 in.) |
| *o | 16 mm (0.630 in.) | *p | 37 mm (1.46 in.) |
| *q | 33.5 mm (1.32 in.) | *r | 25 mm (0.984 in.) |
| *s | 73.5 mm (2.89 in.) | - | - |
11117E
2.INSTALL NO. 1 STRAIGHT SCREW PLUG
- HINT:
-
If the No. 1 straight screw plug is corroded, replace it.
Apply adhesive to the end of each No. 1 straight screw plug.
- Adhesive:
Toyota Genuine Adhesive 1324, Three Bond 1324 or equivalent
Using a 6 mm hexagon wrench, install the 4 No. 1 straight screw plugs to the cylinder head sub-assembly.
- Torque:
- 25 N*m (255 kgf*cm, 18 ft.*lbf)
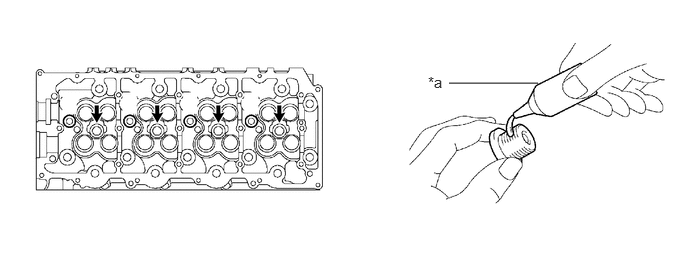
| *a | Adhesive | - | - |
11183
3.INSTALL SEMICIRCULAR PLUG
Remove any old seal packing (FIPG material).
Apply seal packing to the semicircular plug as shown in the illustration.
- Seal packing:
Toyota Genuine Seal Packing Black, Three Bond 1207B or equivalent
- NOTICE:
- ·
The semicircular plug must be installed within 3 minutes after applying the seal packing.
·Prevent seal packing from adhering to the camshaft thrust groove.
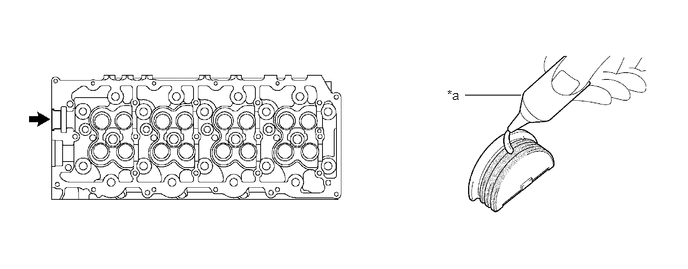
| *a | Seal Packing | - | - |
Install the semicircular plug to the cylinder head sub-assembly.
13711E
4.INSTALL INTAKE VALVE STEM OIL SEAL
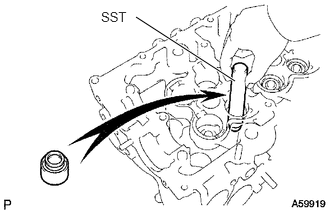
Using SST, push in new intake valve stem oil seals to the calve guide bush.
- SST
- 09201-41020
13715A
5.INSTALL EXHAUST VALVE STEM OIL SEAL
Using SST, push in new exhaust valve stem oil seals to the valve guide bush.
- SST
- 09201-41020
13711
6.INSTALL INTAKE VALVE
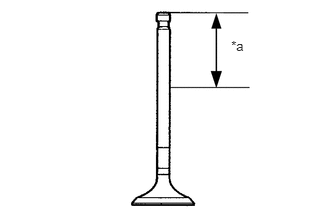
| *a | 30 mm (1.18 in.) or more |
Apply a sufficient coat of engine oil to the tip area of the intake valve shown in the illustration.
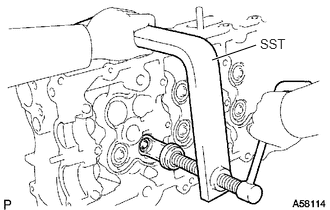
Install the intake valve, valve spring seat, inner compression spring and valve spring retainer to the cylinder head sub-assembly.
Using SST, compress the inner compression spring and install the 2 valve spring retainer locks to the valve stem.
- SST
- 09202-70020
09202-00021
Using a plastic-faced hammer, lightly tap the valve stem tip to assure a proper fit.
- NOTICE:
-
Be careful not to damage the valve stem tip.
13715
7.INSTALL EXHAUST VALVE
| *a | 30 mm (1.18 in.) or more |
Apply a sufficient coat of engine oil to the tip area of the exhaust valve shown in the illustration.
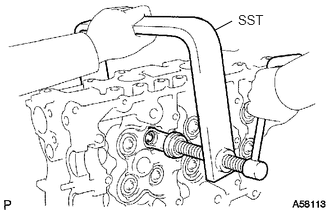
Install the exhaust valve, valve spring seat, inner compression spring and valve spring retainer.
Using SST, compress the inner compression spring and install the 2 valve spring retainer locks to the valve stem to the cylinder head sub-assembly.
- SST
- 09202-70020
09202-00021
Using a plastic-faced hammer, lightly tap the valve stem tip to assure a proper fit.
- NOTICE:
-
Be careful not to damage the valve stem tip.