REAR SUSPENSION REAR SHOCK ABSORBER INSTALLATION
CAUTION / NOTICE / HINT
- HINT:
- ·
Use the same procedure for the RH and LH sides.
·The procedure listed below is for the LH side.
PROCEDURE

 48540
1.INSTALL REAR SHOCK ABSORBER ASSEMBLY LH
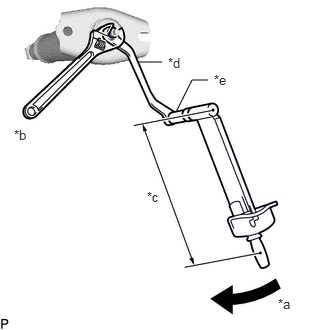
| *a | Turn |
| *b | Hold |
| *c | Torque Wrench Fulcrum Length |
| *d | 12 x 14 mm Long Offset Wrench |
| *e | 12 mm Socket Hexagon Wrench |
Using a 12 mm socket hexagon wrench and 12 x 14 mm long offset wrench, install the 3 rear shock absorber cushion retainers, rear No. 1 shock absorber cushion, rear upper shock absorber bracket LH, rear No. 2 shock absorber cushion and a new lock nut to the rear shock absorber assembly LH.
- Torque:
- Specified tightening torque : 20 N*m (204 kgf*cm, 15 ft.*lbf)
- HINT:
- ·
Calculate the torque wrench reading when changing the fulcrum length of the torque wrench.
Click hereGeneral>INTRODUCTION>REPAIR INSTRUCTION>PRECAUTION
·When using a long offset wrench (fulcrum length of 206.25 mm (8.1201 in.)) + torque wrench (fulcrum length of 300 mm (11.8110 in.)): 11.9 N*m (121 kgf*cm, 9 ft.*lbf)
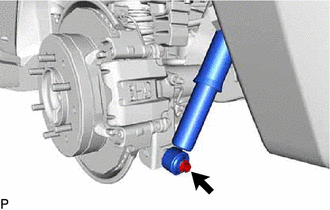
Temporarily install the rear shock absorber assembly LH to the axle housing with the bolt.
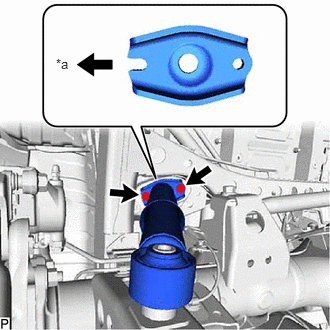
| *a | Vehicle Exterior |
Install the rear shock absorber assembly LH to the frame with the 2 bolts.
- Torque:
- 25 N*m (255 kgf*cm, 18 ft.*lbf)
- HINT:
-
Make sure that the cutout of the rear upper shock absorber bracket LH faces the vehicle exterior.
2.INSTALL REAR WHEEL
3.STABILIZE SUSPENSION
Lower the vehicle.
Press down on the vehicle several time to stabilize the suspension.
48540
4.TIGHTEN REAR SHOCK ABSORBER ASSEMBLY LH
Tighten the bolt.
- Torque:
- 98 N*m (999 kgf*cm, 72 ft.*lbf)
5.PERFORM INITIALIZATION (w/ Automatic Headlight Beam Level Control System)
6.INSPECT AUTOMATIC LIGHT CONTROL SYSTEM (w/ Automatic Headlight Beam Level Control System)
7.INSPECT HEADLIGHT AIMING (w/ Automatic Headlight Beam Level Control System)