EXTERIOR PANELS / TRIM NAME PLATE INSTALLATION
PROCEDURE

 75431A
1.INSTALL NO. 1 BACK DOOR EMBLEM
- HINT:
-
When installing the No. 1 back door emblem, heat the vehicle body and No. 1 back door emblem using a heat light.
- Standard:
Item Temperature Vehicle Body 40 to 60°C (104 to 140°F) No. 1 Back Door Emblem 20 to 30°C (68 to 86°F)
- CAUTION:
-
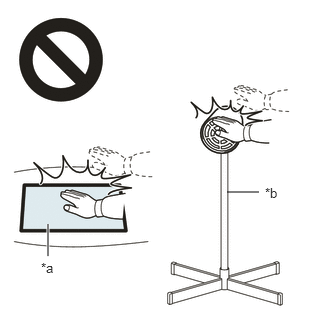 2.365,2 2.698,2 false 0.5,2.333 0.5,2.667 true 0.427,2.708 0.74,2.865 0.313,0.156 10 false *a 2.76,1.927 3.073,2.083 0.313,0.156 10 false *b
*a Heated Part *b Heat Light
- ·
Do not touch the heat light and heated parts.
·Touching the heat light may result in burns.
·Touching heated parts for a long time may result in burns.
Clean the vehicle body surface.
Using a heat light, heat the vehicle body surface.
Remove the double-sided tape from the vehicle body.
Wipe off any tape adhesive residue with cleaner.
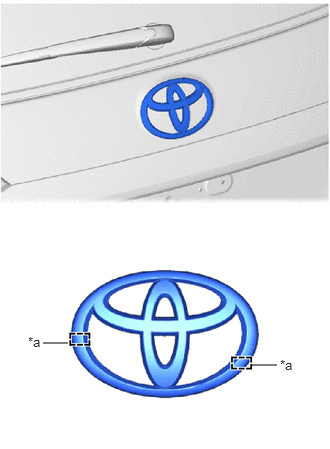
| *a | Boss |
Install a new No. 1 back door emblem.
Using a heat light, heat the vehicle body and a new No. 1 back door emblem.
Remove the peeling paper from the face of the No. 1 back door emblem.
- HINT:
-
After removing the peeling paper, keep the exposed adhesive free from foreign matter.
Align the boss positions and install the No. 1 back door emblem.
- HINT:
-
Press the No. 1 back door emblem firmly to install it.
75441B
2.INSTALL BACK DOOR NAME PLATE
- HINT:
-
When installing the back door name plate, heat the back door outside garnish sub-assembly and back door name plate using a heat light.
- Standard:
Item Temperature Back Door Outside Garnish Sub-assembly 40 to 60°C (104 to 140°F) Back Door Name Plate 20 to 30°C (68 to 86°F)
- CAUTION:
-
2.365,2 2.698,2 false 0.5,2.333 0.5,2.667 true 0.427,2.708 0.74,2.865 0.313,0.156 10 false *a 2.76,1.927 3.073,2.083 0.313,0.156 10 false *b
*a Heated Part *b Heat Light
- ·
Do not touch the heat light and heated parts.
·Touching the heat light may result in burns.
·Touching heated parts for a long time may result in burns.
Clean the back door outside garnish sub-assembly surface.
Using a heat light, heat the back door outside garnish sub-assembly surface.
Remove the double-sided tape from the vehicle body.
Wipe off any tape adhesive residue with cleaner.
Install a new back door name plate.
Using a heat light, heat the back door outside garnish sub-assembly and a new back door name plate.
Remove the peeling paper from the face of the back door name plate.
- HINT:
-
After removing the peeling paper, keep the exposed adhesive free from foreign matter.
Install the back door name plate in the position shown in the illustration.
- HINT:
- ·
The values in the illustration are reference values.
·Press the back door name plate firmly to install it.
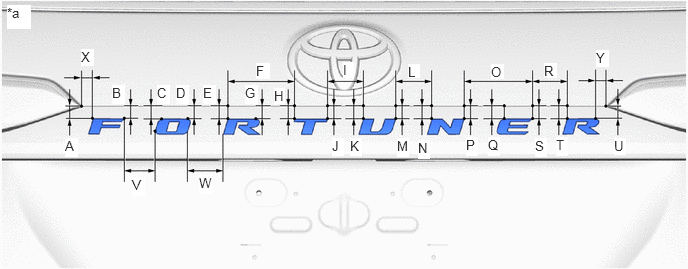
| *a | Reference Values | - | - |
- Standard:
Area Specified Condition Area Specified Condition A 19.0 mm (0.748 in.) B 19.2 mm (0.756 in.) C 19.3 mm (0.760 in.) D 19.4 mm (0.764 in.) E 19.4 mm (0.764 in.) F 81.3 to 83.3 mm (3.20 to 3.28 in.) G 19.5 mm (0.768 in.) H 19.5 mm (0.768 in.) I 42.8 to 44.8 mm (1.69 to 1.76 in.) J 19.5 mm (0.768 in.) K 19.5 mm (0.768 in.) L 43.0 to 45.0 mm (1.69 to 1.77 in.) M 19.5 mm (0.768 in.) N 19.5 mm (0.768 in.) O 83.1 to 85.1 mm (3.27 to 3.35 in.) P 19.4 mm (0.764 in.) Q 19.3 mm (0.760 in.) R 41.3 to 43.3 mm (1.63 to 1.70 in.) S 19.2 mm (0.756 in.) T 19.2 mm (0.756 in.) U 19.0 mm (0.748 in.) V 38.5 to 40.5 mm (1.52 to 1.59 in.) W 41.2 to 43.2 mm (1.62 to 1.70 in.) X 11.3 mm (0.445 in.) Y 14.4 mm (0.567 in.) - -
75459A
3.INSTALL BACK DOOR MARK
- HINT:
-
When installing the back door mark, heat the vehicle body and back door mark using a heat light.
- Standard:
Item Temperature Vehicle Body 40 to 60°C (104 to 140°F) Back Door Mark 20 to 30°C (68 to 86°F)
- CAUTION:
-
2.365,2 2.698,2 false 0.5,2.333 0.5,2.667 true 0.427,2.708 0.74,2.865 0.313,0.156 10 false *a 2.76,1.927 3.073,2.083 0.313,0.156 10 false *b
*a Heated Part *b Heat Light
- ·
Do not touch the heat light and heated parts.
·Touching the heat light may result in burns.
·Touching heated parts for a long time may result in burns.
Clean the vehicle body surface.
Using a heat light, heat the vehicle body surface.
Remove the double-sided tape from the vehicle body.
Wipe off any tape adhesive residue with cleaner.
Install a new back door mark.
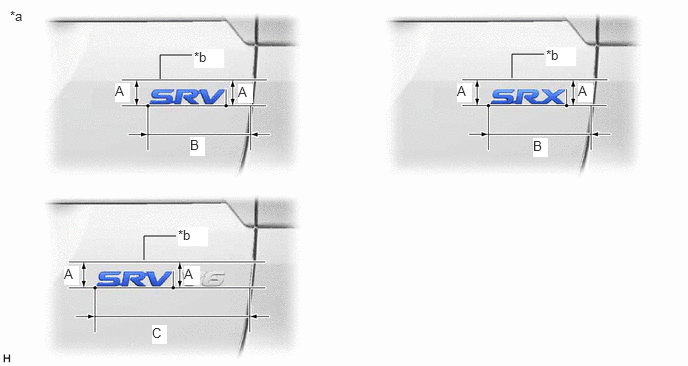
| *a | Reference Values | *b | Back Door R End |
Using a heat light, heat the vehicle body and a new back door mark.
Remove the peeling paper from the face of the back door mark.
- HINT:
-
After removing the peeling paper, keep the exposed adhesive free from foreign matter.
Install the back door mark in the position shown in the illustration.
- HINT:
- ·
The values in the illustration are reference values.
·Press the back door mark firmly to install it.
- Standard:
Area Specified Condition Area Specified Condition A 56.0 mm (2.20 in.) B 175.0 mm (6.89 in.) C 263.0 mm (10.4 in.) - -
75428B
4.INSTALL FRONT NO. 2 DOOR NAME PLATE
- HINT:
-
When installing the front No. 2 door name plate, heat the vehicle body and front No. 2 door name plate using a heat light.
- Standard:
Item Temperature Vehicle Body 40 to 60°C (104 to 140°F) Front No. 2 Door Name Plate 20 to 30°C (68 to 86°F)
- CAUTION:
-
2.365,2 2.698,2 false 0.5,2.333 0.5,2.667 true 0.427,2.708 0.74,2.865 0.313,0.156 10 false *a 2.76,1.927 3.073,2.083 0.313,0.156 10 false *b
*a Heated Part *b Heat Light
- ·
Do not touch the heat light and heated parts.
·Touching the heat light may result in burns.
·Touching heated parts for a long time may result in burns.
Clean the vehicle body surface.
Using a heat light, heat the vehicle body surface.
Remove the double-sided tape from the vehicle body.
Wipe off any tape adhesive residue with cleaner.
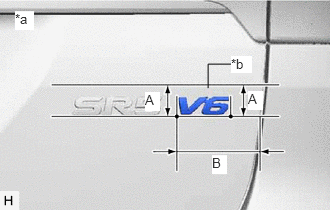
| *a | Reference Values |
| *b | Back Door R End |
Install a new front No. 2 door name plate.
Using a heat light, heat the vehicle body and a new front No. 2 door name plate.
Remove the peeling paper from the face of the front No. 2 door name plate.
- HINT:
-
After removing the peeling paper, keep the exposed adhesive free from foreign matter.
Install the front No. 2 door name plate in the position shown in the illustration.
- HINT:
- ·
The values in the illustration are reference values.
·Press the front No. 2 door name plate firmly to install it.
- Standard:
Area Specified Condition A 56.0 mm (2.20 in.) B 116.0 mm (4.57 in.)
75441E
5.INSTALL NO. 1 BACK DOOR NAME PLATE
- HINT:
-
When installing the No. 1 back door name plate, heat the vehicle body and No. 1 back door name plate using a heat light.
- Standard:
Item Temperature Vehicle Body 40 to 60°C (104 to 140°F) No. 1 Back Door Name Plate 20 to 30°C (68 to 86°F)
- CAUTION:
-
2.365,2 2.698,2 false 0.5,2.333 0.5,2.667 true 0.427,2.708 0.74,2.865 0.313,0.156 10 false *a 2.76,1.927 3.073,2.083 0.313,0.156 10 false *b
*a Heated Part *b Heat Light
- ·
Do not touch the heat light and heated parts.
·Touching the heat light may result in burns.
·Touching heated parts for a long time may result in burns.
Clean the vehicle body surface.
Using a heat light, heat the vehicle body surface.
Remove the double-sided tape from the vehicle body.
Wipe off any tape adhesive residue with cleaner.
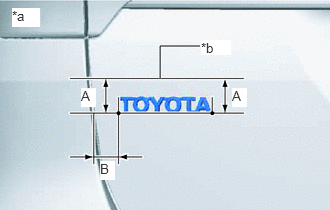
| *a | Reference Values |
| *b | Back Door R End |
Install a new No. 1 door name plate.
Using a heat light, heat the vehicle body and a new No. 1 door name plate.
Remove the peeling paper from the face of the No. 1 door name plate.
- HINT:
-
After removing the peeling paper, keep the exposed adhesive free from foreign matter.
Install the No. 1 door name plate in the position shown in the illustration.
- HINT:
- ·
The values in the illustration are reference values.
·Press the No. 1 door name plate firmly to install it.
- Standard:
Area Specified Condition A 54.0 mm (2.13 in.) B 37.0 mm (1.46 in.)
75441C
6.INSTALL NO. 2 BACK DOOR NAME PLATE
- HINT:
-
When installing the No. 2 back door name plate, heat the back door outside garnish sub-assembly and No. 2 back door name plate using a heat light.
- Standard:
Item Temperature Vehicle Body 40 to 60°C (104 to 140°F) No. 2 Back Door Name Plate 20 to 30°C (68 to 86°F)
- CAUTION:
-
2.365,2 2.698,2 false 0.5,2.333 0.5,2.667 true 0.427,2.708 0.74,2.865 0.313,0.156 10 false *a 2.76,1.927 3.073,2.083 0.313,0.156 10 false *b
*a Heated Part *b Heat Light
- ·
Do not touch the heat light and heated parts.
·Touching the heat light may result in burns.
·Touching heated parts for a long time may result in burns.
Clean the vehicle body surface.
Using a heat light, heat the vehicle body surface.
Remove the double-sided tape from the vehicle body.
Wipe off any tape adhesive residue with cleaner.
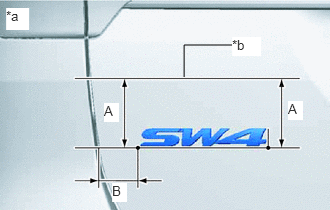
| *a | Reference Values |
| *b | Back Door R End |
Install a new No. 2 door name plate.
Using a heat light, heat the vehicle body and a new No. 2 door name plate.
Remove the peeling paper from the face of the No. 2 door name plate.
- HINT:
-
After removing the peeling paper, keep the exposed adhesive free from foreign matter.
Install the No. 2 door name plate in the position shown in the illustration.
- HINT:
- ·
The values in the illustration are reference values.
·Press the No. 2 door name plate firmly to install it.
- Standard:
Area Specified Condition A 97.0 mm (3.82 in.) B 59.0 mm (2.32 in.)