BRAKE CONTROL / DYNAMIC CONTROL SYSTEMS BRAKE ACTUATOR(w/o VSC) REMOVAL
CAUTION / NOTICE / HINT
The necessary procedures (adjustment, calibration, initialization, or registration) that must be performed after parts are removed, installed, or replaced during the brake actuator assembly removal/installation are shown below.
| Replacement Part or Procedure | Necessary Procedures | Effects/Inoperative when not Performed | Link |
|---|---|---|---|
| Skid control ECU (Brake actuator assembly) | Perform registration of rear differential lock identification information | ·
DTCs are output ·
ABS warning light illumination |
( ) |
PROCEDURE

 1. PRECAUTION
- NOTICE:
-
After turning the ignition switch off, waiting time may be required before disconnecting the cable from the battery terminal. Therefore, make sure to read the disconnecting the cable from the battery terminal notice before proceeding with work.
-
Click hereGeneral>INTRODUCTION>REPAIR INSTRUCTION>PRECAUTION
2.DISCONNECT CABLE FROM NEGATIVE BATTERY TERMINAL
- CAUTION:
-
Wait at least 90 seconds after disconnecting the cable from the negative (-) battery terminal to disable the SRS system.
- NOTICE:
-
When disconnecting the cable, some systems need to be initialized after the cable is reconnected.
-
Click hereGeneral>INTRODUCTION>REPAIR INSTRUCTION>INITIALIZATION
3.DRAIN BRAKE FLUID
- NOTICE:
-
Wash off brake fluid immediately if it comes in contact with any painted surface.
44510
4.REMOVE BRAKE ACTUATOR ASSEMBLY WITH BRACKET
Place tags or marks to identify the installation locations of each brake line.
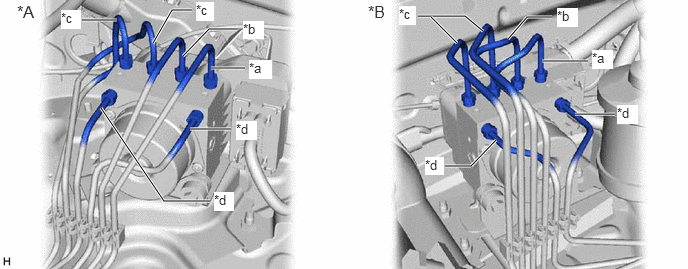
| *A | for LHD | *B | for RHD |
| *a | To Front Wheel Cylinder RH | *b | To Front Wheel Cylinder LH |
| *c | To Rear Wheel Cylinder | *d | From Master Cylinder |
Release the latch of the actuator connector and disconnect the connector.
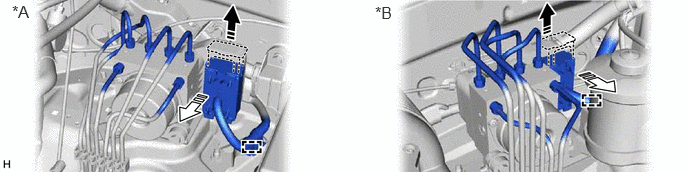
| *A | for LHD | *B | for RHD |

|
Lock Lever Released | 
|
Connector Disconnected |
Detach the clamp from the brake actuator bracket.
Using a union nut wrench, disconnect the 6 brake lines from the brake actuator.
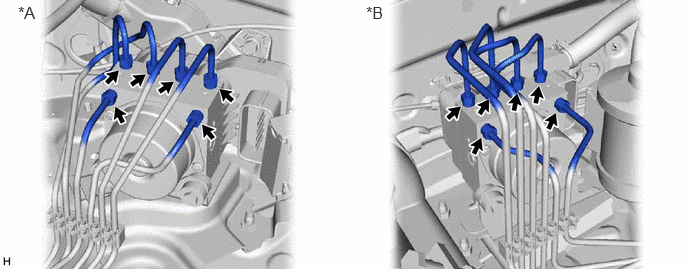
| *A | for LHD | *B | for RHD |
Remove the 3 nuts and brake actuator with bracket.
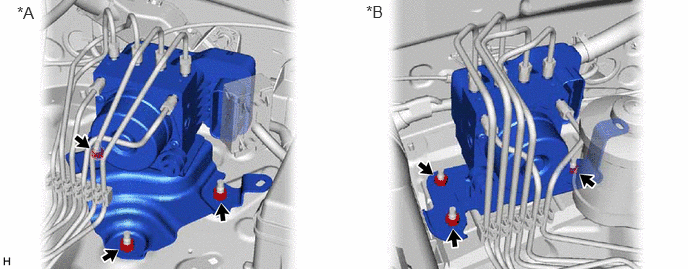
| *A | for LHD | *B | for RHD |
- NOTICE:
-
Be careful not to damage the brake tubes.