2TR-FE ENGINE CONTROL SFI SYSTEM DATA LIST / ACTIVE TEST
DATA LIST
- HINT:
-
Using the GTS to read the Data List allows the values or states of switches, sensors, actuators and other items to be read without removing any parts. This non-intrusive inspection can be very useful because intermittent conditions or signals may be discovered before parts or wiring is disturbed. Reading the Data List information early in troubleshooting is one way to save diagnostic time.
- NOTICE:
- ·
In the table below, the values listed under "Normal Condition" are reference values. Do not depend solely on these reference values when deciding whether a part is faulty or not.
·The actual values may differ from the values listed in the chart under "Results of real-vehicle check" due to climate, weather conditions, etc.
- HINT:
-
Normal Condition: If no conditions are specifically stated for "idling", the shift lever should be in N or P, the A/C switch should be off and all accessory switches should be off.
Warm up the engine.
Turn the A/C switch off.
Turn the ignition switch off.
Connect the GTS to the DLC3.
Turn the ignition switch to ON.
Enter the following menus: Powertrain / Engine and ECT / Data List.
- HINT:
- ·
To display the list box, press the pull down menu button next to Primary. Then select a measurement group.
·When you select a measurement group, the ECU data belonging to that group is displayed.
·Measurement Group List / Description
·All Data / All data
·Primary / -
·Engine Control / Engine control system related data
·Ptrl General / -
·Ptrl AF Control / Air fuel ratio control system related data
·Ptrl AF O2 Sensor / Air fuel ratio sensor and heated oxygen sensor related data
·Ptrl Throttle / Gasoline throttle system related data
·Ptrl Intake Control / Intake control system related data
·Ptrl Valve Control / Valve control system related data
·Ptrl Misfire / "Misfire" related data
·Ptrl Starting / "Difficult to start" related data
·Ptrl Rough Idle / "Rough idle" related data
·Ptrl Evaporative / Evaporative system related data
·Ptrl 2nd Air / Secondary air injection system related data
·Ptrl CAT Converter / Catalyst converter related data
·Check Mode / Check mode related data
·Monitor Status / Monitor status related data
·Ignition / Ignition system related data
·Charging Control / Charging control system related data
·Compression / Data used during "Check the Cylinder Compression" Active Test
·AT / Automatic transmission system related data
·Vehicle Information / Vehicle information
Turn the GTS on.
According to the display on the GTS, read the Data List.
- HINT:
-
"Result of real-vehicle check" is the assessment of one vehicle. Use it only for reference.
Various Vehicle Conditions 1 (All Data)
- Powertrain > Engine > Data List
-
Tester Display Measurement Item Range Normal Condition Diagnostic Note Vehicle Speed Vehicle speed Min.: 0 km/h (0 mph), Max.: 255 km/h (158 mph) Actual vehicle speed ·This is the current vehicle speed.
·The vehicle speed is detected using the wheel speed sensors.
·Vehicle speed data is delayed when it is displayed. Therefore, even if the vehicle speed listed in the freeze frame data is 0 km/h (0 mph), this does not always mean that the malfunction occurred when the vehicle was stopped.
Engine Speed Engine speed Min.: 0 rpm, Max.: 16383 rpm 600 to 700 rpm: Idling When the crankshaft position sensor is malfunctioning, "Engine Speed" is approximately 0 rpm or varies greatly from the actual engine speed. Calculate Load Load calculated by ECM Min.: 0%, Max.: 100% - ·This is the engine load calculated based on the estimated intake manifold pressure.
·Calculate Load = Estimated intake manifold pressure / maximum intake manifold pressure x 100 (%)
(For example, when the estimated intake pressure is the same as atmospheric pressure, Calculate Load is 100%).
Vehicle Load Vehicle load Min.: 0%, Max.: 25700% - ·This is the engine intake air charging efficiency.
·Vehicle Load = Current intake airflow (g/rev.) / maximum intake airflow
Maximum intake airflow = Displacement (L) / 2 x 1.2 (g/rev.)
- HINT:
-
Due to individual engine differences, intake air temperature, etc., the value may exceed 100%.
-
Intake airflow (g/rev.) = Intake airflow (gm/sec) x 60 / Engine speed (rpm)
-
(Intake airflow (gm/sec) is MAF)
MAF Airflow rate from mass air flow meter sub-assembly Min.: 0 gm/sec, Max.: 655.35 gm/sec ·2.0 to 6.0 gm/sec: Idling
·7.0 to 11.0 gm/sec: 2000 rpm
·11.0 to 17.0 gm/sec: 3000 rpm
This is the intake air amount from the mass air flow meter sub-assembly. Atmosphere Pressure Atmospheric pressure Min.: 0 kPa (0 mmHg), Max.: 255 kPa (1912 mmHg) Equivalent to atmospheric pressure (absolute pressure) ·This value is calculated from the intake air amount.
·Standard atmospheric pressure: 101 kPa(abs) [760 mmHg(abs)]
·For every 100 m (328 ft.) increase in altitude, pressure drops by 1 kPa (7.5 mmHg). This varies by weather.
Coolant Temp Coolant temperature Min.: -40°C (-40°F), Max.: 140°C (284°F) 80 to 90°C (176 to 203°F): After warming up This is the engine coolant temperature.
- HINT:
- ·
After warming up the engine, the engine coolant temperature is 75 to 100°C (167 to 212°F).
·After a long soak, the engine coolant temperature, intake air temperature and ambient air temperature are approximately equal.
·If the value is -40°C (-40°F), or higher than 135°C (275°F), the sensor circuit is open or shorted.
·Check if the engine overheats when the value indicates higher than 135°C (275°F).
Intake Air Intake air temperature Min.: -40°C (-40°F), Max.: 140°C (284°F) Equivalent to temperature at location of mass air flow meter sub-assembly ·After a long soak, the engine coolant temperature, intake air temperature and ambient air temperature are approximately equal.
·If the value is -40°C (-40°F), or higher than 128°C (262°F), the sensor circuit is open or shorted.
Engine Run Time Engine run time Min.: 0 s, Max.: 65535 s Time after engine start This is the time elapsed since the engine started.
- HINT:
-
The time is counted only while the engine is running.
Initial Engine Coolant Temp Initial engine coolant temperature Min.: -40°C (-40°F), Max.: 119.3°C (247°F) - This is the coolant temperature stored when the ignition switch is turned to ON. Initial Intake Air Temp Initial intake air temperature Min.: -40°C (-40°F), Max.: 119.3°C (247°F) - This is the intake air temperature stored when the ignition switch is turned to ON. Battery Voltage Battery voltage Min.: 0 V, Max.: 65.535 V 11 to 14 V: Idling If 11 V or less, characteristics of some electrical components may change.
Throttle Control 1 (Ptrl Throttle)
- Powertrain > Engine > Data List
-
Tester Display Measurement Item Range Normal Condition Diagnostic Note Accelerator Position Accelerator pedal position Min.: 0%, Max.: 399.9% Actual accelerator pedal position This is the accelerator pedal position defined using the learned fully released position (sensor output) of accelerator pedal position sensor No. 1 as 0% and the fully depressed position as 100%. Accel Sens. No.1 Volt % Absolute accelerator pedal position No. 1 Min.: 0%, Max.: 100% ·10 to 22%: Accelerator pedal fully released
·52 to 90%: Accelerator pedal fully depressed
The accelerator pedal position sensor No. 1 output is converted using 5 V = 100%.
- HINT:
-
If there are no accelerator pedal position sensor DTCs stored, it is possible to conclude that the accelerator pedal position sensor system is normal.
Accel Sens. No.2 Volt % Absolute accelerator pedal position No. 2 Min.: 0%, Max.: 100% ·24 to 40%: Accelerator pedal fully released
·68 to 95%: Accelerator pedal fully depressed
The accelerator pedal position sensor No. 2 output is converted using 5 V = 100%.
Throttle Control 2 (All Data)
- Powertrain > Engine > Data List
-
Tester Display Measurement Item Range Normal Condition Diagnostic Note Accel Sensor Out No.1 Accelerator pedal position sensor No. 1 voltage Min.: 0 V, Max.: 4.98 V ·0.5 to 1.1 V: Accelerator pedal released
·2.6 to 4.5 V: Accelerator pedal fully depressed
This is the raw voltage from the accelerator pedal position sensor No. 1. Accel Sensor Out No.2 Accelerator pedal position sensor No. 2 voltage Min.: 0 V, Max.: 4.98 V ·1.2 to 2.0 V: Accelerator pedal released
·3.4 to 4.75 V: Accelerator pedal fully depressed
This is the raw voltage from the accelerator pedal position sensor No. 2.
Accelerator pedal position sensor No. 2 is used to monitor accelerator pedal position sensor No. 1. When there is a malfunction in sensor No. 1, the ECM uses sensor No. 2 to control the engine.
Throttle Control 3 (Ptrl Throttle)
- Powertrain > Engine > Data List
-
Tester Display Measurement Item Range Normal Condition Diagnostic Note Accelerator Idle Position Whether or not accelerator pedal position sensor detecting released accelerator pedal ON or OFF ON: Accelerator pedal fully released This is a parameter calculated by the ECM which indicates whether the accelerator pedal is in the learned idle position. Accel Fully Close Learn #1 Accelerator fully released learned value No. 1 Min.: 0 deg, Max.: 124.5 deg - This is the value of accelerator pedal position sensor No. 1 learned when the accelerator pedal is released. Accel Fully Close Learn #2 Accelerator fully released learned value No. 2 Min.: 0 deg, Max.: 124.5 deg - This is the value of accelerator pedal position sensor No. 2 learned when the accelerator pedal is released. Throttle Sensor Volt % Absolute throttle position sensor No. 1 Min.: 0%, Max.: 100% ·10 to 22%: Accelerator pedal fully released
·66 to 98%: Accelerator pedal fully depressed
The throttle position sensor No. 1 output is converted using 5 V = 100%.
- HINT:
-
If there are no throttle position sensor DTCs stored, it is possible to conclude that the throttle position sensor system is normal.
Throttl Sensor #2 Volt % Throttle sensor position No. 2 Min.: 0%, Max.: 100% ·42 to 62%: Accelerator pedal fully released
·92 to 100%: Accelerator pedal fully depressed
The throttle position sensor No. 2 output is converted using 5 V = 100%. ST1 Brake pedal signal ON or OFF ·ON: Brake pedal depressed
·OFF: Brake pedal fully released
This is the stop light switch assembly signal (ST1- terminal). System Guard System guard ON or OFF ON ·When there is a difference between the target and actual throttle valve opening angles, system guard turns off and stops the electronic throttle control system function.
·OFF: Electronic throttle control is stopped.
Open Side Malfunction Open malfunction ON or OFF OFF This parameter indicates a malfunction in the electronic throttle when the throttle valve is open. Throttle Idle Position Whether or not throttle position sensor detecting idle ON or OFF - ·This is a parameter calculated by the ECM.
·The value is ON when the throttle is at the idle position and OFF when the throttle is open.
Throttle Require Position Required throttle position Min.: 0 V, Max.: 4.98 V - This is a value calculated by the ECM showing the voltage for the target throttle valve position. It is almost an exact match of the Throttle Position No. 1 value except during very rapid throttle valve movement, such as that used during wheel spin control. Throttle Sensor Position Throttle sensor position Min.: 0%, Max.: 100% ·0%: Accelerator pedal fully released
·50 to 80%: Accelerator pedal fully depressed
·This is the throttle valve opening amount used for engine control.
(100% signifies 125° of throttle valve rotation. This does not include the amount the throttle valve is opened to maintain the idle speed during idling.)
·This value has no meaning when the ignition switch is turned to ON and the engine is stopped.
·The throttle valve opening amount during idling is indicated by 0%. When the throttle valve is fully open, the value is 68%.
Throttle Position No.1 Throttle position sensor No. 1 output voltage Min.: 0 V, Max.: 4.98 V Almost same as "Throttle Require Position"
·0.5 to 1.1 V: Accelerator pedal fully released
·3.2 to 4.8 V: Accelerator pedal fully depressed
·0.6 to 1.4 V: Fail-safe operating
This is the throttle position sensor No. 1 output voltage. Throttle Position No.2 Throttle position sensor No. 2 output voltage Min.: 0 V, Max.: 4.98 V ·2.1 to 3.1 V: Accelerator pedal fully released
·4.6 to 4.98 V: Accelerator pedal fully depressed
·2.1 to 3.1 V: Fail-safe operating
This is the throttle position sensor No. 2 output voltage. Throttle Position Command Throttle position command value Min.: 0 V, Max.: 4.98 V - Throttle Position Command is the same value as Throttle Require Position. Throttle Sens Open Pos #1 Throttle position sensor No. 1 Min.: 0 V, Max.: 4.98 V 0.6 to 1.4 V This is the throttle position sensor No. 1 output voltage when there is no current supplied to the electronic throttle actuator. The accelerator pedal is released but the throttle valve is kept open by the throttle valve opener with the Ignition switch ON. Throttle Sens Open Pos #2 Throttle position sensor No. 2 Min.: 0 V, Max.: 4.98 V 1.7 to 2.5 V This is the throttle position sensor No. 2 output voltage when there is no current supplied to the electronic throttle actuator. The accelerator pedal is released but the throttle valve is kept open by the throttle valve opener with the Ignition switch ON. Throttle Motor Current Throttle actuator current Min.: 0 A, Max.: 19.9 A 0 to 3.0 A: Idling ·When this value is large but the actual opening angle (Throttle Position No. 1) does not reach the target opening angle (Throttle Require Position), there is an "unable to open" malfunction.
·This value normally fluctuates around 1 A.
Throttle Motor DUTY Throttle actuator Min.: 0%, Max.: 100% 10 to 22%: Idling This is the output duty ratio of the throttle actuator drive circuit. Throttle Motor Duty (Open) Throttle actuator duty ratio (open) Min.: 0%, Max.: 255% 0 to 40%: Idling ·This is the duty ratio used to drive the throttle actuator and open the throttle valve. It is an ECM command signal.
·When the throttle valve is being opened, Throttle Motor Duty (Open) is 10 to 50%.
Throttle Motor Duty (Close) Throttle actuator duty ratio (close) Min.: 0%, Max.: 255% 0 to 40%: Idling This is the duty ratio used to drive the throttle actuator and close the throttle valve. It is an ECM command signal.
- HINT:
-
During idling, the throttle valve opening angle is usually controlled using a duty ratio drive signal which closes the throttle valve. However, when carbon deposits build up, it may be necessary to open the throttle valve more than the throttle valve opener does. In that case, the opening angle is controlled using a "Throttle Motor Duty (Open)" signal which opens the throttle valve.
Throttle Fully Close Learn Throttle valve fully closed position (learned value) Min.: 0 V, Max.: 4.98 V 0.4 to 1.0 V: Accelerator pedal fully released ·The ECM uses this learned value to determine the fully closed (and fully open) position of the throttle valve. This learned value is calculated by the ECM with the throttle valve opener angle (approximately 4 to 7°, the position when the ignition switch is turned to ON, the accelerator pedal is released and the throttle actuator is off).
·Learning is performed immediately after the ignition switch is turned to ON.
+BM Voltage +BM voltage Min.: 0 V, Max.: 79.998 V 11 to 14 V: Ignition switch ON and system normal This is the power supply for the electronic throttle actuator. When the power supply is interrupted for approximately 1 second, DTCs P2118 (open circuit) and P0657 (short circuit, ECU malfunction) are stored and the electronic throttle control system enters fail-safe mode (normal operation is not restored until the ignition switch is turned off). Actuator Power Supply Actuator power supply ON or OFF ON: Idling If +BM power is lost, this item changes to OFF. Throttle Air Flow Learning Value(Area 1) Throttle air flow learning value of area 1 Min.: 0, Max.: 1.99 - - Throttle Air Flow Learning Value(Area 2) Throttle air flow learning value of area 2 Min.: 0, Max.: 1.99 - - Throttle Air Flow Learning Value(Area 3) Throttle air flow learning value of area 3 Min.: 0, Max.: 1.99 - - Throttle Air Flow Learning Value(Calculated Value) Throttle air flow learning value (calculated value) Min.: 0, Max.: 1.99 - - Throttle Air Flow Learning Value(Atmosphere Pressure Offset Value) Throttle air flow learning value (atmosphere pressure offset value) Min.: 0, Max.: 2.55 - - Throttle Air Flow Learning Prohibit(Intake Air Pressure Malfunction) Throttle air flow learning prohibit (intake air pressure malfunction) OK or NG OK - Throttle Air Flow Learning Prohibit(Air Fuel Ratio Malfunction) Throttle air flow learning prohibit (air fuel ratio malfunction) OK or NG OK - Throttle Position Throttle valve opening angle Min.: 0 deg, Max.: 499.99 deg - This value has no meaning when the ignition switch is turned to ON and the engine is stopped.
Idle Speed Control (Ptrl Rough Idle)
- Powertrain > Engine > Data List
-
Tester Display Measurement Item Range Normal Condition Diagnostic Note ISC Flow Flow rate calculated using information from mass airflow meter sub-assembly Min.: 0 L/s, Max.: 79.99 L/s - This is the total ISC airflow amount (the amount of intake air necessary to maintain idling).
- HINT:
-
ISC Flow (total ISC airflow amount) = ISC Learning Value + ISC Feedback Value + each compensation amount
ISC Position Requested throttle opening amount calculated using ISC control Min.: 0 deg, Max.: 499.99 deg - This is the throttle valve opening amount while the engine is idling (the throttle valve opening amount necessary to maintain ISC air flow). ISC Feedback Value ISC feedback amount Min.: -40 L/s, Max.: 39.99 L/s - This is the feedback amount necessary to adjust the airflow amount to maintain the target idle speed.
- HINT:
-
When the idle speed differs from the target, the feedback amount is adjusted. If the feedback amount becomes more than a certain value, this will be reflected in the ISC learned airflow value.
ISC Learning Value ISC learned airflow value Min.: -40 L/s, Max.: 39.99 L/s - This is the learned value of the airflow amount necessary for engine idling.
- HINT:
- ·
If ISC Feedback Value becomes more than a certain value, this will be reflected in ISC Learning Value.
·ISC Flow (total ISC airflow amount) = ISC Learning Value + ISC Feedback Value + each compensation amount
Electric Load Feedback Val Compensation flow rate according to electrical load Min.: -40 L/s, Max.: 39.99 L/s - This is the ISC compensation amount determined according to the electrical load. Air Conditioner FB Val Compensation flow rate according to air conditioner load Min.: -40 L/s, Max.: 39.99 L/s - This is the ISC compensation amount determined according to the air conditioner load. PS Feedback Val Compensation flow rate according to power steering load Min.: -40 L/s, Max.: 39.99 L/s - This is the ISC compensation amount determined according to the power steering load. Low Revolution Control Low engine speed control operation state ON or OFF - ·This parameter indicates whether the engine speed dropped immediately after starting due to poor combustion, etc. This parameter changes to ON when the engine speed drops to below the following speeds 1 to 7 seconds after the engine is started (when the A/C is on, the engine speed thresholds below increase by 100 to 200 rpm).
·900 rpm (when the engine coolant temperature is 10°C (50°F)).
·850 rpm (when the engine coolant temperature is 30°C (86°F)).
·750 rpm (when the engine coolant temperature is 60°C (140°F)).
Before 5 seconds elapse after starting the engine, this parameter indicates the status of the previous trip.
After 5 seconds elapse after starting the engine, this parameter indicates the status of the current trip.
- HINT:
-
The engine is considered to have started when the engine speed reaches 400 rpm. When the engine speed decreases immediately after starting the engine, this parameter changes to ON and remains ON for the rest of the trip.
-
ON: The engine speed decreased immediately after starting the engine.
-
OFF: The engine speed did not decrease immediately after starting the engine.
·For use when engine stall, starting problems or rough idle is present.
N Range Status Shift lever N status ON or OFF - - Eng Stall Control FB Flow Intake air compensation flow rate Min.: -40 L/s, Max.: 39.99 L/s - ·The intake air amount and ignition timing are adjusted when there is a large decrease in engine speed (for example, a decrease to 550 rpm or less) in order to prevent engine stall.
·For use when engine stall, starting problems or rough idle is present.
Fuel System 1 (Ptrl General)
- Powertrain > Engine > Data List
-
Tester Display Measurement Item Range Normal Condition Diagnostic Note Injector (Port) Injection period of the No. 1 cylinder Min.: 0 μs, Max.: 65535 μs - This is the injection period of the No. 1 cylinder (the command value from the ECM). Injection Volum (Cylinder1) Injection volume (cylinder 1) Min.: 0 ml, Max.: 2.047 ml 0 to 0.5 ml This is the fuel injection volume for 10 injections. Fuel Pump/Speed Status Fuel pump status ON or OFF ON: Starter on or engine running - Current Fuel Type Status of the current fuel type - Gasoline/petrol -
EVAP System (Ptrl Evaporative)
- Powertrain > Engine > Data List
-
Tester Display Measurement Item Range Normal Condition Diagnostic Note EVAP (Purge) VSV Purge VSV control duty Min.: 0%, Max.: 100% - ·This is the command signal from the ECM.
·This is the purge VSV control duty ratio. When EVAP (Purge) VSV is any value except 0%, EVAP purge* is being performed.
EVAP purge*: Gasoline vapor from the fuel tank is being introduced into the intake system via the purge VSV.
·When the engine is cold or immediately after the engine is started, EVAP (Purge) VSV is 0%.
Evap Purge Flow Purge flow Min.: 0%, Max.: 399.9% - ·This is the percentage of total engine airflow contributed by EVAP purge operation.
(Evap Purge Flow = Purge flow / Engine airflow x 100 (%))
·It is based on MAF and a stored value for airflow and controlled by adjusting the duty cycle for the purge VSV.
Purge Density Learn Value Purge density learned value Min.: -200, Max.: 199.993 - ·Purge Density Learn Value is the proportion of the decrease in injection volume (based on the change in the air fuel ratio feedback compensation value) related to a 1% purge flow rate.
·When Purge Density Learn Value is a large negative value, the purge effect is large.
·The purge density is determined from the change in the air fuel ratio feedback compensation value when purge flow is introduced.
·Purge density learning is performed so that the feedback compensation value is 0 +/-2%.
- HINT:
- ·
Usually, the value is approximately +/-1%.
·1%: The concentration of HC in the purge gas is relatively low.
·0%: The concentration of HC in the purge gas is approximately equal to the stoichiometric air fuel ratio.
·Large negative values indicate that the concentration of HC in the purge gas is relatively high.
EVAP Purge VSV VSV status for EVAP control ON or OFF - This parameter displays ON when EVAP (Purge) VSV is 30% or higher, and displays OFF when the VSV duty ratio is less than 30%. Purge Cut VSV Duty Purge VSV duty Min.: 0%, Max.: 399.9% - -
Air Fuel Ratio Control 1 (All Data)
- Powertrain > Engine > Data List
-
Tester Display Measurement Item Range Normal Condition Diagnostic Note Target Air-Fuel Ratio Target air fuel ratio Min.: 0, Max.: 1.99 0.8 to 1.2: During idling ·This is the target air fuel ratio used by the ECM.
·1.0 is the stoichiometric air fuel ratio. Values that are more than 1 indicate the system attempting to make the air fuel ratio leaner. Values that are less than 1 indicate the system attempting to make the air fuel ratio richer.
·Target Air-Fuel Ratio and AF Lambda B1S1 are related.
Air Fuel Ratio Control 2 (Ptrl AF O2 Sensor)
- Powertrain > Engine > Data List
-
Tester Display Measurement Item Range Normal Condition Diagnostic Note AF Lambda B1S1 Output air fuel ratio associated with bank 1 sensor 1 Min.: 0, Max.: 1.99 ·Value less than 1 (0.000 to 0.999) = Rich
·1 = Stoichiometric air fuel ratio
·Value more than 1 (1.001 to 1.999) = Lean
·This is the actual air fuel ratio calculated based on the air fuel ratio sensor output.
·Performing the "Control the Injection Volume" or "Control the Injection Volume for A/F Sensor" function of the Active Test enables the technician to check the voltage output of the sensor.
·Results of real-vehicle check when performing the Active Test:
·Injection Volume: +/-0%
AF Lambda B1S1: 0.99
AFS Voltage B1S1: 3.29 V
AFS Current B1S1: 0.00 mA
O2S B1S2: 0.43 V
·Injection Volume: -12.5%
AF Lambda B1S1: 1.16
AFS Voltage B1S1: 3.85 V
AFS Current B1S1: 0.20 mA
O2S B1S2: 0.015 V
·Injection Volume: +12.5%
AF Lambda B1S1: 0.89
AFS Voltage B1S1: 2.59 V
AFS Current B1S1: -0.27 mA
O2S B1S2: 0.94 V
AFS Voltage B1S1 Air fuel ratio sensor output voltage for bank 1 sensor 1 Min.: 0 V, Max.: 7.99 V 2.8 to 3.8 V: Idling ·This is the voltage output of the air fuel ratio sensor (the voltage cannot be measured at the terminals of the sensor). This value is calculated by the ECM based on the current output of the air fuel ratio sensor (refer to AFS Current below for the actual sensor output).
·Performing the Control the Injection Volume or Control the Injection Volume for A/F Sensor function of the Active Test enables the technician to check the voltage output of the sensor.
AFS Current B1S1 Air fuel ratio sensor output current for bank 1 sensor 1 Min.: -128 mA, Max.: 127.99 mA -0.5 to 0.5 mA: Idling ·With a stoichiometric air fuel ratio (for example, during idling after the engine is warmed up), the air fuel ratio sensor current output is approximately -0.5 to 0.5 mA.
·When the value is outside the range of 0.7 to 2.2 mA when the fuel-cut is being performed, there is a malfunction in the air fuel ratio sensor or sensor circuit.
A/F Heater Duty #1 Air fuel ratio sensor heater duty ratio for bank 1 Min.: 0%, Max.: 399.9% 0 to 100% When the value is any value except 0%, current is being supplied to the heater. O2S B1S2 Heated oxygen sensor output voltage for bank 1 sensor 2 Min.: 0 V, Max.: 1.275 V 0 to 1 V ·This is the output voltage of the heated oxygen sensor.
·Values close to 0 V indicate an air fuel ratio leaner than the stoichiometric ratio.
·Values close to 1 V indicate an air fuel ratio richer than the stoichiometric ratio.
·During air fuel ratio feedback control, the value moves back and forth in the range of 0 to 1 V.
·Performing the "Control the Injection Volume" or "Control the Injection Volume for A/F Sensor" function of the Active Test enables the technician to check voltage output of the sensor.
·Results of real-vehicle check when performing the Active Test:
·Injection Volume: -12.5%
AF Lambda B1S1: 1.16
AFS Voltage B1S1: 3.85 V
AFS Current B1S1: 0.20 mA
O2S B1S2: 0.06 V
·Injection Volume: +12.5%
AF Lambda B1S1: 0.89
AFS Voltage B1S1: 2.59 V
AFS Current B1S1: -0.27 mA
O2S B1S2: 0.94 V
O2 Heater B1S2 Heated oxygen sensor heater for bank 1 sensor 2 Active or Not Act - - O2 Heater Curr Val B1S2 Heated oxygen sensor current for bank 1 sensor 2 Min.: 0 A, Max.: 4.999 A - When the value is any value except 0 A, current is being supplied to the heater. Short FT #1 Short-term fuel trim for bank 1 Min.: -100%, Max.: 99.2% -20 to 20% This item is the "short-term fuel injection volume compensation ratio" used to maintain the air fuel ratio at the stoichiometric ratio using the air fuel ratio sensor for feedback. Long FT #1 Long-term fuel trim for bank 1 Min.: -100%, Max.: 99.2% -20 to 20% ·The ECM will learn the Long FT #1 values based on Short FT #1. The goal is to keep Short FT #1 at 0% to keep the air fuel ratio mixture at the stoichiometric ratio.
·This value is used to determine whether the system related to air fuel ratio control is malfunctioning.
·The condition of the system is determined based on the sum of Short FT #1 and Long FT #1 (excluding times when the system is in transition).
·15% or higher: There may be a lean air fuel ratio.
·-15 to 15%: The air fuel ratio can be determined to be normal.
·-15% or less: There may be a rich air fuel ratio.
·Air fuel ratio feedback learning is divided up according to the engine operating range (engine speed x load), and a separate value is stored for each operating range. "Long FT #1" indicates the learned value for the current operating range.
[A/F Learn Value Idle #1], [A/F Learn Value Low #1], [A/F Learn Value Mid1 #1], [A/F Learn Value Mid2 #1] and [A/F Learn Value High #1] indicate the learned values for the different operating ranges. The learned value that is the same as "Long FT #1" indicates the current engine operating range.
Total FT #1 Total fuel trim for bank 1 Min.: -0.5, Max.: 0.496 -0.28 to 0.2: Idling Total FT #1 = Short FT #1 + Long FT #1 Fuel System Status #1 Fuel system status for bank 1 OL, CL, OLDrive, OLFault or CLFault CL: Idling after warming up ·OL (Open Loop): Has not yet satisfied conditions to go to closed loop.
·CL (Closed Loop): Uses feedback to perform fuel control.
·OLDrive: Open loop due to driving conditions (fuel enrichment).
·OLFault: Open loop due to a detected system fault.
·CLFault: Closed loop but the air fuel ratio sensor, which is used for fuel control, is malfunctioning.
·CL (Closed Loop): During air fuel ratio feedback control, AF Lambda B1S1 is approximately 1.0 and AFS Voltage B1S1 is approximately 3.3 V.
Fuel System Status #2 Fuel system status for bank 2 OL, CL, OLDrive, OLFault or CLFault Unused - A/F Learn Value Idle #1 Air fuel ratio learn value of idle area for bank 1 Min.: -50%, Max.: 49.6% -20 to 20% Learning is performed when idling with the engine warmed up (engine coolant temperature is 75°C [167°F] or higher). A/F Learn Value Low #1 Air fuel ratio learn value of low load area for bank 1 Min.: -50%, Max.: 49.6% -20 to 20% Learning is performed when driving with the engine warmed up (engine coolant temperature is 75°C [167°F] or higher) and operating in the low load range (when the range of engine loads is divided into four parts). A/F Learn Value Mid1 #1 Air fuel ratio learn value of middle1 load area for bank 1 Min.: -50%, Max.: 49.6% -20 to 20% Learning is performed when driving with the engine warmed up (engine coolant temperature is 75°C [167°F] or higher) and operating in the mid-size load range closer to the low load range (when the range of engine loads is divided into four parts). A/F Learn Value Mid2 #1 Air fuel ratio learn value of middle2 load area for bank 1 Min.: -50%, Max.: 49.6% -20 to 20% Learning is performed when driving with the engine warmed up (engine coolant temperature is 75°C [167°F] or higher) and operating in the mid-size load range closer to the high load range (when the range of engine loads is divided into four parts). A/F Learn Value High #1 Air fuel ratio learn value of high load area for bank 1 Min.: -50%, Max.: 49.6% -20 to 20% Learning is performed when driving with the engine warmed up (engine coolant temperature is 75°C [167°F] or higher) and operating in the high load range (when the range of engine loads is divided into four parts).
Secondary Air Injection System (Ptrl 2nd Air)
- Powertrain > Engine > Data List
-
Tester Display Measurement Item Range Normal Condition Diagnostic Note Air Pump Pressure (Absolute) Air pump pressure (absolute) Min.: 0 kPa, Max.: 65535 kPa ·Atmospheric pressure +1 kPa or more: Air pump on, air switching valve open
·Close to atmospheric pressure: Air pump off, air switching valve closed
- Air Pump Pulsation Pressure Air pump pulsation pressure Min.: 0 kPa, Max.: 655.35 kPa - Cumulative pulsation pressure calculated by ECM Secondary Air Control VSV Air switching valve status ON or OFF ON: ECM commanding air switching valve to open - 2nd Air System Status Secondary air injection system status ON or OFF ON: ECM commanding air pump and air switching valve to operate This system operates immediately after a cold engine start. AI Test Secondary air injection system operation prohibition READY or NOT RDY Permission status of forced operation of secondary air injection system -
Ignition System (Ignition)
- Powertrain > Engine > Data List
-
Tester Display Measurement Item Range Normal Condition Diagnostic Note IGN Advance Ignition timing advance for No. 1 cylinder Min.: -64 deg, Max.: 63.5 deg BTDC 0 to 20 deg: Idling - Knock Feedback Value Knocking feedback value Min.: -1024 deg(CA), Max.: 1023.9 deg(CA) - ·This is the ignition timing retard compensation amount determined by the presence or absence of knocking.
Ignition timing = Most retarded timing value* + Knock Correct Learn Value* + Knock Feedback Value* + each compensation amount
Example: 21 deg(CA) = 10 deg(CA) + 14 deg(CA) - 3 deg(CA)
Most retarded timing value*: The most retarded timing value is a constant determined by the engine speed and engine load.
Knock Correct Learn Value*: The knock correction learned value is calculated as shown below in order to keep Knock Feedback Value as close to -3 deg(CA) as possible.
When Knock Feedback Value is less than -4 deg(CA), Knock Correct Learn Value is slowly decreased.
When Knock Feedback Value is more than -2 deg(CA), Knock Correct Learn Value is slowly increased.
Knock Feedback Value*: The base value is -3 deg(CA) and is adjusted based on the presence or absence of knocking. When there is no knocking, the value is increased, and when knocking is present, the value is decreased.
-1 deg(CA): There is no knocking and ignition timing is advanced.
-6 deg(CA): Knocking is present and the ignition timing is being retarded.
- HINT:
-
If Knock Feedback Value does not change around the time when knocking occurs even though knocking continues (for example, stays at -3 deg(CA)), it can be determined that knocking is not being detected.
- Possible Causes:·
There is a problem with the knock control sensor sensitivity.
·The knock control sensor is improperly installed.
·There is a problem with a wire harness.
Knock Correct Learn Value Knocking correction learned value Min.: -1024 deg(CA), Max.: 1023.9 deg(CA) - ·Refer to "Knock Feedback Value".
·When there is knocking or a lack of power, compare the following values to another vehicle of the same model.
·Engine Speed
·Calculate Load
·IGN Advance
·Knock Feedback Value
·Knock Correct Learn Value
·Knock Correct Learn Value is large: There is no knocking and the ignition timing is advanced.
·Knock Correct Learn Value is small: Knocking is present and the ignition timing is being retarded.
- HINT:
-
When knocking continues even though Knock Correct Learn Value is less than that of the vehicle being used for comparison (in other words, the ignition timing is being retarded but the knocking is not stopping), there may be a buildup of deposits or other such problems due to deterioration over time (oil entering the cylinders, poor quality fuel, etc.).
Idle Spark Advn Ctrl #1 Individual cylinder timing advance compensation amount (No. 1) Min.: 0° CA, Max.: 15.93° CA - ·This is the ignition timing advance compensation amount used to stabilize idling (each cylinder has a separate value). When the speed for a certain cylinder drops, the system advances the timing for that particular cylinder in an attempt to restore the speed and stabilize idling.
·It may be possible to use this item to help determine specific cylinders which are not operating normally.
Idle Spark Advn Ctrl #2 Individual cylinder timing advance compensation amount (No. 2) Min.: 0° CA, Max.: 15.93° CA - ·This is the ignition timing advance compensation amount used to stabilize idling (each cylinder has a separate value). When the speed for a certain cylinder drops, the system advances the timing for that particular cylinder in an attempt to restore the speed and stabilize idling.
·It may be possible to use this item to help determine specific cylinders which are not operating normally.
Idle Spark Advn Ctrl #3 Individual cylinder timing advance compensation amount (No. 3) Min.: 0° CA, Max.: 15.93° CA - ·This is the ignition timing advance compensation amount used to stabilize idling (each cylinder has a separate value). When the speed for a certain cylinder drops, the system advances the timing for that particular cylinder in an attempt to restore the speed and stabilize idling.
·It may be possible to use this item to help determine specific cylinders which are not operating normally.
Idle Spark Advn Ctrl #4 Individual cylinder timing advance compensation amount (No. 4) Min.: 0° CA, Max.: 15.93° CA - ·This is the ignition timing advance compensation amount used to stabilize idling (each cylinder has a separate value). When the speed for a certain cylinder drops, the system advances the timing for that particular cylinder in an attempt to restore the speed and stabilize idling.
·It may be possible to use this item to help determine specific cylinders which are not operating normally.
Various Vehicle Conditions 2 (All Data)
- Powertrain > Engine > Data List
-
Tester Display Measurement Item Range Normal Condition Diagnostic Note VVT Control Status #1 Variable Valve Timing (VVT) control status for bank 1 ON or OFF - ·ON: The ECM is sending commands to change the timing (even when the timing is advanced, when the timing is being maintained and not being retarded or advanced any further, the value changes to OFF).
·OFF: The system is commanding the timing to change to the most retarded timing.
VVT Advance Fail VVT control failure status ON or OFF ON: VVT control failure ON: There is an intake VVT timing advance malfunction. VVT Aim Angle #1 VVT hold duty learned value for bank 1 Min.: 0%, Max.: 399.9% - This value represents the duty ratio necessary to operate the camshaft timing oil control valve assembly in order to block the camshaft timing oil control valve assembly path and maintain the advanced state of the VVT controller. VVT Change Angle #1 VVT displacement angle for bank 1 Min.: 0 DegFR, Max.: 639.9 DegFR - By checking VVT Change Angle during the Active Test, it is also possible to determine whether or not the camshaft position sensor signal is being output. VVT OCV Duty #1 VVT camshaft timing oil control valve operation duty for bank 1 Min.: 0%, Max.: 399.9% - - VVT Ex Hold Lrn Val #1 VVT exhaust hold duty ratio learned value for bank 1 Min.: 0%, Max.: 399.9% - This value represents the duty ratio necessary to operate the camshaft timing oil control valve assembly in order to block the camshaft timing oil control valve assembly path and maintain the advanced state of the VVT controller. VVT Ex Chg Angle #1 VVT exhaust displacement angle for bank 1 Min.: 0 DegFR, Max.: 639.9 DegFR - - VVT Ex OCV Duty #1 VVT exhaust camshaft timing oil control valve duty for bank 1 Min.: 0%, Max.: 399.9% - -
Various Vehicle Conditions 2 (All Data)
- Powertrain > Engine > Data List
-
Tester Display Measurement Item Range Normal Condition Diagnostic Note VN Turbo Type VN turbo type Not Avl, Commo, Vacuum or CAN Com Not Avl Indicates the VN turbo vane actuation method.
Catalyst (Ptrl CAT Converter)
- Powertrain > Engine > Data List
-
Tester Display Measurement Item Range Normal Condition Diagnostic Note Catalyst Temp B1S1 Catalyst temperature for bank 1 sensor 1 Min.: -40°C (-40°F), Max.: 6513.5°C (11756.3°F) - ·This is the temperature of the front catalyst estimated by the ECM.
·This value is included in the conditions used to detect catalyst deterioration (DTC P0420), etc., and should therefore be used as a reference when recreating malfunction conditions.
Catalyst Temp B1S2 Catalyst temperature for bank 1 sensor 2 Min.: -40°C (-40°F), Max.: 6513.5°C (11756.3°F) - This is the temperature of the rear catalyst estimated by the ECM.
Various Vehicle Conditions 3 (All Data)
- Powertrain > Engine > Data List
-
Tester Display Measurement Item Range Normal Condition Diagnostic Note Starter Signal Starter signal ON or OFF ·ON: Starter operating
·OFF: Starter not operating
- Power Steering Signal Power steering switch signal ON or OFF ON: Power steering operating - Neutral Position SW Signal Park/neutral position switch ON or OFF ON: Shift lever in P or N for Automatic Transmission Models Clutch Switch Clutch switch ON or OFF ON: Clutch pedal depressed for Manual Transmission Models Clutch Start SW Clutch start switch status ON or OFF - for Manual Transmission Models 4WD SW 4WD switch status ON or OFF ON: Vehicle in 4WD (part-time 4WD vehicle) - Transfer L4 L4 status of the transfer ON or OFF ON: 4WD control switch in 4L position - Stop Light Switch Stop light switch ON or OFF ·ON: Brake pedal depressed
·OFF: Brake pedal released
- A/C Signal A/C switch status ON or OFF ON: A/C on - Closed Throttle Position SW Closed throttle position switch ON or OFF ·ON: Throttle fully closed
·OFF: Throttle open
- Fuel Cut Condition Fuel cut condition ON or OFF ON: Fuel cut operating - Immobiliser Communication Immobiliser communication ON or OFF ON: Normal -
Check Mode (Check Mode)
- Powertrain > Engine > Data List
-
Tester Display Measurement Item Range Normal Condition Diagnostic Note Check Mode Check mode ON or OFF ON: Check mode on *1 SPD Test Result Check mode result for vehicle speed sensor Compl or Incmpl - - AS Test Result Check mode result for secondary air injection system Compl or Incmpl - - Misfire Test Result Check mode result for misfire monitor Compl or Incmpl - - OXS1 Test Result Check mode result for heated oxygen sensor (bank 1) Compl or Incmpl - - A/F Test Results #1 Check mode result for air fuel ratio sensor (bank 1) Compl or Incmpl - -
Test Result (Monitor Status)
- Powertrain > Engine > Data List
-
Tester Display Measurement Item Range Normal Condition Diagnostic Note Complete Parts Monitor Comprehensive component monitor Not Avl or Avail - *2 Fuel System Monitor Fuel system monitor Not Avl or Avail - *2 Misfire Monitor Misfire monitor Not Avl or Avail - *2 EGR/VVT Monitor EGR/VVT monitor Not Avl or Avail - *2 EGR/VVT Monitor EGR/VVT monitor Compl or Incmpl - *2 O2S(A/FS) Heater Monitor O2S (A/FS) heater monitor Not Avl or Avail - *2 O2S(A/FS) Heater Monitor O2S (A/FS) heater monitor Compl or Incmpl - *2 O2S(A/FS) Monitor O2S (A/FS) monitor Not Avl or Avail - *2 O2S(A/FS) Monitor O2S (A/FS) monitor Compl or Incmpl - *2 A/C Monitor A/C monitor Not Avl or Avail - *2 A/C Monitor A/C monitor Compl or Incmpl - *2 2nd Air Monitor 2nd air monitor Not Avl or Avail - *2 2nd Air Monitor 2nd air monitor Compl or Incmpl - *2 EVAP Monitor EVAP monitor Not Avl or Avail - *2 EVAP Monitor EVAP monitor Compl or Incmpl - *2 Heated Catalyst Monitor Heated catalyst monitor Not Avl or Avail - *2 Heated Catalyst Monitor Heated catalyst monitor Compl or Incmpl - *2 Catalyst Monitor Catalyst monitor Not Avl or Avail - *2 Catalyst Monitor Catalyst monitor Compl or Incmpl - *2
Various Vehicle Conditions 4 (All Data)
- Powertrain > Engine > Data List
-
Tester Display Measurement Item Range Normal Condition Diagnostic Note TC Terminal TC terminal status ON or OFF - - # Codes(Include History) Number of codes Min.: 0, Max.: 255 0 This is the number of DTCs stored. MIL MIL status ON or OFF OFF - MIL ON Run Distance Distance driven with MIL on Min.: 0 Km (0 mile), Max.: 65535 Km (40723 mile) - This is the distance driven after a DTC is stored. Running Time from MIL ON Running time from MIL on Min.: 0 min, Max.: 65535 min Running time after MIL turned on - Time after DTC Cleared Time after DTCs cleared Min.: 0 min, Max.: 65535 min Time after DTCs cleared This is the time elapsed after DTCs were cleared (or after the vehicle left the factory). Time elapsed after the ignition switch is turned off is not counted. Distance from DTC Cleared Distance driven after DTCs cleared Min.: 0 km (0 mile), Max.: 65535 km (40723 mile) Distance driven after DTCs cleared This is the distance driven after DTCs were cleared (or after the vehicle left the factory). Warmup Cycle Cleared DTC Warm-up cycles after DTCs cleared Min.: 0, Max.: 255 - ·This is the number of warm-up cycles after the DTCs were cleared.
·This is the number of times the engine was warmed up* after DTCs were cleared (or after the vehicle left the factory).
Warmed up*: An engine warm-up is defined as the engine coolant temperature rising 20°C (36°F) or more and reaching a temperature of 70°C (158°F) or higher after the engine is started.
Dist Batt Cable Disconnect Distance driven after battery cable disconnected Min.: 0 Km (0 mile), Max.: 65535 Km (40723 mile) Total distance vehicle driven after battery cable disconnected - IG OFF Elapsed Time Time after ignition switch turned off Min.: 0 minutes, Max.: 655350 minutes Cumulative time after the ignition switch is turned off Displays the time elapsed from when the engine is stopped until the engine is started again.
- HINT:
-
When the soak timer does not activate due to the engine being stopped for only a short amount of time, a value for this item may not be stored.
OBD Requirements OBD requirement - EOBD (Euro OBD) - Number of Emission DTC Emissions-related DTCs - - This is the number of emissions-related DTCs. TC and TE1 TC and CG (TE1) terminals of DLC3 ON or OFF - - Total Distance Traveled Total distance traveled Min.: 0 km (0 mile), Max.: 16777215 km (10425361 mile) - -
Misfire (Ptrl Misfire)
- Powertrain > Engine > Data List
-
Tester Display Measurement Item Range Normal Condition Diagnostic Note Ignition Trig. Count Ignition counter Min.: 0, Max.: 65535 0 to 400 ·This is the cumulative number of ignitions.
·This counter is incremented by one for each ignition (this stops when misfire monitoring stops). This value is cleared every 200 revolutions.
·The misfire rate for each cylinder is calculated by dividing the misfire count for each cylinder by Ignition Trig. Count.
·The misfire rate for each cylinder = Cylinder 1 to 4 Misfire Count / Ignition Trig. Count
- HINT:
- ·
For 4-cylinder engines, the values range from 0 to 400.
·For 6-cylinder engines, the values range from 0 to 600.
·For 8-cylinder engines, the values range from 0 to 800.
Cylinder #1 Misfire Count Misfire count of cylinder 1 Min.: 0, Max.: 255 0 ·This is the misfire count for each individual cylinder.
·This counter is increased by one for each misfire and is cleared every 200 revolutions.
·Check this item to help determine the malfunctioning cylinder.
Cylinder #2 Misfire Count Misfire count of cylinder 2 Min.: 0, Max.: 255 0 ·This is the misfire count for each individual cylinder.
·This counter is increased by one for each misfire and is cleared every 200 revolutions.
·Check this item to help determine the malfunctioning cylinder.
Cylinder #3 Misfire Count Misfire count of cylinder 3 Min.: 0, Max.: 255 0 ·This is the misfire count for each individual cylinder.
·This counter is increased by one for each misfire and is cleared every 200 revolutions.
·Check this item to help determine the malfunctioning cylinder.
Cylinder #4 Misfire Count Misfire count of cylinder 4 Min.: 0, Max.: 255 0 ·This is the misfire count for each individual cylinder.
·This counter is increased by one for each misfire and is cleared every 200 revolutions.
·Check this item to help determine the malfunctioning cylinder.
All Cylinders Misfire Count Misfire count of all cylinders Min.: 0, Max.: 255 0 ·This is the total misfire count of all cylinders.
·This counter is increased by one for each misfire, has a maximum value of 255 and is cleared every 1000 revolutions.
Misfire RPM Engine speed for first misfire range Min.: 0 rpm, Max.: 6375 rpm 0 rpm: 0 misfires ·This is the average engine speed recorded when misfiring occurs.
·This value is closer to the actual conditions of the vehicle at the time misfire occurred than the values of engine speed and engine load stored in the freeze frame data. When reproducing malfunction conditions, use this value as a reference.
Misfire Load Engine load for first misfire range Min.: 0 g/rev, Max.: 3.98 g/rev 0 g/rev: 0 misfires ·This is the average engine load recorded when misfiring occurs.
·This value is closer to the actual conditions of the vehicle at the time misfire occurred than the values of engine speed and engine load stored in the freeze frame data. When reproducing malfunction conditions, use this value as a reference.
- HINT:
-
To convert g/rev to gm/sec: RPM / 60 x g/rev = gm/sec.
Misfire Margin Misfire monitoring Min.: -128%, Max.: 127% 0 to 99.2% ·This is the misfire detection margin.
·Misfire Margin = (Misfire detection threshold - maximum engine speed variation) / misfire detection threshold x 100%
·When the variation in the engine speed is large and exceeds the misfire detection threshold, the misfire count starts. Misfire margin is a measure of how much the engine speed variation can increase with respect to the threshold before the engine is determined to be misfiring.
·A large value means there is a large margin for the engine speed to vary before the engine is determined to be misfiring.
·Example:
When the engine is determined to be misfiring, Misfire Margin = -128 to 0%.
Various Vehicle Conditions 5 (All Data)
- Powertrain > Engine > Data List
-
Tester Display Measurement Item Range Normal Condition Diagnostic Note Engine Speed (Starter Off) Engine speed when starter off Min.: 0 rpm, Max.: 51199 rpm - This is the engine speed immediately after starting the engine. Starter Count Number of times starter turned on after ignition switch to ON Min.: 0, Max.: 255 - ·This is the number of times the starter turned on during the current trip.
·Number of times starter turned ON before engine started displayed in the 1 position.
·Number of times starter turned ON after engine started displayed in the 10 position.
Example:
If "21" is displayed on the GTS, the starter was turned ON 1 time before engine start and turned ON 2 times after engine start. (The maximum value for each counter is 9 times before engine start and 11 times after engine start)Run Dist of Previous Trip Distance driven during previous trip Min.: 0 km (0 mile), Max.: 655.35 km (407.23 mile) - ·Before 5 seconds elapse after starting the engine, which is DTC P1604 (Startability Malfunction) detection duration, this parameter indicates the distance driven during the previous trip.
·After 5 seconds elapse after starting the engine, this parameter indicates the distance driven during the current trip calculated from the vehicle speed signal.
- HINT:
-
Run Dist of Previous Trip in freeze frame data which were present when the startability malfunction occurred (DTC P1604 detected) indicates the distance driven during the previous trip, but in all other cases, such as for the snapshot data of Data List (real-time measurements), or for freeze frame data which were present when the DTCs other than P1604 were detected, the value indicates the distance driven during the current trip.
Rough Idle (Ptrl Rough Idle)
- Powertrain > Engine > Data List
-
Tester Display Measurement Item Range Normal Condition Diagnostic Note Compression Leakage Count Compression leakage count Min.: 0, Max.: 255 0 When the counter displays 5 or higher during an engine stall, startability malfunction or rough idle, it may be the result of pressure loss caused by deposits jamming the valve, etc. Rough Idle Status Status of the rough idlestatus Normal, Misfire, Continuous poor combustion, Intermittent poor combustion, Low frequency poor combustion Normal The following list of statuses indicates the degree and frequency of rough idling from highest to lowest.
Use this as a reference when trying to reproduce the rough idling.
·Misfire
·Continuous poor combustion
·Intermittent poor combustion
·Low frequency poor combustion
Plural Cylinders Rough Idle Status of the plural cylinders rough idle ON or OFF OFF Indicates multiple cylinders are the cause of rough idling when ON. Rough Idle #1 Status of the rough idle #1 ON or OFF OFF ·Indicates speed has dropped compared to other cylinders and idling is rough for the indicated cylinder when ON.
·This item indicates cylinders which are likely to be the cause of rough idle.
Rough Idle #2 Status of the rough idle #2 ON or OFF OFF Same as Rough Idle #1 Rough Idle #3 Status of the rough idle #3 ON or OFF OFF Same as Rough Idle #1 Rough Idle #4 Status of the rough idle #4 ON or OFF OFF Same as Rough Idle #1
Various Vehicle Conditions 6 (All Data)
- Powertrain > Engine > Data List
-
Tester Display Measurement Item Range Normal Condition Diagnostic Note Engine Starting Time Time elapsed before engine starts (after starter turns on until engine speed reaches 400 rpm) Min.: 0 ms, Max.: 655350 ms - ·This is the time elapsed after the starter turns on until the engine speed reaches 400 rpm.
·This value is cleared 5 seconds after the engine is started and the value is displayed as 0 ms.
Previous Trip Coolant Temp Engine coolant temperature during previous trip Min.: -40°C (-40°F), Max.: 215°C (419°F) - ·Before 120 seconds elapse after starting the engine, this parameter indicates the engine coolant temperature at the end of the previous trip.
·After 120 seconds elapse after starting the engine, this parameter indicates the engine coolant temperature during the current trip.
Previous Trip Intake Temp Intake air temperature during previous trip Min.: -40°C (-40°F), Max.: 215°C (419°F) - ·Before 120 seconds elapse after starting the engine, this parameter indicates the intake air temperature at the end of the previous trip.
·After 120 seconds elapse after starting the engine, this parameter indicates the intake air temperature during the current trip.
Engine Oil Temperature Engine oil temperature (estimated temperature) Min.: -40°C (-40°F), Max.: 215°C (419°F) - - Previous Trip Eng Oil Temp Engine oil temperature during previous trip Min.: -40°C (-40°F), Max.: 215°C (419°F) - - Ambient Temp for A/C Ambient temperature for A/C Min.: -40°C (-40°F), Max.: 215°C (419°F) - - Previous Trip Ambient Temp Ambient temperature during previous trip Min.: -40°C (-40°F), Max.: 215°C (419°F) - - Engine Start Hesitation History of hesitation during engine start ON or OFF - This value changes to ON when the engine speed does not reach 500 rpm during cranking. Low Rev for Eng Start History of low engine speed after engine start ON or OFF - This item changes to ON when the engine speed drops to 200 rpm or less within approximately 2 seconds of starting the engine. Minimum Engine Speed Minimum engine speed Min.: 0 rpm, Max.: 51199 rpm - ·This is the lowest engine speed detected throughout the trip after the engine is started and ISC learning is completed.
·For use when engine stall, starting problems or rough idle is present.
Fuel Cut Elps Time Time elapsed after engine runs at high speed Min.: 0 sec, Max.: 68746 sec - The time elapsed after a fuel cut after high engine speed has occurred (more than the engine speed at which fuel cut occurs + 500 rpm).
Charging Control (Charging Control)
- Powertrain > Engine > Data List
-
Tester Display Measurement Item Range Normal Condition Diagnostic Note Alternator Output Duty Generator output duty Min.: 0%, Max.: 399.9% - - Alt Vol - Non Active Test Request voltage when regulator not under forced activation Min.: 0 V, Max.: 79.998 V Battery electrolyte temperature varies (12.5 to 15.3 V) while driving: After engine start - Alt Vol - Active Test Request voltage when regulator under forced activation Min.: 0 V, Max.: 79.998 V Request instruction voltage value: After engine start - Previous Trip Alternator Max Output Time Accumulated time of maximum power generation by alternator during previous trip Min.: 0 sec, Max.: 65535 sec - - Initial Engine Battery Minimum Voltage Minimum battery voltage at engine start Min.: 0 V, Max.: 25.5 V - - ACT VSV A/C cut status for Active Test ON or OFF - -
Various Vehicle Conditions 7 (All Data)
- Powertrain > Engine > Data List
-
Tester Display Measurement Item Range Normal Condition Diagnostic Note Brake Override System Brake override system status ON or OFF ON: Brake override system operating - Idle Fuel Cut Fuel cut at idle ON or OFF ON: Fuel cut operating Idle Fuel Cut = "ON" when the throttle valve is fully closed and the engine speed is high. FC TAU Fuel cut TAU (fuel cut during very light load) ON or OFF ON: Fuel cut operating This is the fuel cut performed under a very light load to prevent the engine combustion from becoming incomplete. Immobiliser Fuel Cut Status of immobiliser fuel cut ON or OFF - - Immobiliser Fuel Cut History Status of the immobiliser fuel cut history ON or OFF - When DTC P1604 is output and Immobiliser Fuel Cut History indicates ON, the engine could not start due to immobiliser operation. Brake Ejector VSV Status of brake ejector VSV OPEN or CLOSE CLOSE - Electrical Load Signal 1 Electrical load signal ON or OFF ON: Tail switch ON - Electrical Load Signal 2 Electrical load signal ON or OFF ON: Rear defogger switch ON - Cruise Cancel Signal Status of the cruise cancel signal ON or OFF - -
Various Vehicle Conditions 8 (Vehicle Information)
- Powertrain > Engine > Data List
-
Tester Display Measurement Item Range Normal Condition Diagnostic Note Model Code Model code - - Used for identifying the model code: TGN## Engine Type Engine type - - Used for identifying the engine type: 2TRFE Cylinder Number Number of cylinders Min.: 0, Max.: 255 - Used for identifying the number of cylinders: 4 Transmission Type Transmission (transaxle) type - - Used for identifying the transmission (transaxle) type: ECT 6th or MT Transmission Type2 Transmission (transaxle) type2 - NA - Destination Destination - - Used for identifying the destination: W Model Year Model year Min.: 1900, Max.: 2155 - Used for identifying the model year: 20## System Identification System identification - - Used for identifying the engine system: Gasoline (gasoline engine)
Compression (Compression)
- Powertrain > Engine > Data List
-
Tester Display Measurement Item Range Normal Condition Diagnostic Note Engine Speed of Cyl #1 Engine speed for cylinder No. 1 Min.: 0 rpm, Max.: 51199 rpm - ·This is output only when Check the Cylinder Compression is performed using the Active Test.
·This is the engine speed for each cylinder measured during the fuel-cut with the engine cranking.
·When there is compression loss, the engine speed for that cylinder increases.
- HINT:
-
When multiple cylinders have compression loss, the engine speeds for multiple cylinders increase and it is not possible to determine which cylinders have compression loss. At this time, it is necessary to actually perform a compression measurement.
Engine Speed of Cyl #2 Engine speed for cylinder No. 2 Min.: 0 rpm, Max.: 51199 rpm - ·This is output only when Check the Cylinder Compression is performed using the Active Test.
·This is the engine speed for each cylinder measured during the fuel-cut with the engine cranking.
·When there is compression loss, the engine speed for that cylinder increases.
- HINT:
-
When multiple cylinders have compression loss, the engine speeds for multiple cylinders increase and it is not possible to determine which cylinders have compression loss. At this time, it is necessary to actually perform a compression measurement.
Engine Speed of Cyl #3 Engine speed for cylinder No. 3 Min.: 0 rpm, Max.: 51199 rpm - ·This is output only when Check the Cylinder Compression is performed using the Active Test.
·This is the engine speed for each cylinder measured during the fuel-cut with the engine cranking.
·When there is compression loss, the engine speed for that cylinder increases.
- HINT:
-
When multiple cylinders have compression loss, the engine speeds for multiple cylinders increase and it is not possible to determine which cylinders have compression loss. At this time, it is necessary to actually perform a compression measurement.
Engine Speed of Cyl #4 Engine speed for cylinder No. 4 Min.: 0 rpm, Max.: 51199 rpm - ·This is output only when Check the Cylinder Compression is performed using the Active Test.
·This is the engine speed for each cylinder measured during the fuel-cut with the engine cranking.
·When there is compression loss, the engine speed for that cylinder increases.
- HINT:
-
When multiple cylinders have compression loss, the engine speeds for multiple cylinders increase and it is not possible to determine which cylinders have compression loss. At this time, it is necessary to actually perform a compression measurement.
Av Engine Speed of All Cyl Average engine speed for all cylinders Min.: 0 rpm, Max.: 51199 rpm - This is output only when Check the Cylinder Compression is performed using the Active Test.
*1: Refer to Check Mode Procedure.
Click hereEngine / Hybrid System>2TR-FE ENGINE CONTROL>SFI SYSTEM>CHECK MODE PROCEDURE
*2:
Avail: The monitor is available on the vehicle.
Not Avl: The monitor is not available on the vehicle.
Incmpl / Compl: The item changes from Incmpl to Compl if the monitor was completed at least once at some time in the past. This item does not change when the ignition switch is turned off. However, the item changes back to Incmpl when DTCs are cleared or the battery cable is disconnected.
ACTIVE TEST
- HINT:
-
Using the GTS to perform Active Tests allows relays, VSVs, actuators and other items to be operated without removing any parts. This non-intrusive functional inspection can be very useful because intermittent operation may be discovered before parts or wiring is disturbed. Performing Active Tests early in troubleshooting is one way to save diagnostic time. Data List information can be displayed while performing Active Tests.
Warm up the engine.
Turn the ignition switch off.
Connect the GTS to the DLC3.
Turn the ignition switch to ON.
Turn the GTS on.
Enter the following menus: Powertrain / Engine and ECT / Active Test.
According to the display on the GTS, perform the Active Test.
- Powertrain > Engine > Active Test
-
Tester Display Measurement Item Control Range Diagnostic Note Control the Injection Volume Control the injection volume Between -12.5% and 24.8% ·All fuel injector assemblies are tested at the same time.
·Perform the test at 3000 rpm or less.
·Injection volume can be changed in fine gradations within the control range.
·Control the Injection Volume enables the checking and graphing of the air fuel ratio sensor and heated oxygen sensor voltage outputs.
·To conduct the test, enter the following menus: Powertrain / Engine and ECT / Active Test / Control the Injection Volume / Ptrl AF Control / AFS Voltage B1S1 and O2S B1S2.
·During the Active Test, air fuel ratio feedback control and feedback learning are stopped.
Control the Injection Volume for A/F Sensor Change injection volume -12.5%/0%/12.5% ·All fuel injector assemblies are tested at the same time.
·Perform the test at 3000 rpm or less.
·Control the Injection Volume for A/F Sensor enables the checking and graphing of the air fuel ratio sensor and heated oxygen sensor voltage outputs.
·To conduct the test, enter the following menus: Powertrain / Engine and ECT / Active Test / Control the Injection Volume for A/F Sensor / Ptrl AF Control / AFS Voltage B1S1 and O2S B1S2.
·During the Active Test, air fuel ratio feedback control and feedback learning are stopped.
·See waveform *2.
Activate the VSV for Secondary Air Control Activate the secondary air injection system ON/OFF ·Do not perform this test for 5 seconds or more.
·After the test, do not perform the test again for 30 seconds.
·The air switching valve and air pump operate.
Activate the VSV for Evap Control Activate purge VSV control ON/OFF ·The purge VSV is opened with a 30% duty ratio.
·See waveform *4.
Control the A/C Cut Signal Control A/C cut signal ON/OFF Test possible when following
·Ignition switch to ON.
·Engine is stopped.
·Shift lever is in P or N.
Control the Fuel Pump / Speed Activate fuel pump ON/OFF Perform this test when the following conditions are met:
·Ignition switch is turned to ON.
·Engine is stopped.
·Shift lever is in P or N.
Connect the TC and TE1 Turn on and off TC and CG (TE1) connection ON/OFF ·ON: TC and CG (TE1) are connected.
·OFF: TC and CG (TE1) are disconnected.
·Perform this test when the following conditions are met:
·Ignition switch is turned to ON.
·Engine is stopped.
·Shift lever is in P or N.
Control the Idle Fuel Cut Prohibit Prohibit idling fuel cut control ON/OFF Perform this test when the following conditions are met:
·Ignition switch is turned to ON.
·Engine is stopped.
·Shift lever is in P or N.
Control the ETCS Open/Close Slow Speed Throttle actuator Close/Open
Open: Throttle valve opens slowlyPerform this test when the following conditions are met:
·Ignition switch is turned to ON.
·Engine is stopped.
·Accelerator pedal is fully depressed (accelerator pedal position: 58 degrees or more).
·Shift lever is in P or N.
Control the ETCS Open/Close Fast Speed Throttle actuator Close/Open
Open: Throttle valve opens quickly·Same as above.
·See waveform *3.
Control the VVT Linear (Bank1) Control camshaft timing oil control valve assembly (for intake camshaft of bank 1) -128 to 127% (This value added to present camshaft timing oil control valve control duty)
100%: Maximum advance
-100%: Maximum retard·Engine stalls or idles roughly when the camshaft timing oil control valve assembly is operated by 100%.
·Perform this test when the following conditions are met:
·Engine is idling.
·Shift lever is in P or N.
·DTCs related to the VVT system may be stored due to Active Test operation, but this does not indicate a malfunction.
·See waveform *5.
Control the VVT System (Bank1) Turn camshaft timing oil control valve assembly (for intake camshaft) on and off ON/OFF
ON: VVT OCV Duty #1 100%·Engine stalls or idles roughly when the camshaft timing oil control valve assembly is turned on.
·Engine runs and idles normally when the camshaft timing oil control valve assembly is off.
·Perform this test when the following conditions are met:
·Engine is idling.
·Shift lever is in P or N.
·DTCs related to the VVT system may be stored due to Active Test operation, but this does not indicate a malfunction.
Control the VVT Exhaust Linear (Bank1) Control camshaft timing oil control valve assembly (for intake camshaft of bank 1) -128 to 127% (This value added to present camshaft timing oil control valve control duty)
100%: Maximum retard
-100%: Maximum advance·Engine stalls or idles roughly when the camshaft timing oil control valve assembly is operated by 100%.
·Perform this test when the following conditions are met:
·Engine is idling.
·Shift lever is in P or N.
·DTCs related to the VVT system may be stored due to Active Test operation, but this does not indicate a malfunction.
·See waveform *6.
Brake Ejector VSV Inspection Activate brake ejector VSV ON/OFF Perform this test when the following conditions are met:
·Battery voltage is higher than 10 V.
Control the Voltage of Alternator Request output voltage of generator regulator during forced activation 12.5 to 14.8 V Test is possible after engine start Perform this test when the following conditions are met:
·Ignition switch is turned to ON.
·Engine is running.
·Shift lever is in P or N.
Control the Cylinder Fuel Cut ·Cylinder #1 injector fuel cut
·Cylinder #2 injector fuel cut
·Cylinder #3 injector fuel cut
·Cylinder #4 injector fuel cut
ON/OFF Perform this test when the following conditions are met:
·Vehicle is stopped.
·Engine is idling.
·Shift lever is in P or N.
Control the All Cylinders Fuel Cut Fuel cut for all cylinders ON/OFF This test when the following conditions are met:
·Vehicle is stopped.
·Engine is idling.
·Shift lever is in P or N.
Check the Cylinder Compression Check the cylinder compression pressure ON/OFF Fuel injection and ignition stop in all cylinders.
*1
- HINT:
-
*1:
-
In this Active Test, the fuel and ignition of all cylinders is cut. The engine must then be cranked for approximately 10 seconds. At this time, the speed of each cylinder is measured. If the speed of one cylinder is more than the other cylinders, it can be determined that the compression pressure of that cylinder is lower than the other cylinders.
Warm up the engine.
Turn the ignition switch off.
Connect the GTS to the DLC3.
Turn the ignition switch to ON.
Turn the GTS on.
Enter the following menus: Powertrain / Engine and ECT / Active Test / Check the Cylinder Compression.
- HINT:
-
To display the entire Data List, press the pull down menu button next to Primary. Then select Compression.
Push the snapshot button to turn the snapshot function on.
- HINT:
-
Using the snapshot function, data can be recorded during the Active Test.
While the engine is not running, press the RIGHT or LEFT button to change Check the Cylinder Compression to ON.
- HINT:
-
After performing the above procedure, Check the Cylinder Compression will start. Fuel injection for all cylinders is prohibited and each cylinder engine speed measurement enters standby mode.
Crank the engine for about 10 seconds.
- HINT:
-
Continue to crank the engine until the values change from the default value (51199 rpm).
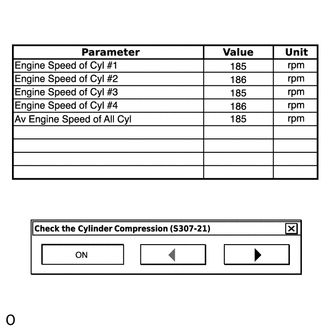
Monitor the engine speed (Engine Speed of Cyl #1 to #4) displayed on the GTS.
- HINT:
-
At first, the GTS displays extremely high cylinder engine speed values. After approximately 10 seconds of engine cranking, each cylinder engine speed measurement will change to the actual engine speed.
- NOTICE:
- ·
Do not crank the engine continuously for 20 seconds or more.
·If it is necessary to crank the engine again after Check the Cylinder Compression has been changed to ON and the engine has been cranked once, press Exit to return to the Active Test menu screen. Then change Check the Cylinder Compression to ON and crank the engine.
·Use a fully-charged battery.
Stop cranking the engine, and then change "Check the Cylinder Compression" to OFF after the engine stops.
- NOTICE:
-
If the Active Test is changed to OFF while the engine is being cranked, the engine will start.
Push the snapshot button to turn the snapshot function off.
Select "Stored Data" on the GTS screen, select the recorded data and display the data as a graph.
- HINT:
-
If the data is not displayed as a graph, the change of the values cannot be observed.
Check the change in engine speed values.
- HINT:
-
As the data values of the Active Test return to their default values when cranking is stopped, the engine speed value of each cylinder cannot be observed. Therefore, it is necessary to use the data recorded with the snapshot function to check the engine speed values recorded during cranking.
- Reference Waveforms for Active Test
- ·
*2: Control the Injection Volume for A/F Sensor (Idling after warming up)
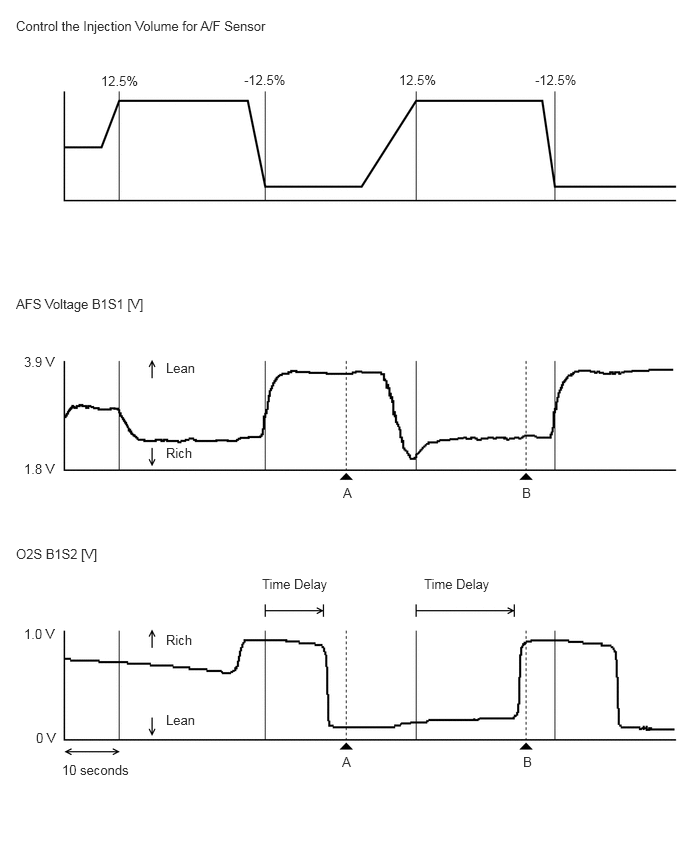 1.052,0.76 1.729,1.115 0.677,0.354 10 false 12.5% 2.542,0.75 3.219,1.104 0.677,0.354 10 false -12.5% 5.573,0.75 6.25,1.104 0.677,0.354 10 false -12.5% 4.156,0.75 4.833,1.104 0.677,0.354 10 false 12.5% 0.167,3.083 1.688,3.396 1.521,0.313 10 false AFS Voltage B1S1 [V] 0.167,5.688 1.688,6 1.521,0.313 10 false O2S B1S2 [V] 2.729,6 3.583,6.313 0.854,0.313 10 false Time Delay 4.417,6 5.271,6.313 0.854,0.313 10 false Time Delay 1.729,6.583 2.583,6.896 0.854,0.313 10 false Rich 1.729,7.417 2.583,7.729 0.854,0.313 10 false Lean 0.646,7.938 1.5,8.25 0.854,0.313 10 false 10 seconds 3.563,7.854 3.833,8.083 0.271,0.229 10 false A 5.448,7.854 5.719,8.083 0.271,0.229 10 false B 0.25,6.521 0.75,6.75 0.5,0.229 10 false 1.0 V 0.375,7.604 0.813,7.833 0.438,0.229 10 false 0 V 5.438,5.052 5.708,5.281 0.271,0.229 10 false B 3.573,5.052 3.844,5.281 0.271,0.229 10 false A 1.729,4.635 2.583,4.948 0.854,0.313 10 false Rich 1.729,3.75 2.583,4.063 0.854,0.313 10 false Lean 0.25,4.802 0.75,5.031 0.5,0.229 10 false 1.8 V 0.25,3.688 0.75,3.917 0.5,0.229 10 false 3.9 V 0.167,0.188 3.167,0.5 3,0.313 10 false Control the Injection Volume for A/F Sensor
- HINT:
-
During the Active Test, air fuel ratio feedback control and feedback learning are stopped.
Tester Display Measurement Item/Range Normal Condition Control the Injection Volume - ▲A ▲B Active Test operation -12.5% 12.5% AFS Voltage B1S1 3.801 V 2.543 V O2S B1S2 0.055 V 0.955 V
- HINT:
- ·
Usually, the value of AFS Voltage drops below 3.1 V when the control value for Control the Injection Volume is changed to 12.5%.
·Usually, the value of AFS Voltage changes to 3.4 V or higher when the control value for Control the Injection Volume is changed to -12.5%.
·Usually, the value of O2S changes to 0.55 V or higher when the control value for Control the Injection Volume is changed to 12.5%.
·Usually, the value of O2S drops below 0.4 V when the control value for Control the Injection Volume is changed to -12.5%.
·*3: Control the ETCS Open/Close Fast Speed [Active Test for electrical throttle control system] (Ignition switch ON)
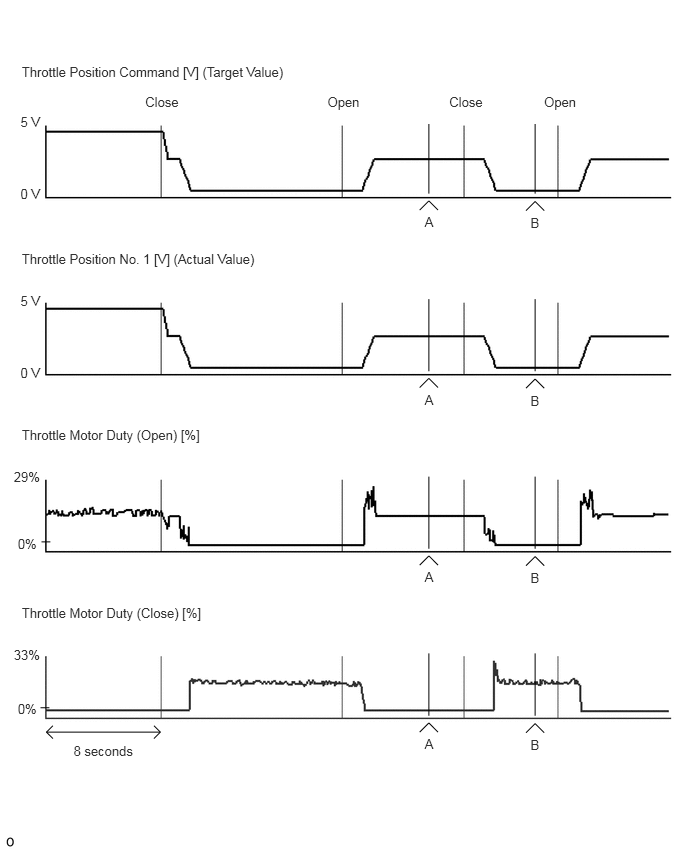 0.483,7.626 1.67,7.626 false 0.551,7.693 0.483,7.626 0.483,7.626 0.551,7.559 false 1.603,7.559 1.67,7.626 1.67,7.626 1.603,7.693 false 0.766,7.739 1.463,7.915 0.696,0.176 10 8 seconds 4.371,7.626 4.467,7.53 4.467,7.53 4.562,7.626 false 5.478,7.632 5.574,7.537 5.574,7.537 5.669,7.632 false 4.423,7.671 4.584,7.832 0.161,0.161 10 A 5.525,7.678 5.686,7.839 0.161,0.161 10 B 0.227,0.663 3.066,0.847 2.839,0.184 10 Throttle Position Command [V] (Target Value) 0.213,1.188 0.459,1.345 0.247,0.156 10 5 V 0.213,1.938 0.459,2.094 0.247,0.156 10 0 V 0.227,2.61 2.76,2.794 2.534,0.184 10 Throttle Position No. 1 [V] (Actual Value) 0.213,3.052 0.459,3.208 0.247,0.156 10 5 V 0.213,3.801 0.459,3.957 0.247,0.156 10 0 V 0.227,4.446 2.182,4.63 1.955,0.184 10 Throttle Motor Duty (Open) [%] 0.143,4.887 0.459,5.043 0.316,0.156 10 29% 0.185,5.581 0.431,5.737 0.247,0.156 10 0% 0.227,6.302 2.182,6.486 1.955,0.184 10 Throttle Motor Duty (Close) [%] 0.143,6.743 0.459,6.9 0.316,0.156 10 33% 0.185,7.304 0.431,7.46 0.247,0.156 10 0% 4.467,7.456 4.467,6.806 false 5.574,7.456 5.574,6.806 false 4.371,5.886 4.467,5.79 4.467,5.79 4.562,5.886 false 5.478,5.892 5.574,5.797 5.574,5.797 5.669,5.892 false 4.423,5.932 4.584,6.092 0.161,0.161 10 A 5.525,5.938 5.686,6.099 0.161,0.161 10 B 4.467,5.716 4.467,4.964 false 5.574,5.716 5.574,4.964 false 4.371,4.037 4.467,3.941 4.467,3.941 4.562,4.037 false 5.478,4.043 5.574,3.948 5.574,3.948 5.669,4.043 false 4.423,4.082 4.584,4.243 0.161,0.161 10 A 5.525,4.089 5.686,4.25 0.161,0.161 10 B 4.467,3.867 4.467,3.115 false 5.574,3.867 5.574,3.115 false 4.371,2.187 4.467,2.092 4.467,2.092 4.562,2.187 false 5.478,2.194 5.574,2.098 5.574,2.098 5.669,2.194 false 4.423,2.233 4.584,2.394 0.161,0.161 10 A 5.525,2.239 5.686,2.4 0.161,0.161 10 B 4.467,2.017 4.467,1.291 false 5.574,2.017 5.574,1.291 false 3.412,0.983 3.846,1.158 0.434,0.175 10 Open 4.68,0.983 5.215,1.158 0.535,0.175 10 Close 5.668,0.983 6.102,1.158 0.434,0.175 10 Open 1.513,0.983 2.048,1.158 0.535,0.175 10 Close 0.514,7.372 0.421,7.372 false 0.525,5.644 0.432,5.644 false
- HINT:
- ·
Usually, Throttle Position Command (Target Value) and Throttle Position No. 1 (Actual Value) are almost the same.
·If any DTCs related to the Electronic Throttle Control System (ETCS) are stored, this Active Test does not function.
Tester Display Measurement Item/Range Normal Condition Control the ETCS Open/Close Fast Speed - ▲A ▲B Active Test operation Open Close Throttle Position Command 2.597 V 0.742 V Throttle Position No. 1 2.597 V 0.742 V Throttle Motor Duty (Open) 11% 0% Throttle Motor Duty (Close) 0% 12%
·*4: Activate the VSV for Evap Control (Idling after warming up)
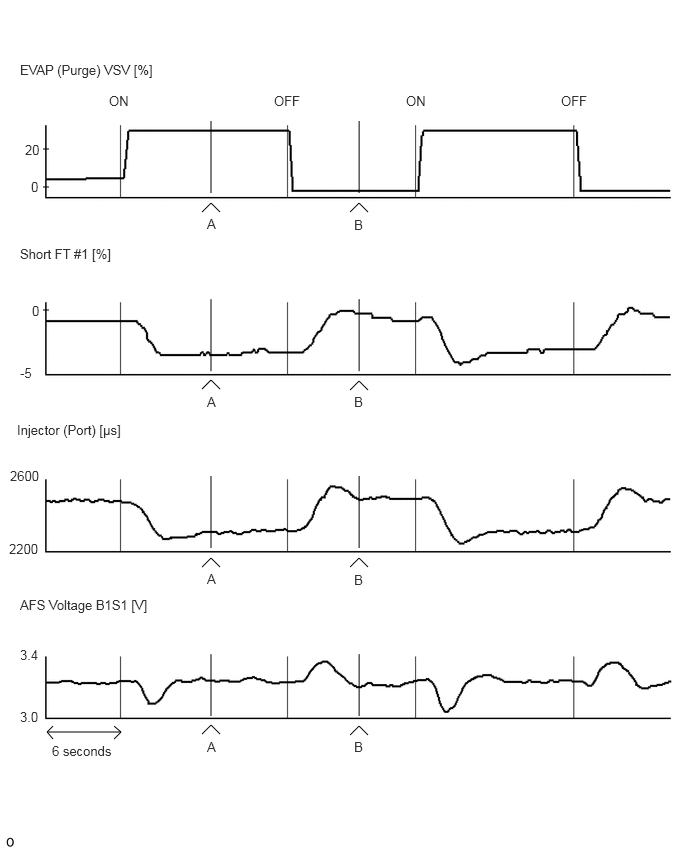 0.49,7.625 1.26,7.625 false 0.552,7.698 0.49,7.625 0.49,7.625 0.552,7.563 false 1.188,7.563 1.26,7.625 1.26,7.625 1.188,7.698 false 2.104,7.646 2.198,7.552 2.198,7.552 2.292,7.646 false 3.646,7.656 3.74,7.563 3.74,7.563 3.833,7.656 false 2.198,7.458 2.198,6.813 false 3.74,7.458 3.74,6.813 false 2.104,5.906 2.198,5.813 2.198,5.813 2.292,5.906 false 3.646,5.906 3.74,5.813 3.74,5.813 3.833,5.906 false 2.198,5.708 2.198,4.958 false 3.74,5.708 3.74,4.958 false 2.104,4.052 2.198,3.958 2.198,3.958 2.292,4.052 false 3.646,4.063 3.74,3.969 3.74,3.969 3.833,4.063 false 2.198,3.865 2.198,3.115 false 3.74,3.865 3.74,3.115 false 2.104,2.208 2.198,2.115 2.198,2.115 2.292,2.208 false 3.646,2.208 3.74,2.115 3.74,2.115 3.833,2.208 false 2.198,2.01 2.198,1.26 false 3.74,2.01 3.74,1.26 false 0.51,1.948 0.448,1.948 false 0.51,3.229 0.448,3.229 false 0.51,1.552 0.448,1.552 false 0.542,7.74 1.24,7.917 0.698,0.177 10 false 6 seconds 2.156,7.698 2.313,7.854 0.156,0.156 10 false A 3.688,7.698 3.844,7.854 0.156,0.156 10 false B 0.177,4.396 1.344,4.594 1.167,0.198 10 false Injector (Port) [μs] 0.104,4.875 0.469,5.042 0.365,0.167 10 false 2600 0.094,5.635 0.458,5.802 0.365,0.167 10 false 2200 0.208,0.646 1.688,0.844 1.479,0.198 10 false EVAP (Purge) VSV [%] 0.26,1.479 0.479,1.646 0.219,0.167 10 false 20 0.323,1.865 0.458,2.031 0.135,0.167 10 false 0 0.208,2.563 1.24,2.76 1.031,0.198 10 false Short FT #1 [%] 0.208,3.802 0.479,3.969 0.271,0.167 10 false -5 0.333,3.156 0.469,3.323 0.135,0.167 10 false 0 0.208,6.219 1.604,6.417 1.396,0.198 10 false AFS Voltage B1S1 [V] 0.208,7.385 0.479,7.552 0.271,0.167 10 false 3.0 0.208,6.74 0.469,6.906 0.26,0.167 10 false 3.4 2.156,5.948 2.313,6.104 0.156,0.156 10 false A 3.688,5.958 3.844,6.115 0.156,0.156 10 false B 2.156,4.104 2.313,4.26 0.156,0.156 10 false A 3.688,4.104 3.844,4.26 0.156,0.156 10 false B 2.156,2.25 2.313,2.406 0.156,0.156 10 false A 3.688,2.26 3.844,2.417 0.156,0.156 10 false B 4.229,0.969 4.49,1.135 0.26,0.167 10 false ON 1.135,0.969 1.396,1.135 0.26,0.167 10 false ON 2.854,0.969 3.198,1.135 0.344,0.167 10 false OFF 5.844,0.969 6.188,1.135 0.344,0.167 10 false OFF
- HINT:
-
Even when the Active Test is turned on (the purge VSV is opened 30%), air fuel ratio feedback continues and control is performed so that the air fuel ratio is the stoichiometric ratio. Therefore, by observing the change in "Short FT #1", it is possible to determine whether the purge VSV is actually open as well as the concentration of HC in the purge gas.
Tester Display Measurement Item/Range Normal Condition Activate the VSV for Evap Control - ▲A ▲B Active Test operation ON OFF EVAP (Purge) VSV ON OFF Short FT #1 -1.563% 0.000% Injection (Port) 2288.0 μs 2430.0 μs AFS Voltage B1S1 3.249 V 3.205 V
- HINT:
-
The graphs and values above are for reference only because the fuel injection volume (compensation volume) varies depending on the HC density of the purge air from the canister.
·*5: Control the VVT Linear (Bank 1)
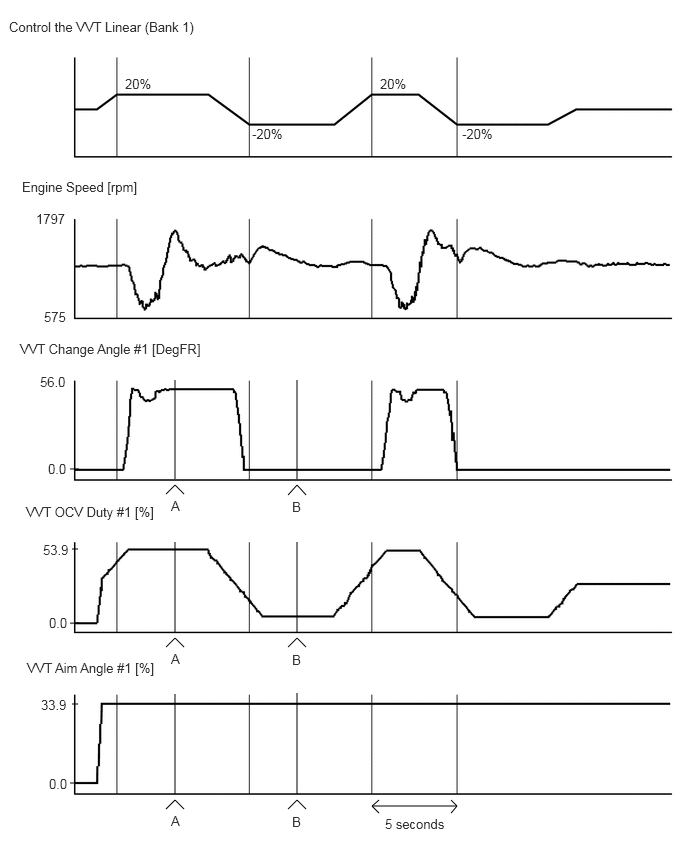 1.729,6.74 1.823,6.646 1.823,6.646 1.917,6.74 false 3,6.74 3.094,6.646 3.094,6.646 3.188,6.74 false 1.823,6.583 1.823,5.646 false 3.094,6.583 3.094,5.646 false 1.729,5.146 1.823,5.052 1.823,5.052 1.917,5.146 false 3,5.156 3.094,5.052 3.094,5.052 3.188,5.156 false 1.823,4.99 1.823,3.958 false 3.094,4.99 3.094,3.958 false 0.813,5.719 0.75,5.719 false 1.729,8.427 1.823,8.333 1.823,8.333 1.917,8.427 false 3,8.427 3.094,8.333 3.094,8.333 3.188,8.427 false 1.823,8.271 1.823,7.229 false 3.094,8.271 3.094,7.219 false 0.813,7.333 0.75,7.333 false 3.875,8.396 4.76,8.396 false 3.948,8.469 3.875,8.396 3.875,8.396 3.948,8.333 false 4.698,8.333 4.76,8.396 4.76,8.396 4.698,8.469 false 0.823,4.885 0.729,4.885 false 0.823,6.49 0.729,6.49 false 0.823,8.156 0.729,8.156 false 0.375,2.198 0.76,2.365 0.385,0.167 10 false 1797 0.458,3.219 0.76,3.385 0.302,0.167 10 false 575 0.229,1.865 1.5,2.052 1.271,0.188 10 false Engine Speed [rpm] 0.208,3.552 2.188,3.75 1.979,0.198 10 false VVT Change Angle #1 [DegFR] 0.417,3.896 0.76,4.094 0.344,0.198 10 false 56.0 0.5,4.802 0.76,5 0.26,0.198 10 false 0.0 0.271,5.25 1.667,5.448 1.396,0.198 10 false VVT OCV Duty #1 [%] 0.448,5.646 0.792,5.844 0.344,0.198 10 false 53.9 0.51,6.406 0.802,6.604 0.292,0.198 10 false 0.0 1.781,6.781 1.938,6.938 0.156,0.156 10 false A 3.042,6.792 3.198,6.948 0.156,0.156 10 false B 1.781,5.188 1.938,5.344 0.156,0.156 10 false A 3.042,5.198 3.198,5.354 0.156,0.156 10 false B 0.281,6.875 1.677,7.073 1.396,0.198 10 false VVT Aim Angle #1 [%] 0.427,7.26 0.958,7.458 0.531,0.198 10 false 33.9 0.51,8.083 0.958,8.281 0.448,0.198 10 false 0.0 1.781,8.469 1.938,8.625 0.156,0.156 10 false A 3.042,8.479 3.198,8.635 0.156,0.156 10 false B 0.094,0.198 2.146,0.385 2.052,0.188 10 false Control the VVT Linear (Bank 1) 1.302,0.792 1.708,0.948 0.406,0.156 10 false 20% 2.625,1.313 3.031,1.469 0.406,0.156 10 false -20% 3.958,0.792 4.365,0.948 0.406,0.156 10 false 20% 4.813,1.313 5.219,1.469 0.406,0.156 10 false -20% 4.01,8.5 4.677,8.646 0.667,0.146 10 false 5 seconds
Tester Display Measurement Item/Range Normal Condition Control the VVT Linear (Bank 1) - ▲A ▲B Active Test operation* 20% -20% VVT Change Angle #1 41.0 DegFR 0.0 DegFR VVT OCV Duty #1 58.0% 18.0% VVT Aim Angle #1 37.0% 37.0%
- HINT:
- ·
Active Test operation*: Change the control value for Control the VVT Linear to 20% or -20%.
·The Control the VVT Linear Active Test considers the value of VVT Aim Angle to be 0 and raises or lowers the duty ratio with respect to VVT Aim Angle #1.
·The sum of the control value for the Control the VVT Linear Active Test and the value of VVT Aim Angle is approximately equal to the value of VVT OCV Duty #1.
·When the control value for the Control the VVT Linear Active Test is changed a few times, there should not be a large discrepancy between VVT OCV Duty when the system starts advancing or retarding the timing and the rate of change of VVT Change Angle #1.
·*6: Control the VVT Exhaust Linear (Bank 1)
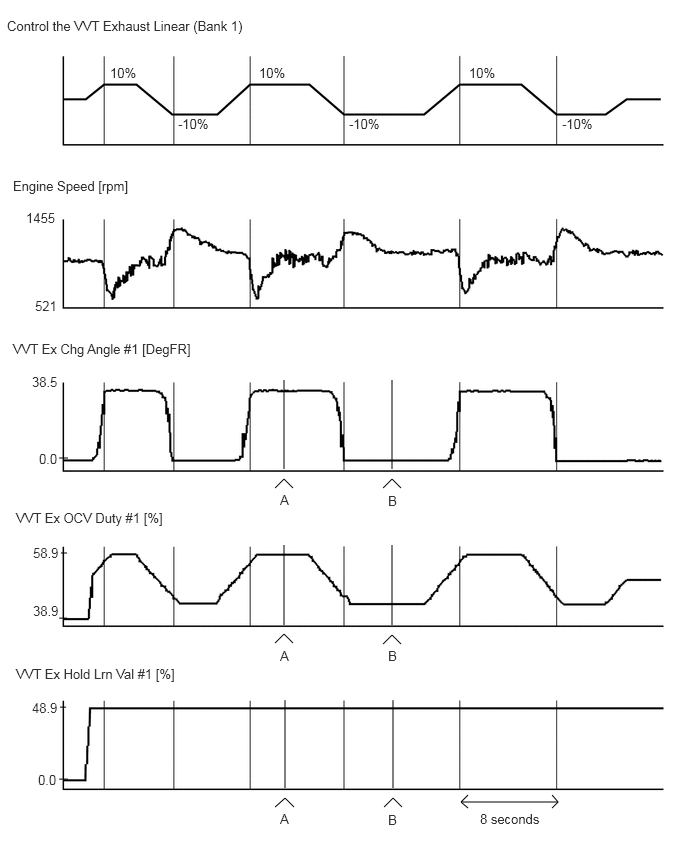 2.865,6.698 2.958,6.604 2.958,6.604 3.052,6.698 false 3.99,6.708 4.083,6.615 4.083,6.615 4.177,6.708 false 2.958,6.51 2.958,5.677 false 4.083,6.51 4.083,5.677 false 2.865,5.083 2.958,4.99 2.958,4.99 3.052,5.083 false 3.99,5.083 4.083,4.99 4.083,4.99 4.177,5.083 false 2.958,4.885 2.958,3.958 false 4.083,4.885 4.083,3.958 false 0.698,5.76 0.635,5.76 false 2.865,8.406 2.969,8.313 2.969,8.313 3.063,8.406 false 4,8.406 4.094,8.313 4.094,8.313 4.188,8.406 false 2.969,8.208 2.969,7.292 false 4.094,8.208 4.094,7.292 false 0.688,7.365 0.625,7.365 false 4.802,8.354 5.813,8.354 false 4.875,8.417 4.802,8.354 4.802,8.354 4.875,8.281 false 5.75,8.281 5.813,8.354 5.813,8.354 5.75,8.417 false 0.708,4.771 0.615,4.771 false 0.698,6.438 0.615,6.438 false 0.708,8.115 0.615,8.115 false 0.271,2.188 0.656,2.354 0.385,0.167 10 false 1455 0.365,3.104 0.667,3.271 0.302,0.167 10 false 521 0.135,1.854 1.406,2.042 1.271,0.188 10 false Engine Speed [rpm] 0.135,3.552 2.115,3.75 1.979,0.198 10 false VVT Ex Chg Angle #1 [DegFR] 0.333,3.896 0.677,4.094 0.344,0.198 10 false 38.5 0.406,4.698 0.667,4.896 0.26,0.198 10 false 0.0 0.167,5.313 1.771,5.51 1.604,0.198 10 false VVT Ex OCV Duty #1 [%] 0.344,5.677 0.688,5.875 0.344,0.198 10 false 58.9 0.344,6.281 0.635,6.479 0.292,0.198 10 false 38.9 2.917,6.75 3.073,6.906 0.156,0.156 10 false A 4.042,6.75 4.198,6.906 0.156,0.156 10 false B 2.917,5.125 3.073,5.281 0.156,0.156 10 false A 4.042,5.135 4.198,5.292 0.156,0.156 10 false B 0.167,6.938 1.948,7.135 1.781,0.198 10 false VVT Ex Hold Lrn Val #1 [%] 0.333,7.292 0.677,7.49 0.344,0.198 10 false 48.9 0.396,8.042 0.688,8.24 0.292,0.198 10 false 0.0 2.917,8.448 3.073,8.604 0.156,0.156 10 false A 4.042,8.458 4.198,8.615 0.156,0.156 10 false B 5,8.448 5.667,8.594 0.667,0.146 10 false 8 seconds 0.073,0.188 2.635,0.375 2.563,0.188 10 false Control the VVT Exhaust Linear (Bank 1) 1.146,0.677 1.552,0.833 0.406,0.156 10 false 10% 2.698,0.677 3.104,0.833 0.406,0.156 10 false 10% 4.885,0.677 5.292,0.833 0.406,0.156 10 false 10% 1.854,1.208 2.26,1.365 0.406,0.156 10 false -10% 3.635,1.208 4.042,1.365 0.406,0.156 10 false -10% 5.854,1.208 6.26,1.365 0.406,0.156 10 false -10%
Tester Display Measurement Item/Range Normal Condition Control the VVT Exhaust Linear (Bank 1) - ▲A ▲B Active Test operation* 10% -10% VVT Ex Chg Angle #1 38.5 DegFR 0.0 DegFR VVT Ex OCV Duty #1 54.0% 34.0% VVT Ex Hold Lrn Val #1 44.0% 44.0%
- HINT:
- ·
Active Test operation*: Change the control value for Control the VVT Exhaust Linear to 10% or -10%.
·The Control the VVT Exhaust Linear Active Test considers the value of VVT Ex Hold Lrn Val to be 0 and raises or lowers the duty ratio with respect to VVT Ex Hold Lrn Val #1.
·The sum of the control value for the Control the VVT Exhaust Linear Active Test and the value of VVT Ex Hold Lrn Val is approximately equal to the value of VVT Ex OCV Duty #1.
·When the control value for the Control the VVT Exhaust Linear Active Test is changed a few times, there should not be a large discrepancy between VVT Ex OCV Duty when the system starts advancing or retarding the timing and the rate of change of VVT Ex Chg Angle #1.
SYSTEM CHECK
- HINT:
-
Performing a system check enables the system, which consists of multiple actuators, to be operated without removing any parts. In addition, it can show whether or not any DTCs are stored, and can detect potential malfunctions in the system. The system check can be performed with the GTS.
Connect the GTS to the DLC3.
Turn the ignition switch to ON.
Turn the GTS on.
Enter the following menus: Powertrain / Engine and ECT / Utility.
Perform the system check by referring to the table below.
| Tester Display | Test Part | Control Range | Diagnostic Notes |
|---|---|---|---|
| Secondary Air Injection Check
(Automatic Mode) |
Perform secondary air injection system operation automatically | With warm engine, ignition switch turned off once | ·
If there are no pending DTCs after performing this test, the system is functioning normally. ·
Refer to the inspection procedure for secondary air injection system DTCs. ·
When performing air injection check operation after the battery cable is reconnected, wait for 7 minutes with the ignition switch to ON or the engine running. ·
Turn the ignition switch off when the system check is finished. |
| Secondary Air Injection Check
(Manual Mode) |
Perform 3 operations in order to operate secondary air injection system monitor manually | With warm engine, ignition switch turned off once | ·
Used to detect malfunctioning parts. ·
Refer to the inspection procedure for secondary air injection system DTCs. ·
When performing the air injection check operation after the battery cable is reconnected, wait for 7 minutes with the ignition switch to ON or the engine running. ·
Turn the ignition switch off when the system check is finished. |