DOOR LOCK POWER DOOR LOCK CONTROL SYSTEM Collision Door Lock Release Function does not Operate
DESCRIPTION
When an impact is detected, a relay inside the door control battery is operated to switch the power source of the door lock with motor assemblies from the vehicle battery to the door control battery.
WIRING DIAGRAM
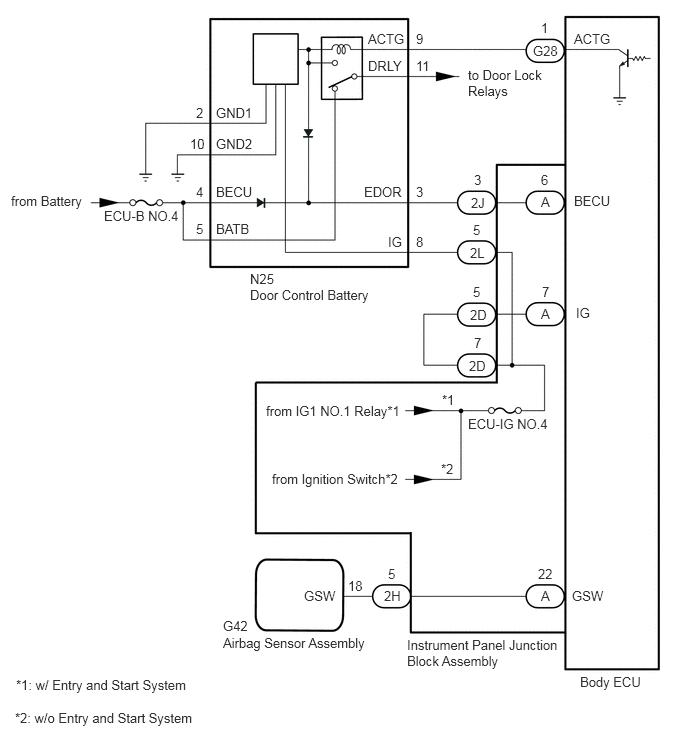
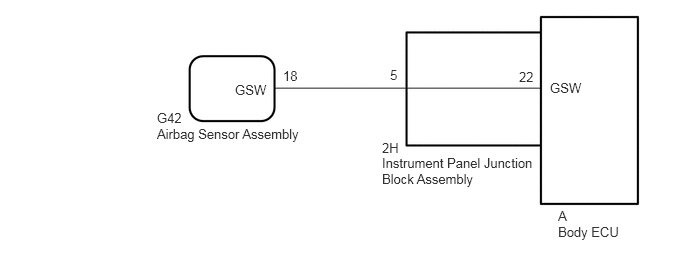
CAUTION / NOTICE / HINT
- NOTICE:
- ·
Inspect the fuses for circuits related to this system before performing the following procedure.
·If the body ECU has been replaced, it is necessary to initialize the body ECU.*1
Click hereGeneral>INTRODUCTION>REPAIR INSTRUCTION>INITIALIZATION
·As the door control battery is installed between the vehicle battery and body ECU, first perform the inspections to confirm that there are no malfunctions in the power source circuit for the body ECU before performing this troubleshooting procedure.*2
Click hereVehicle Interior>DOOR LOCK>POWER DOOR LOCK CONTROL SYSTEM>PRECAUTION
·After turning the ignition switch off, waiting time may be required before disconnecting the cable from the negative (-) battery terminal. Therefore, make sure to read the disconnecting the cable from the negative (-) battery terminal notices before proceeding with work.
Click hereGeneral>INTRODUCTION>REPAIR INSTRUCTION>PRECAUTION
·When disconnecting the cable from the negative (-) battery terminal while performing repairs, some systems need to be initialized after the cable is reconnected.
Click hereGeneral>INTRODUCTION>REPAIR INSTRUCTION>INITIALIZATION
·If the airbag sensor assembly is replaced, refer to the Airbag System.
for Type A:Vehicle Interior>SUPPLEMENTAL RESTRAINT SYSTEMS>AIRBAG SYSTEM(for Type A)>PRECAUTION
for Type B:Vehicle Interior>SUPPLEMENTAL RESTRAINT SYSTEMS>AIRBAG SYSTEM(for Type B)>PRECAUTION
*1: w/ Automatic Light Control System
*2: w/ Door Control Battery
PROCEDURE
Check vehicle condition.
- Result:
Result Proceed to w/ Door Control Battery A w/o Door Control Battery B
A
B
Check door lock operation.
Click hereVehicle Interior>DOOR LOCK>POWER DOOR LOCK CONTROL SYSTEM>OPERATION CHECK
- OK:
All doors lock and unlock normally.
- Result:
Proceed to OK NG
OK
NG
Remove the door control battery.
Click hereVehicle Interior>DOOR LOCK>DOOR CONTROL BATTERY>REMOVAL
Inspect the door control battery.
Click hereVehicle Interior>DOOR LOCK>DOOR CONTROL BATTERY>INSPECTION
- Result:
Proceed to OK NG
OK
NG
Disconnect the G28 body ECU connector.
Disconnect the N25 door control battery connector.
Measure the resistance according to the value(s) in the table below.
- Standard Resistance:
Tester Connection Condition Specified Condition G28-1 (ACTG) - N25-9 (ACTG) Always Below 1 Ω G28-1 (ACTG) or N25-9 (ACTG) - Body ground Always 10 kΩ or higher
- Result:
Proceed to OK NG
OK
NG
Disconnect the N25 door control battery connector.
Disconnect the 2L instrument panel junction block assembly connector.
Measure the resistance according to the value(s) in the table below.
- Standard Resistance:
Tester Connection Condition Specified Condition N25-8 (IG) - 2L-5 Always Below 1 Ω N25-8 (IG) or 2L-5 - Body ground Always 10 kΩ or higher
- Result:
Proceed to OK NG
OK
NG
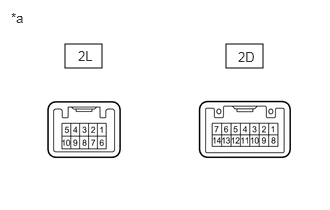
| *a | Component without harness connected
(Instrument Panel Junction Block Assembly) |
Remove the instrument panel junction block assembly.
for LHD:Power Source / Network>POWER DISTRIBUTION>MAIN BODY ECU(for LHD)>REMOVAL
for RHD:Power Source / Network>POWER DISTRIBUTION>MAIN BODY ECU(for RHD)>REMOVAL
Remove the body ECU from the instrument panel junction block assembly.
for LHD:Power Source / Network>POWER DISTRIBUTION>MAIN BODY ECU(for LHD)>REMOVAL
for RHD:Power Source / Network>POWER DISTRIBUTION>MAIN BODY ECU(for RHD)>REMOVAL
Measure the resistance according to the value(s) in the table below.
- Standard Resistance:
Tester Connection Condition Specified Condition 2D-7 - 2L-5 Always Below 1 Ω
- Result:
Proceed to OK NG
OK
NG
for LHD:Power Source / Network>POWER DISTRIBUTION>MAIN BODY ECU(for LHD)>REMOVAL
for RHD:Power Source / Network>POWER DISTRIBUTION>MAIN BODY ECU(for RHD)>REMOVAL
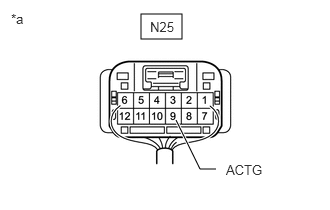
| *a | Rear view of wire harness connector
(to Door Control Battery) |
Measure the voltage according to the value(s) in the table below.
- HINT:
- ·
After the ignition switch is turned off, the door control battery is discharged in at most 30 minutes. The discharge time may be shortened depending on the amount of door control battery charge.
·After the ignition switch is turned ON, the door control battery is charged in at most 90 minutes. The charging time may be shortened depending on the amount of door control battery charge.
- Standard Voltage:
Tester Connection Switch Condition Specified Condition N25-9 (ACTG) - Body ground Door control battery not charged Below 2 V Door control battery charging or charged 7.3 to 9.9 V
- Result:
Proceed to OK NG
OK
NG
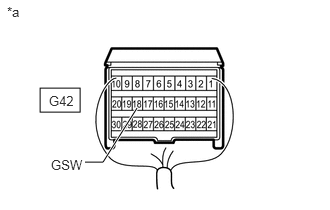
| *a | Rear view of wire harness connector
(to Airbag Sensor Assembly) |
Disconnect the cable from the negative (-) battery terminal.
- CAUTION:
-
Wait at least 90 seconds after disconnecting the cable from the negative (-) battery terminal to disable the SRS system.
- NOTICE:
-
Turning the ignition switch to ON with the airbag sensor assembly connector disconnected causes other DTCs to be stored. Clear the DTCs after performing this inspection.
Disconnect the airbag sensor assembly connector.
for Type A:Vehicle Interior>SUPPLEMENTAL RESTRAINT SYSTEMS>AIRBAG SYSTEM(for Type A)>PRECAUTION
for Type B:Vehicle Interior>SUPPLEMENTAL RESTRAINT SYSTEMS>AIRBAG SYSTEM(for Type B)>PRECAUTION
Connect the cable to the negative (-) battery terminal.
Measure the voltage according to the value(s) in the table below.
- Standard Voltage:
Tester Connection Switch Condition Specified Condition G42-18 (GSW) - Body ground Ignition switch ON 2.8 to 4.3 V
- Result:
Proceed to OK NG
OK
NG
Disconnect the cable from the negative (-) battery terminal.
- CAUTION:
-
Wait at least 90 seconds after disconnecting the cable from the negative (-) battery terminal to disable the SRS system.
- NOTICE:
-
Turning the ignition switch to ON with the airbag sensor assembly connector disconnected causes other DTCs to be stored. Clear the DTCs after performing this inspection.
Disconnect the 2H instrument panel junction block assembly connector.
Disconnect the G42 airbag sensor assembly connector.
for Type A:Vehicle Interior>SUPPLEMENTAL RESTRAINT SYSTEMS>AIRBAG SYSTEM(for Type A)>PRECAUTION
for Type B:Vehicle Interior>SUPPLEMENTAL RESTRAINT SYSTEMS>AIRBAG SYSTEM(for Type B)>PRECAUTION
Measure the resistance according to the value(s) in the table below.
- Standard Resistance:
Tester Connection Condition Specified Condition 2H-5 - G42-18 (GSW) Always Below 1 Ω 2H-5 or G42-18 (GSW) - Body ground Always 10 kΩ or higher
- Result:
Proceed to OK NG
OK
NG
Remove the instrument panel junction block assembly.
for LHD:Power Source / Network>POWER DISTRIBUTION>MAIN BODY ECU(for LHD)>REMOVAL
for RHD:Power Source / Network>POWER DISTRIBUTION>MAIN BODY ECU(for RHD)>REMOVAL
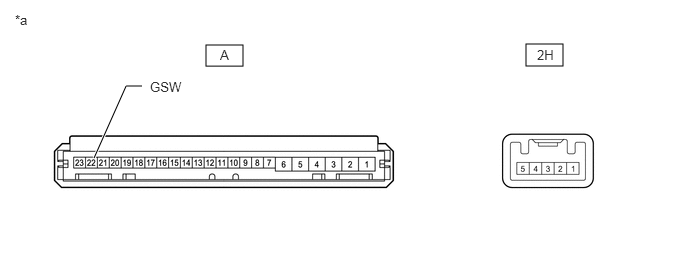
| *a | Component without harness connected
(Instrument Panel Junction Block Assembly) |
- | - |
Remove the body ECU from the instrument panel junction block assembly.
for LHD:Power Source / Network>POWER DISTRIBUTION>MAIN BODY ECU(for LHD)>REMOVAL
for RHD:Power Source / Network>POWER DISTRIBUTION>MAIN BODY ECU(for RHD)>REMOVAL
Measure the resistance according to the value(s) in the table below.
- Standard Resistance:
Tester Connection Condition Specified Condition A-22 (GSW) - 2H-5 Always Below 1 Ω
- Result:
Proceed to OK NG
OK
for LHD:Power Source / Network>POWER DISTRIBUTION>MAIN BODY ECU(for LHD)>REMOVAL
for RHD:Power Source / Network>POWER DISTRIBUTION>MAIN BODY ECU(for RHD)>REMOVAL
NG
for LHD:Power Source / Network>POWER DISTRIBUTION>MAIN BODY ECU(for LHD)>REMOVAL
for RHD:Power Source / Network>POWER DISTRIBUTION>MAIN BODY ECU(for RHD)>REMOVAL