SEAT BELT REAR SEAT OUTER BELT ASSEMBLY(for Double Cab) INSTALLATION
CAUTION / NOTICE / HINT
- HINT:
- ·
Use the same procedure for the RH and LH sides.
·The procedure listed below is for the LH side.
·A bolt without a torque specification is shown in the standard bolt chart.
Click hereGeneral>SPECIFICATIONS>STANDARD BOLT>SPECIFIED TORQUE FOR STANDARD BOLTS
PROCEDURE

 73370C
1.INSTALL REAR NO. 1 SEAT OUTER BELT ASSEMBLY LH
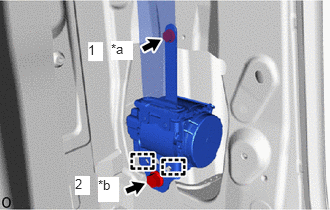
| *a | Bolt A |
| *b | Bolt B |
Attach the 2 guides and temporarily install the rear No. 1 seat outer belt assembly LH with the 2 bolts.
Tighten the 2 bolts in the order shown in the illustration.
- Torque:
- for Bolt A : 12.5 N*m (127 kgf*cm, 9 ft.*lbf)
- for Bolt B : 42.0 N*m (428 kgf*cm, 31 ft.*lbf)
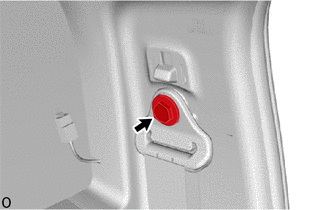
Connect the shoulder anchor of the rear No. 1 seat outer belt assembly LH with the bolt.
- Torque:
- 42 N*m (428 kgf*cm, 31 ft.*lbf)
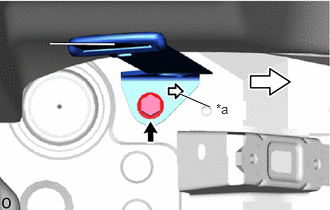
| *a | Mark |

|
Front |
Install the bolt and connect the floor anchor of the rear No. 1 seat outer belt assembly LH as shown in the illustration.
- Torque:
- 42 N*m (428 kgf*cm, 31 ft.*lbf)
Check that the ELR locks.
- NOTICE:
-
The check should be performed with the rear No. 1 seat outer belt assembly LH installed.
With the belt assembly installed, check that the belt locks when it is pulled out quickly.
62514A
2.INSTALL LOWER QUARTER TRIM PANEL LH
73178B
3.INSTALL SEAT BELT ANCHOR COVER CAP
67914B
4.INSTALL FRONT DOOR SCUFF PLATE LH
5.INSTALL REAR SEAT ASSEMBLY
for Seat Cushion 60/40 Split Type:
Click hereVehicle Interior>SEAT>REAR SEAT ASSEMBLY(for Seat Cushion 60/40 Split Type)>INSTALLATION
for Seat Cushion Bench Type:
Click hereVehicle Interior>SEAT>REAR SEAT ASSEMBLY(for Seat Cushion Bench Type)>INSTALLATION