WINDOW / GLASS BACK WINDOW GLASS(for Double Cab) INSTALLATION
CAUTION / NOTICE / HINT
- HINT:
-
A bolt without a torque specification is shown in the standard bolt chart.
-
Click hereGeneral>SPECIFICATIONS>STANDARD BOLT>SPECIFIED TORQUE FOR STANDARD BOLTS
PROCEDURE

 64810
1.CLEAN BACK WINDOW ASSEMBLY
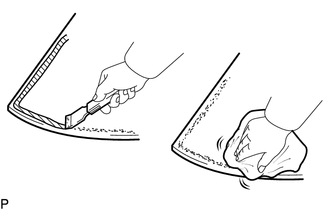
When reusing the back window assembly:
Using a scraper, remove the spacers, clips, adhesive dam, moulding, adhesive and double-sided tape sticking to the back window assembly.
- NOTICE:
-
Do not damage the windshield glass.
Clean the outer edges of the back window assembly with non-residue solvent.
- NOTICE:
-
Even if using a new back window assembly, clean it with non-residue solvent.
64818
2.INSTALL BACK WINDOW GLASS SPACER
- HINT:
-
Perform this procedure when reusing a back window assembly.
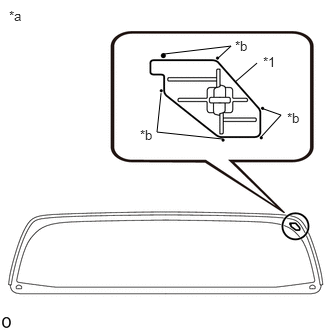
| *1 | Back Window Glass Spacer |
| *a | Back Side of Back Window Assembly |
| *b | Ceramic Notch |
Apply Primer G to the back window glass spacer installation area on the back window assembly.
- NOTICE:
- ·
Allow the primer to dry for 3 minutes or more.
·Throw away any leftover primer.
·Do not apply too much primer.
Remove the peeling paper and install a new back window glass spacer.
Install the back window glass spacer to the back window assembly in the location shown in the illustration.
- NOTICE:
-
Install the back window glass spacer after Primer G has been allowed to dry (approximately 3 min).
64819A
3.INSTALL NO. 2 BACK WINDOW GLASS SPACER
- HINT:
-
Perform this procedure when reusing a back window assembly.
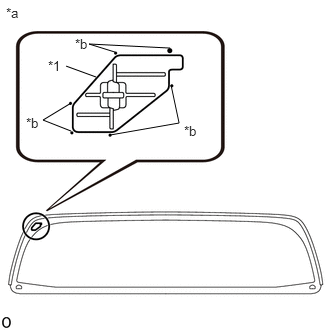
| *1 | No. 2 Back Window Glass Spacer |
| *a | Back Side of Back Window Assembly |
| *b | Ceramic Notch |
Apply Primer G to the No. 2 back window glass spacer installation area on the back window assembly.
- NOTICE:
- ·
Allow the primer to dry for 3 minutes or more.
·Throw away any leftover primer.
·Do not apply too much primer.
Remove the peeling paper and install a new No. 2 back window glass spacer.
Install the No. 2 back window glass spacer to the back window assembly in the location shown in the illustration.
- NOTICE:
-
Install the No. 2 back window glass spacer after Primer G has been allowed to dry (approximately 3 min).
64827D
4.INSTALL BACK WINDOW GLASS CLIP
- HINT:
-
Perform this procedure when reusing a back window assembly.
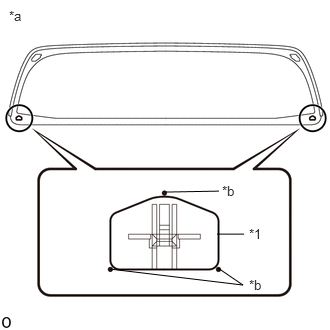
| *1 | Back Window Glass Clip |
| *a | Back Side of Back Window Assembly |
| *b | Ceramic Notch |
Apply Primer G to the back window glass clip installation area on the back window assembly.
- NOTICE:
- ·
Allow the primer to dry for 3 minutes or more.
·Throw away any leftover primer.
·Do not apply too much primer.
Remove the peeling paper and install the 2 new back window glass clips.
Install the back window glass clips to the back window assembly in the location shown in the illustration.
- NOTICE:
-
Install the back window glass clips. after Primer G has been allowed to dry (approximately 3 min).
75571G
5.INSTALL NO. 1 BACK WINDOW MOULDING
- HINT:
-
Perform this procedure when reusing a back window assembly.
Apply Primer G to the No. 1 back window moulding installation area on the back window assembly.
- NOTICE:
- ·
Allow the primer to dry for 3 minutes or more.
·Throw away any leftover primer.
·Do not apply too much primer.
Remove the peeling paper and install a new No. 1 back window moulding.
Install the No. 1 back window moulding to the back window assembly in the location shown in the illustration.
- NOTICE:
-
Install the No. 1 back window moulding after Primer G has been allowed to dry (approximately 3 min).
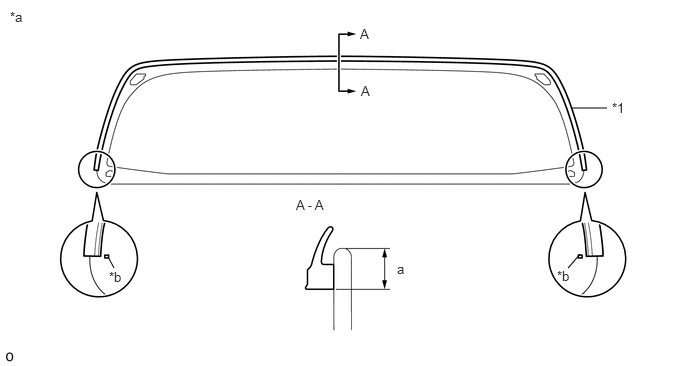
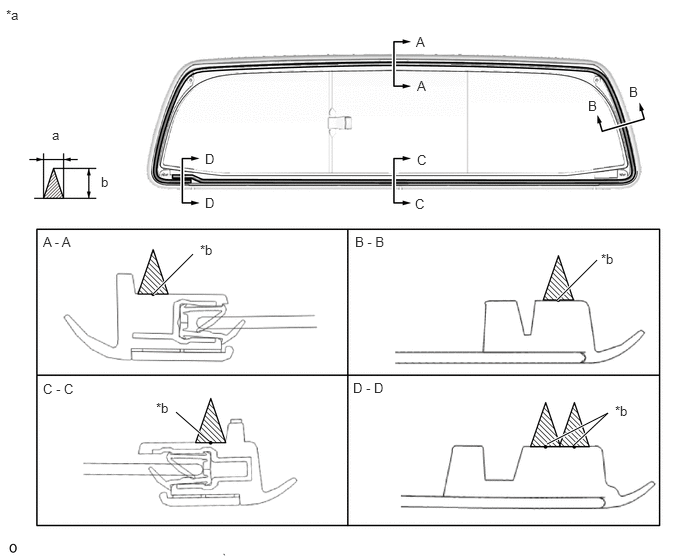
| *1 | No. 1 Back Window Moulding | - | - |
| *a | Back Side of Back Window Assembly | *b | Ceramic Notch |
- Standard:
Area Measurement a 8.3 mm (0.327 in.)
56117A
6.INSTALL WINDOW GLASS ADHESIVE DAM
Apply Primer G to the window glass adhesive dam installation area on the back window assembly.
- NOTICE:
- ·
Allow the primer to dry for 3 minutes or more.
·Throw away any leftover primer.
·Do not apply too much primer.
Remove the peeling paper and install a new window glass adhesive dam.
Install the window glass adhesive dam to the back window assembly in the location shown in the illustration.
- NOTICE:
-
Install the window glass adhesive dam after Primer G has been allowed to dry (approximately 3 min).
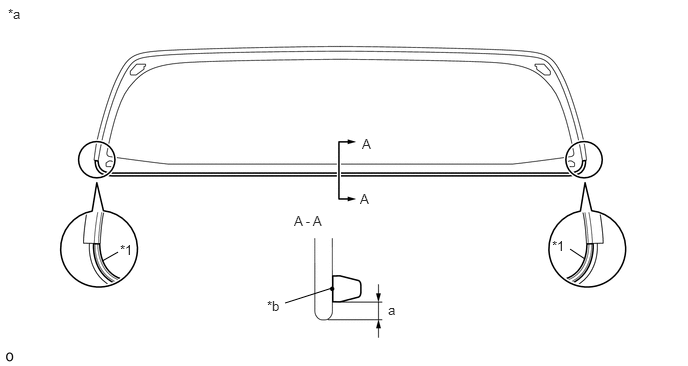
| *1 | Window Glass Adhesive Dam | - | - |
| *a | Back Side of Back Window Assembly | *b | Dam Reference Line |
- Standard:
Area Measurement a 3.3 mm (0.130 in.)
64810
7.INSTALL BACK WINDOW ASSEMBLY (for Fixed Type)
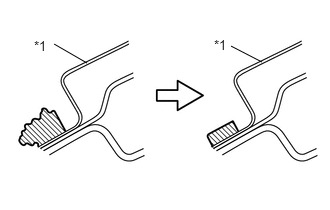
| *1 | Vehicle Body |

|
Adhesive |
Clean and shape the contact surface of the vehicle body.
On the contact surface of the vehicle body, use a knife to cut away excess adhesive as shown in the illustration.
- HINT:
-
Leave as much adhesive on the vehicle body as possible.
- NOTICE:
-
Be careful not to damage the vehicle body.
Clean the contact surface of the vehicle body with cleaner.
- HINT:
-
Even if all the adhesive has been removed, clean the vehicle body.
Back window assembly preliminary installation procedures.
Install the suction cups to the back window assembly.
Temporarily place the back window assembly onto the vehicle body and set it so that the gap between the body and the upper portion and sides of the back window assembly is even.
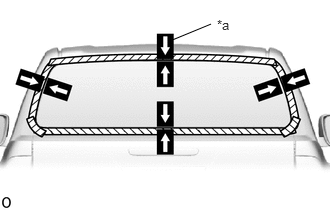
| *a | Matchmarks |
Place adhesive tape on the back window assembly and body panel and use a pen to place matchmarks for installation (when using a new back window assembly).
- HINT:
-
When reusing a back window assembly, check the position of the matchmarks and make adjustments.
Remove the back window assembly.
Apply Primer M to the exposed panel surface of the body panel.
- NOTICE:
- ·
Do not apply too much Primer M.
·Do not apply Primer M to the adhesive.
·Be careful when applying primer to the panel joints and spot welds.
Apply Primer G to the back window assembly in the locations shown in the illustration.
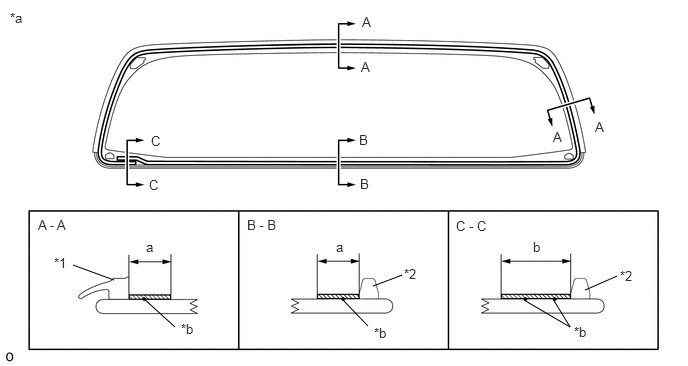
| *1 | No. 1 Back Window Moulding | *2 | Window Glass Adhesive Dam |
| *a | Back Side of Back Window Assembly | *b | Adhesive Application Center Line |
|
|
Primer G Application Area | - | - |
- Standard:
Area Measurement a 11.0 mm (0.433 in.) b 19.0 mm (0.748 in.)
- HINT:
-
If primer is applied to an area that is not specified, wipe off the primer with non-residue solvent before it dries.
- NOTICE:
- ·
Allow the primer G to dry for 3 minutes or more.
·Throw away any leftover primer G.
·Do not apply too much primer G.
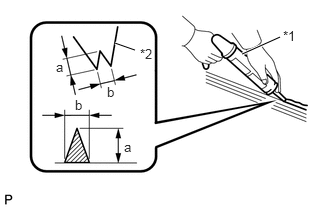
| *1 | Sealer Gun |
| *2 | Nozzle |
Cut off the tip of a cartridge nozzle as shown in the illustration.
- Standard:
Area Measurement a 12.0 mm (0.472 in.) b 8.0 mm (0.315 in.)
- Adhesive:
Toyota Genuine Windshield Glass Adhesive or equivalent
- HINT:
-
After cutting off the tip, use all adhesive within the time written in the table below.
- Usage Time Frame:
Temperature Usage Time Frame 35°C (95°F) 15 minutes 20°C (68°F) 1 hour 40 minutes 5°C (41°F) 8 hours
Apply a bead of adhesive to the location shown in the illustration.
- NOTICE:
-
Apply the adhesive after Primer G has been allowed to dry (approximately 3 min).
Load a sealer gun with the cartridge.
Apply a bead of adhesive to the location shown in the illustration.
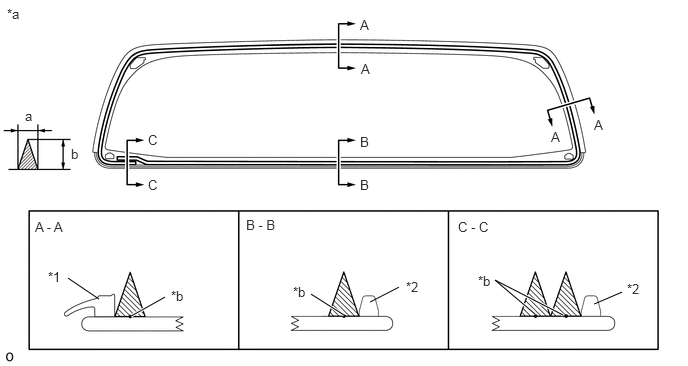
| *1 | No. 1 Back Window Moulding | *2 | Window Glass Adhesive Dam |
| *a | Back Side of Back Window Assembly | *b | Adhesive Application Center Line |
|
|
Adhesive | - | - |
- Standard:
Area Measurement a 8.0 mm (0.315 in.) b 12.0 mm (0.472 in.)
- NOTICE:
- ·
Allow the primer coating to dry for 3 minutes or more.
·Check that the clips are attached to the vehicle body correctly.
·Check the clearance between the vehicle body and glass.
Install the back window assembly.
| *a | Matchmarks |
Using suction cups, position the back window assembly so that the matchmarks are aligned and install the back window assembly.
- NOTICE:
-
Install the back window assembly after Primer M on the body panel has been allowed to dry (approximately 3 min).
Lightly press the back window assembly from outside the vehicle so that it is securely fit to the vehicle body.
- HINT:
-
Press the glass with a force of 98 N (10 kgf, 22 lbf) or more.
Using a scraper, remove any excess adhesive or apply as necessary.
- HINT:
-
Apply adhesive up to the edge of the back window assembly.
- NOTICE:
-
Do not drive the vehicle within the time written in the table below.
- Minimum Time:
Temperature Minimum Time Prior to Driving Vehicle 35°C (95°F) 1 hour 30 minutes 20°C (68°F) 5 hours 5°C (41°F) 24 hours
Remove any excess adhesive before it hardens.
Hold the back window assembly in place securely with protective tape or equivalent until the adhesive hardens.
w/ Defogger:
Connect the back window defogger connector.
64810
8.INSTALL BACK WINDOW ASSEMBLY (for Slide Type)
| *1 | Vehicle Body |
|
|
Adhesive |
Clean and shape the contact surface of the vehicle body.
On the contact surface of the vehicle body, use a knife to cut away excess adhesive as shown in the illustration.
- HINT:
-
Leave as much adhesive on the vehicle body as possible.
- NOTICE:
-
Be careful not to damage the vehicle body.
Clean the contact surface of the vehicle body with cleaner.
- HINT:
-
Even if all the adhesive has been removed, clean the vehicle body.
Back window assembly preliminary installation procedures.
Install the suction cups to the new back window assembly.
Temporarily place the back window assembly onto the vehicle body and set it so that the gap between the body and the upper portion and sides of the back window assembly is even.
| *a | Matchmarks |
Place adhesive tape on the back window assembly and body panel and use a pen to place matchmarks for installation.
- HINT:
-
When reusing a back window assembly, check the position of the matchmarks and make adjustments.
Remove the back window assembly.
Apply Primer M to the exposed panel surface of the body panel.
- NOTICE:
- ·
Do not apply too much Primer M.
·Do not apply Primer M to the adhesive.
·Be careful when applying primer to the panel joints and spot welds.
Apply Primer G to the back window assembly in the locations shown in the illustration.
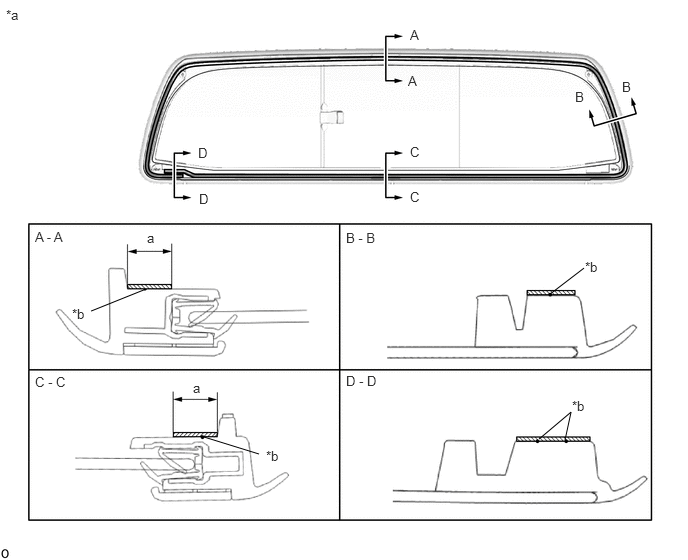
| *a | Back Side of Back Window Assembly | *b | Adhesive Application Center Line |
|
|
Primer G Application Area | - | - |
- Standard:
Area Measurement a 11.0 mm (0.433 in.)
- HINT:
-
If primer is applied to an area that is not specified, wipe off the primer with non-residue solvent before it dries.
- NOTICE:
- ·
Allow the primer G to dry for 3 minutes or more.
·Throw away any leftover primer G.
·Do not apply too much primer G.
| *1 | Sealer Gun |
| *2 | Nozzle |
Cut off the tip of a cartridge nozzle as shown in the illustration.
- Standard:
Area Measurement a 12.0 mm (0.472 in.) b 8.0 mm (0.315 in.)
- Adhesive:
Toyota Genuine Windshield Glass Adhesive or equivalent
- HINT:
-
After cutting off the tip, use all adhesive within the time written in the table below.
- Usage Time Frame:
Temperature Usage Time Frame 35°C (95°F) 15 minutes 20°C (68°F) 1 hour 40 minutes 5°C (41°F) 8 hours
Apply a bead of adhesive to the location shown in the illustration.
- NOTICE:
-
Apply the adhesive after Primer G has been allowed to dry (approximately 3 min).
Load a sealer gun with the cartridge.
Apply a bead of adhesive to the location shown in the illustration.
| *a | Back Side of Back Window Assembly | *b | Adhesive Application Center Line |
|
|
Adhesive | - | - |
- Standard:
Area Measurement a 8.0 mm (0.315 in.) b 12.0 mm (0.472 in.)
- NOTICE:
- ·
Allow the primer coating to dry for 3 minutes or more.
·Check that the clips are attached to the vehicle body correctly.
·Check the clearance between the vehicle body and glass.
Install the back window assembly.
| *a | Matchmarks |
Using suction cups, position the back window assembly so that the matchmarks are aligned and install the back window assembly.
- NOTICE:
-
Install the back window assembly after Primer M on the body panel has been allowed to dry (approximately 3 min).
Lightly press the back window assembly from outside the vehicle so that it is securely fit to the vehicle body.
- HINT:
-
Press the glass with a force of 98 N (10 kgf, 22 lbf) or more.
Using a scraper, remove any excess adhesive or apply as necessary.
- HINT:
-
Apply adhesive up to the edge of the back window assembly.
- NOTICE:
-
Do not drive the vehicle within the time written in the table below.
- Minimum Time:
Temperature Minimum Time Prior to Driving Vehicle 35°C (95°F) 1 hour 30 minutes 20°C (68°F) 5 hours 5°C (41°F) 24 hours
Remove any excess adhesive before it hardens.
Hold the back window assembly in place securely with protective tape or equivalent until the adhesive hardens.
64810
9.CHECK FOR LEAKS AND REPAIR
Conduct a leak test after the adhesive has completely hardened.
Seal any leaks with auto glass sealer.
63310
10.INSTALL ROOF HEADLINING ASSEMBLY
74605A
11.INSTALL COAT HOOK SUB-ASSEMBLY
74610A
12.INSTALL ASSIST GRIP SUB-ASSEMBLY
62512
13.INSTALL QUARTER INSIDE TRIM BOARD LH
62511
14.INSTALL QUARTER INSIDE TRIM BOARD RH
73178B
15.INSTALL SEAT BELT ANCHOR COVER CAP
62514A
16.INSTALL LOWER QUARTER TRIM PANEL LH
62513A
17.INSTALL LOWER QUARTER TRIM PANEL RH
64261C
18.INSTALL UPPER BACK PANEL GARNISH
73709
19.INSTALL TETHER ANCHOR BRACKET SUB-ASSEMBLY
71397B
20.INSTALL REAR SEATBACK HOLDER
67918E
21.INSTALL REAR DOOR SCUFF PLATE LH
67917C
22.INSTALL REAR DOOR SCUFF PLATE RH
23.INSTALL REAR SEAT ASSEMBLY
for Seat Cushion 60/40 Split Type:
Click hereVehicle Interior>SEAT>REAR SEAT ASSEMBLY(for Seat Cushion 60/40 Split Type)>INSTALLATION
for Seat Cushion Bench Type:
Click hereVehicle Interior>SEAT>REAR SEAT ASSEMBLY(for Seat Cushion Bench Type)>INSTALLATION