2KD-FTV INTAKE / EXHAUST INTAKE MANIFOLD INSTALLATION
CAUTION / NOTICE / HINT
- NOTICE:
- ·
When replacing the parts in the following chart (A), replace the No. 1 injection pipe sub-assembly, No. 2 injection pipe sub-assembly, No. 3 injection pipe sub-assembly, No. 4 injection pipe sub-assembly and/or fuel inlet pipe sub-assembly with new ones.
Replaced Parts (A) Pipes Requiring New Replacement ·Injector assembly (including shuffling the injector assemblies between the cylinders)
·Common rail assembly
·Cylinder head sub-assembly
·No. 1 injection pipe sub-assembly
·No. 2 injection pipe sub-assembly
·No. 3 injection pipe sub-assembly
·No. 4 injection pipe sub-assembly
·Supply pump assembly
·Common rail assembly
·Cylinder block sub-assembly
·Cylinder head sub-assembly
·Cylinder head gasket
·Timing Gear Case Assembly
Fuel inlet pipe sub-assembly
·After removing the No. 1 injection pipe sub-assembly, No. 2 injection pipe sub-assembly, No. 3 injection pipe sub-assembly, No. 4 injection pipe sub-assembly and fuel inlet pipe sub-assembly, clean them with a brush and compressed air.
PROCEDURE

 17111
1.INSTALL INTAKE MANIFOLD
Install a new gasket to the cylinder head sub-assembly.
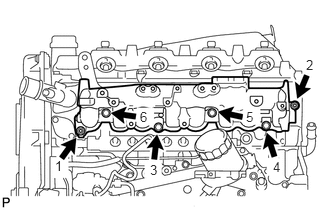
Temporarily install the intake manifold with the 4 bolts 2 nuts.
Tighten the 4 bolts and 2 nuts in the order shown in the illustration.
- Torque:
- 29 N*m (296 kgf*cm, 21 ft.*lbf)
23770
2.INSTALL NO. 2 NOZZLE LEAKAGE PIPE ASSEMBLY
23704
3.INSTALL NO. 4 INJECTION PIPE SUB-ASSEMBLY
23701
4.INSTALL NO. 1, NO. 2 AND NO. 3 INJECTION PIPE SUB-ASSEMBLY
17861F
5.INSTALL INTAKE AIR CONNECTOR
Install a new gasket and the intake air connector to the intake manifold with the 2 nuts and bolt.
- Torque:
- 20 N*m (204 kgf*cm, 15 ft.*lbf)
17873A
6.INSTALL NO. 2 INTAKE AIR CONNECTOR BRACKET
Install the No. 2 intake air connector bracket to the cylinder head sub-assembly and intake manifold with the 3 bolts.
- Torque:
- 20 N*m (204 kgf*cm, 15 ft.*lbf)
25861C
7.INSTALL VACUUM SWITCHING VALVE BRACKET
Install the vacuum switching valve bracket with the 2 bolts.
- Torque:
- 20 N*m (204 kgf*cm, 15 ft.*lbf)
11452
8.INSTALL ENGINE OIL LEVEL DIPSTICK GUIDE
Apply a small amount of clean engine oil to the O-ring.
Install a new O-ring to the engine oil level dipstick guide.
Install the engine oil level dipstick guide with the bolt.
- Torque:
- 8.0 N*m (82 kgf*cm, 71 in.*lbf)
Install the injection pipe clamp with the bolt.
- Torque:
- 5.0 N*m (51 kgf*cm, 44 in.*lbf)
Install the engine oil level dipstick.
17118
9.INSTALL MANIFOLD STAY
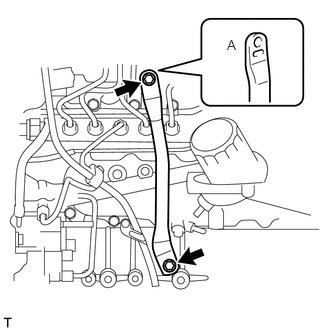
Install the manifold stay to the intake manifold and cylinder block sub-assembly with the 2 bolts.
- Torque:
- 19 N*m (194 kgf*cm, 14 ft.*lbf)
- HINT:
-
The manifold stay indented area (labeled A) must face the intake manifold.
26100G
10.INSTALL DIESEL THROTTLE BODY ASSEMBLY
11.CONNECT CABLE TO NEGATIVE BATTERY TERMINAL
- NOTICE:
-
When disconnecting the cable, some systems need to be initialized after the cable is reconnected.
-
Click hereGeneral>INTRODUCTION>REPAIR INSTRUCTION>INITIALIZATION
12.BLEED AIR FROM FUEL SYSTEM
13.INSPECT FOR FUEL LEAK
14.INSPECT FOR OIL LEAK
15.INSPECT ENGINE OIL LEVEL