1KD-FTV LUBRICATION ENGINE OIL COOLER REMOVAL
CAUTION / NOTICE / HINT
The necessary procedures (adjustment, calibration, initialization, or registration) that must be performed after parts are removed, installed, or replaced during the oil cooler assembly removal/installation are shown below.
| Replacement Part or Procedure | Necessary Procedures | Effects/Inoperative when not Performed | Link |
|---|---|---|---|
| Replacement of fuel supply pump assembly | Supply Pump Initialization | Engine startability | ( ) |
| Replacement of injector assembly | ·
Injector compensation code registration ·
Pilot quantity learning |
Engine starting | ()
|
- NOTICE:
- ·
When replacing the parts in the following chart (A), replace the No. 1 injection pipe sub-assembly, No. 2 injection pipe sub-assembly, No. 3 injection pipe sub-assembly, No. 4 injection pipe sub-assembly and/or fuel inlet pipe sub-assembly with new ones.
Replaced Parts (A) Pipes Requiring New Replacement ·Injector assembly (including shuffling the injector assemblies between the cylinders)
·Common rail assembly
·Cylinder head sub-assembly
·No. 1 injection pipe sub-assembly
·No. 2 injection pipe sub-assembly
·No. 3 injection pipe sub-assembly
·No. 4 injection pipe sub-assembly
·Supply pump assembly
·Common rail assembly
·Cylinder block sub-assembly
·Cylinder head sub-assembly
·Cylinder head gasket
·Timing Gear Case Assembly
Fuel inlet pipe sub-assembly
·After removing the No. 1 injection pipe sub-assembly, No. 2 injection pipe sub-assembly, No. 3 injection pipe sub-assembly, No. 4 injection pipe sub-assembly and fuel inlet pipe sub-assembly, clean them with a brush and compressed air.
PROCEDURE

 51410
1.REMOVE NO. 1 ENGINE UNDER COVER ASSEMBLY
2.DRAIN ENGINE COOLANT
3.DRAIN ENGINE OIL
22100
4.REMOVE FUEL SUPPLY PUMP ASSEMBLY
23810A
5.REMOVE COMMON RAIL ASSEMBLY
28100
6.REMOVE STARTER ASSEMBLY
15601
7.REMOVE OIL FILTER SUB-ASSEMBLY
15701C
8.REMOVE OIL COOLER COVER SUB-ASSEMBLY
Disconnect the connector from the engine oil pressure switch assembly.
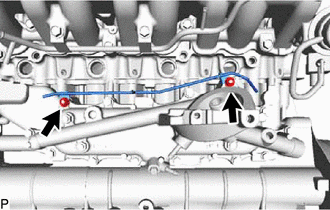
Remove the 2 nuts and disconnect the No. 2 vacuum transmitting pipe sub-assembly from the oil cooler cover sub-assembly.
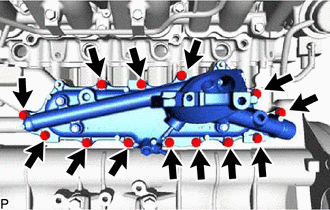
Remove the 13 bolts, oil cooler cover sub-assembly and gasket from the cylinder block sub-assembly.
15710
9.REMOVE OIL COOLER ASSEMBLY
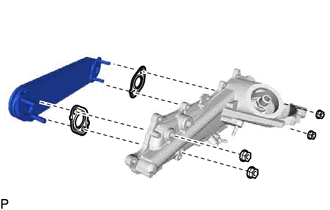
Loosen the 4 nuts.
Partially tap out the oil cooler assembly by tapping each nut head with a plastic-faced hammer.
Remove the 4 nuts, oil cooler assembly and 2 gaskets from the oil cooler cover sub-assembly.