RC60 / RC61 MANUAL TRANSMISSION / TRANSAXLE MANUAL TRANSMISSION UNIT DISASSEMBLY
PROCEDURE

 31230
1.REMOVE CLUTCH RELEASE BEARING ASSEMBLY
31236B
2.REMOVE RELEASE FORK SUPPORT
84210
3.REMOVE BACK-UP LIGHT SWITCH ASSEMBLY
4.REMOVE BACK-UP LIGHT SWITCH BRACKET
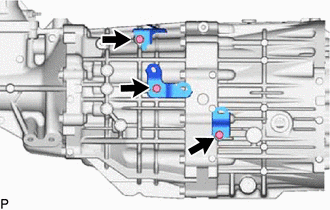
Remove the 3 bolts and back-up light switch brackets.
89413B
5.REMOVE TRANSMISSION REVOLUTION SENSOR (w/ Intelligent Manual Transmission Switch)
84545
6.REMOVE NEUTRAL POSITION SWITCH (w/ Stop And Start System)
33111A
7.REMOVE MANUAL TRANSMISSION CASE PLUG
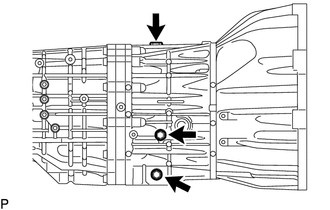
Remove the manual transmission filler plugs, drain plug sub-assembly and 2 gaskets from the manual transmission case sub-assembly.
Using a 10 mm hexagon wrench, remove the straight screw plug with head from the rear transmission case.
33275B
8.REMOVE SHAFT DETENT BALL
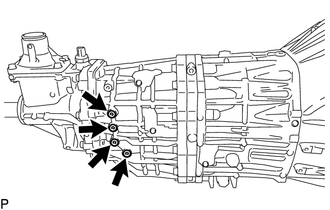
Using a 6 mm hexagon wrench, remove the 4 shift detent ball plugs from the rear transmission case.
Remove the 4 shift detent ball compression springs and 4 shift detent balls from the rear transmission case.
33292A
9.REMOVE LOCK BALL PIN
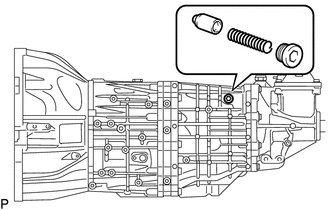
Using a 10 mm hexagon wrench, remove the No. 2 with head straight screw plug from the rear transmission case.
Remove the lock ball pin and shift and select lever spring from the rear transmission case.
33506F
10.REMOVE FLOOR SHIFT CONTROL SHIFT LEVER RETAINER SUB-ASSEMBLY
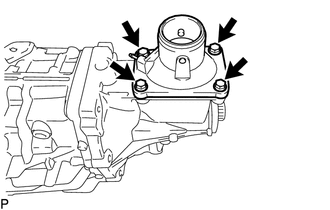
Remove the 4 bolts and then remove the floor shift control shift lever retainer sub-assembly and control shift lever retainer gasket from the extension housing sub-assembly.
33521
11.REMOVE SHIFT LEVER HOUSING
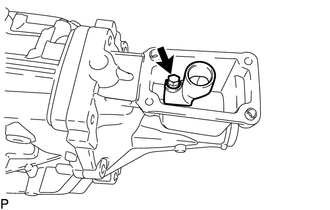
Remove the bolt and shift lever housing.
- NOTICE:
-
Do not damage the sealing surface of the control shift lever retainer sub-assembly
33103
12.REMOVE EXTENSION HOUSING SUB-ASSEMBLY
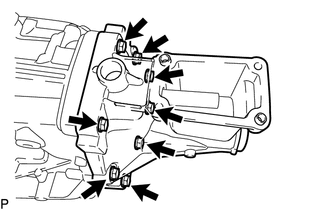
Remove the 8 bolts and extension housing sub-assembly.
33124M
13.REMOVE NO. 4 OIL RECEIVER PIPE
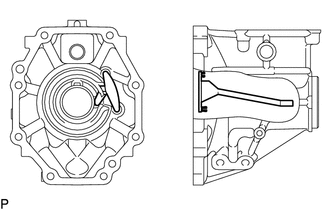
Remove the No. 4 oil receiver pipe from the extension housing sub-assembly.
33103R
14.REMOVE MANUAL TRANSMISSION EXTENSION HOUSING OIL SEAL
33176B
15.REMOVE TRANSMISSION OIL SEPARATOR
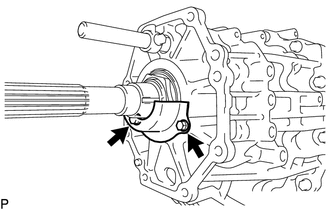
Remove the 2 bolts and transmission oil separator from the rear transmission case.
33127
16.REMOVE TRANSMISSION OIL RUNNER
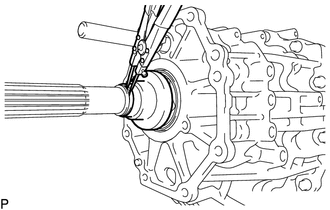
Using a snap ring expander, remove the snap ring from the output shaft sub-assembly.
Remove the transmission oil runner from the output shaft sub-assembly.
33321G
17.UNSTAKE MANUAL TRANSMISSION OUTPUT SHAFT REAR SET NUT
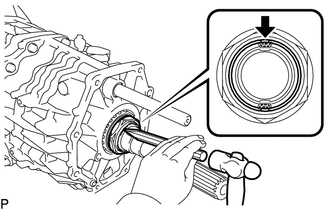
Using a chisel and hammer, unstake the manual transmission output shaft rear set nut.
33321G
18.REMOVE MANUAL TRANSMISSION OUTPUT SHAFT REAR SET NUT
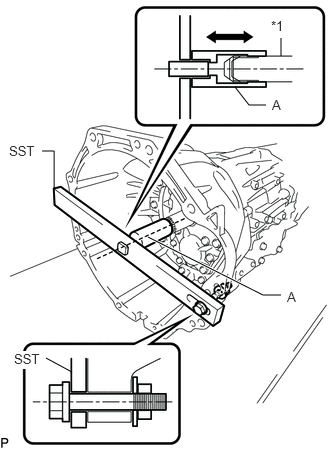
| *1 | Input Shaft |
Engage the gear, and then secure the input shaft using SST.
- SST
- 09322-35010 (09322-03010, 09322-03020, 09322-03030, 90105-12087, 90170-12030, 94622-51200)
- HINT:
- ·
Install SST securely so that the part labeled A is in-line with the input shaft.
·Make sure that the part labeled A moves back and forth by hand after installing SST.
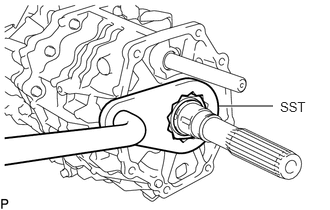
Using SST, remove the manual transmission output shaft rear set nut from the output shaft.
- SST
- 09326-35020
31111
19.REMOVE CLUTCH HOUSING
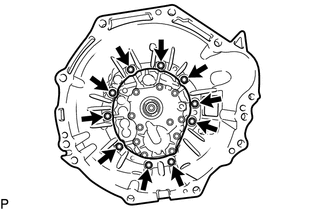
Remove the 10 bolts.
Using a plastic-faced hammer, carefully tap off the clutch housing to remove it.
33131D
20.REMOVE FRONT BEARING RETAINER
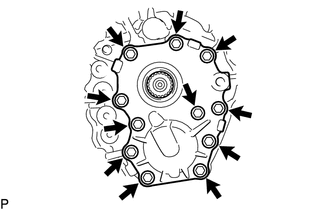
Remove the 11 bolts.
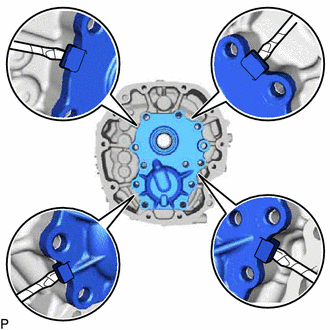
Using a screwdriver wrapped in protective tape, remove the front bearing retainer by prying the points in the illustration.
- NOTICE:
- ·
Do not damage the sealing surface of the clutch housing and manual transmission case sub-assembly.
·Do not damage the sealing surface of the front bearing retainer and manual transmission case sub-assembly.
33124C
21.REMOVE NO. 1 OIL RECEIVER PIPE
Remove the No. 1 oil receiver pipe from the front bearing retainer.
33131A
22.REMOVE FRONT TRANSMISSION BEARING RETAINER OIL SEAL
33411E
23.REMOVE COUNTER GEAR SHAFT NUT
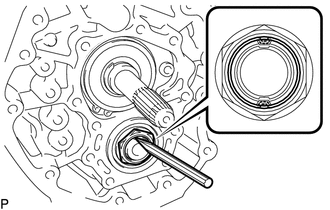
Using a chisel and hammer, unstake the counter gear shaft nut.
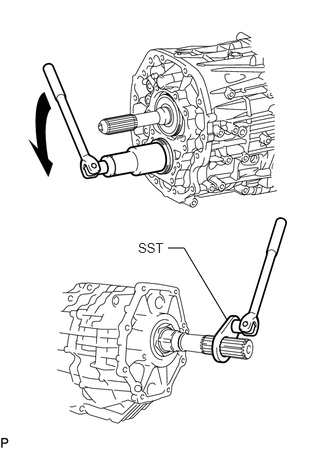
Using SST, hold the output shaft.
- SST
- 09326-35020
Using a 41 mm socket wrench, remove the counter gear shaft nut.
33311T
24.REMOVE INPUT SHAFT SHAFT SNAP RING
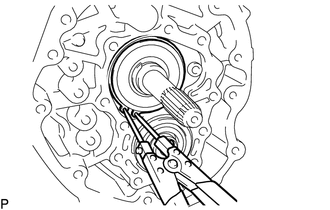
Using snap ring pliers, remove the input shaft shaft snap ring.
33311G
25.REMOVE FRONT BEARING SHAFT SNAP RING
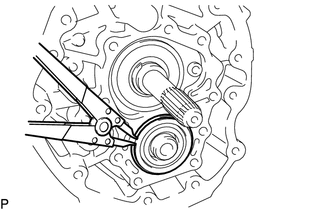
Using a snap ring expander, remove the front bearing shaft snap ring.
26.REMOVE REVERSE IDLER GEAR SHAFT BOLT
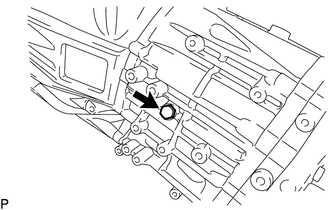
Remove the reverse idler gear shaft bolt and gasket from the reverse idler gear shaft.
33101
27.REMOVE MANUAL TRANSMISSION CASE SUB-ASSEMBLY
- CAUTION:
-
Since the manual transmission unit is very heavy, 2 people are needed to remove the manual transmission case sub-assembly.
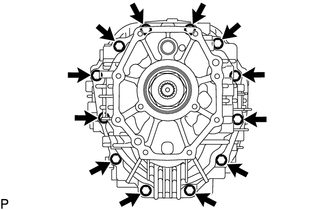
Remove the 12 bolts.
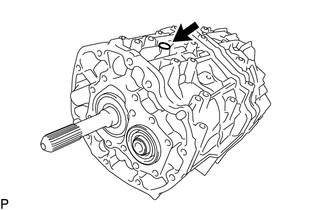
In order to prevent the reverse idler gear from falling when removing the transmission case, set the manual transmission assembly on its side so that the installation hole of the reverse idler gear stopper bolt is facing upward as shown in the illustration.
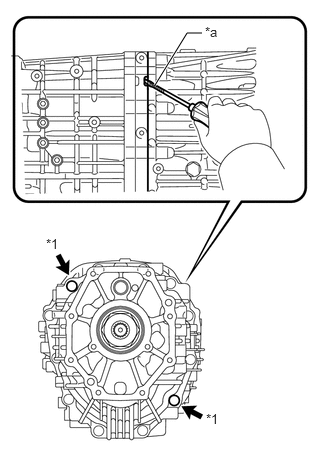
| *1 | Straight Pin |
| *a | Protective Tape |
.Using a screwdriver wrapped in protective tape, separate the transmission case sub-assembly and intermediate plate by prying at the points shown in the illustration.
- NOTICE:
-
Do not damage the sealing surfaces of the manual transmission case sub-assembly and transmission intermediate plate.
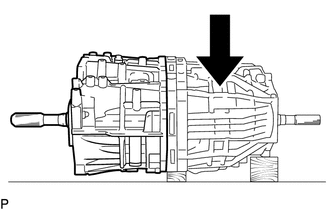
Place wooden blocks or other objects underneath the rear transmission case to securely support it as shown in the illustration
Remove the manual transmission case sub-assembly from the rear transmission case.
33461
28.REMOVE REVERSE IDLER GEAR
- CAUTION:
-
Since the manual transmission is very heavy, perform these procedures with 2 people. While one person is removing the reverse idler gear, have the other person hold the transmission in place.
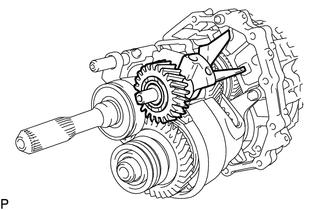
Remove the reverse idler gear and front oil receiver from the transmission unit.
Remove the No. 2 oil receiver from the reverse idler gear shaft.
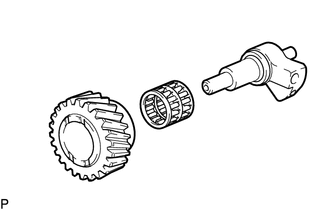
Remove the reverse idler gear bearing and reverse idler gear from the reverse idler gear shaft.
33261C
29.REMOVE SHIFT AND SELECT LEVER SHAFT SUB-ASSEMBLY
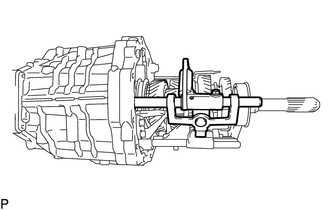
Remove the shift and select lever shaft sub-assembly from the transmission unit.
- CAUTION:
-
Since the manual transmission is very heavy, perform these procedures with 2 people. While one person is removing the shift and select shaft, have the other person hold the transmission in place.
33268C
30.REMOVE SHIFT INTERLOCK PLATE STOPPER
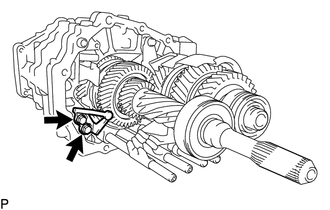
Remove the 2 bolts and shift interlock plate stopper from the transmission unit.
- CAUTION:
-
Since the manual transmission is very heavy, perform these procedures with 2 people. While one person is removing the shift interlock plate stopper, have the other person hold the transmission in place.
33109C
31.REMOVE MANUAL TRANSMISSION OIL SEPARATOR SUB-ASSEMBLY
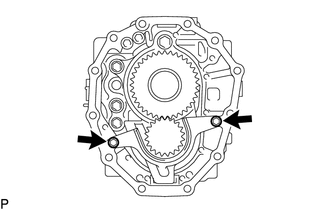
Remove the 2 bolts and transmission oil separator sub-assembly (front side).
- CAUTION:
-
Since the manual transmission is very heavy, perform these procedures with 2 people. While one person is removing the manual transmission oil separator sub-assembly, have the other person hold the transmission in place.
33449B
32.REMOVE TRANSMISSION MAGNET
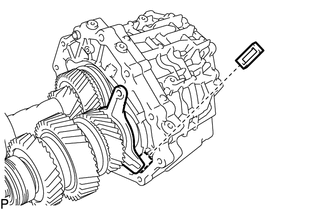
Remove the transmission magnet from the transmission intermediate plate.
- CAUTION:
-
Since the manual transmission is very heavy, perform these procedures with 2 people. While one person is removing the manual transmission magnet, have the other person hold the transmission in place.
33112G
33.REMOVE REAR TRANSMISSION CASE
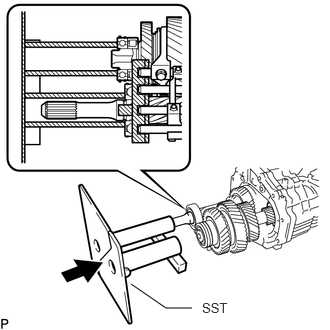
Using SST, set the transmission unit.
- SST
- 09310-71010
- CAUTION:
-
Since the manual transmission unit is very heavy, 2 people are needed to set the transmission unit.
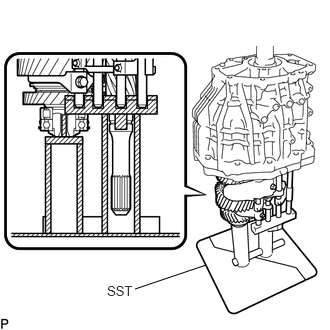
Stand the manual transmission upright as shown in the illustration.
- CAUTION:
-
Since the manual transmission unit is very heavy, 2 people are needed to stand the manual transmission upright as shown in the illustration.
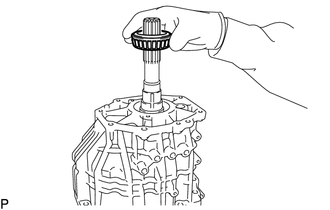
Remove the rear output shaft bearing.
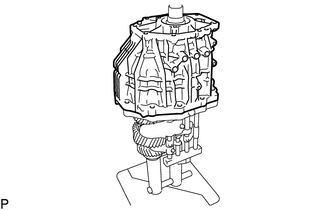
Remove the rear transmission case and intermediate plate.
Remove the intermediate plate from the rear transmission case.
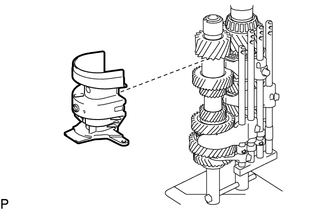
Remove the transmission oil separator sub-assembly (Rear side).
33124L
34.REMOVE NO. 3 OIL RECEIVER PIPE
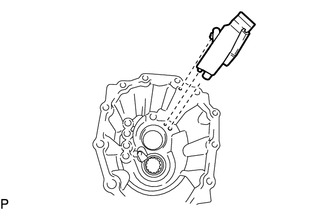
Remove the No. 3 oil receiver pipe from the rear transmission case.
35.REMOVE SHIFT FORK AND SHIFT FORK SHAFT ASSEMBLY
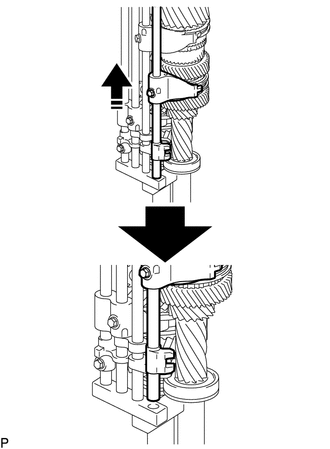

|
Remove in this direction |
Move the No. 2 hub sleeve as shown in the illustration and remove the No. 3 gear shift fork from SST as shown in the illustration.
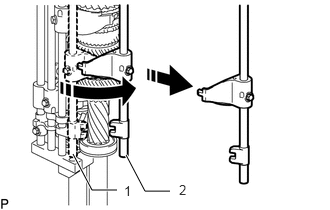
|
|
Remove in this direction |
Slide the No. 3 gear shift fork from position 1 to 2 and then remove the No. 3 gear shift fork together with the No. 3 gear shift fork shaft.
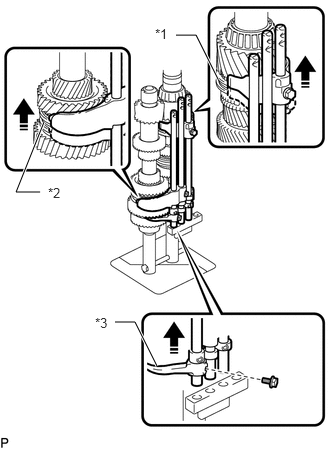
| *1 | No. 2 Transmission Hub Sleeve |
| *2 | No. 1 Transmission Hub Sleeve |
| *3 | No. 4 Transmission Hub Sleeve |
|
|
Remove in this direction |
Slide the No. 2 and No. 1 hub sleeves as shown in the illustration.
Remove the bolt from the No. 4 gear shift fork, and then slide the No. 4 gear shift fork shaft as shown in the illustration.
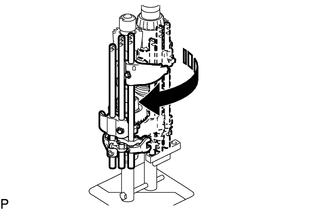
|
|
Remove in this direction |
Move the shift fork and shift fork shaft assembly as shown in the illustration.
- NOTICE:
-
Move the 3 shift fork shafts together.
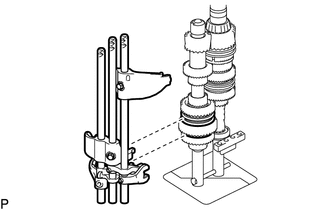
Remove the shift fork and shift fork shaft sub-assembly from the counter gear.
- NOTICE:
-
Do not drop the No. 4 gear shift fork.
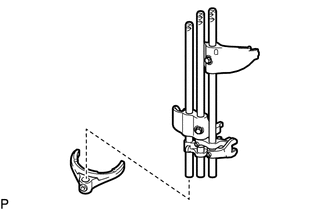
Remove the No. 4 gear shift fork.
33321
36.REMOVE OUTPUT SHAFT
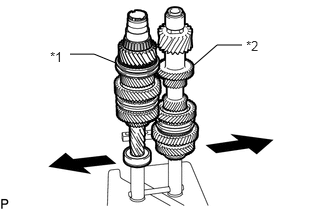
| *1 | Input Shaft |
| *2 | Counter Gear |
Expand SST to the left and right.
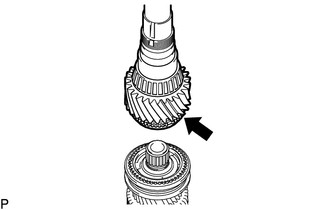
Remove the output shaft from the transmission unit.
Remove the output shaft spacer and rear output shaft bearing shim.
33311D
37.REMOVE INPUT SHAFT BEARING
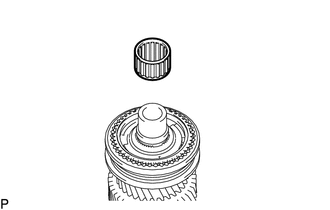
Remove the input shaft bearing from the input shaft.
33369B
38.REMOVE NO. 4 SYNCHRONIZER RING
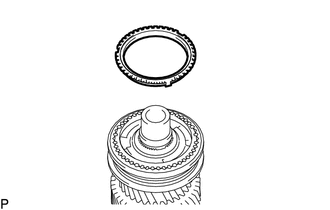
Remove the No. 4 synchronizer ring from the input shaft.
33311
39.REMOVE INPUT SHAFT
Remove the input shaft from SST.
33421
40.REMOVE COUNTER GEAR
Remove the counter gear from SST.
33411H
41.REMOVE REAR COUNTER GEAR BEARING OR ROLLER
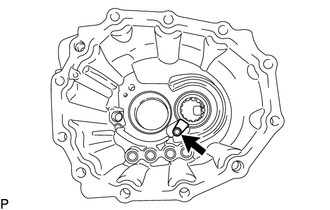
Remove the bolt and bearing lock plate.
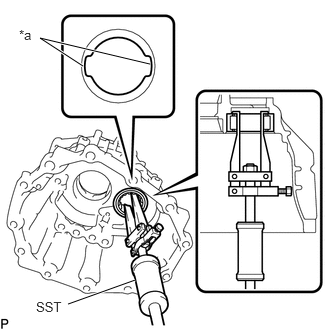
| *a | Groove of the Rear Transmission Case |
Using SST, remove the rear counter gear bearing or roller (outer) from the rear transmission case.
- SST
- 09308-00010
- NOTICE:
-
Do not damage the contact surfaces of the rear transmission case.
- HINT:
-
Align the groove of the rear transmission case with the claws of SST.
33321N
42.REMOVE FRONT OUTPUT SHAFT BEARING
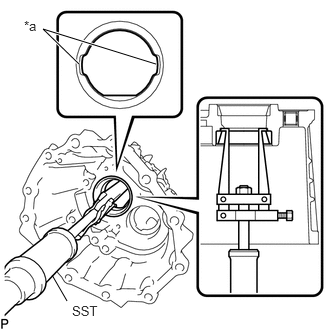
| *a | Groove of the Rear Transmission Case |
Using SST, remove the front output shaft bearing (outer race) from the rear transmission case.
- SST
- 09308-00010
- NOTICE:
-
Do not damage the contact surfaces of the rear transmission case.
- HINT:
-
Align the groove of the rear transmission case with the claws of SST.
33321A
43.REMOVE REAR OUTPUT SHAFT BEARING
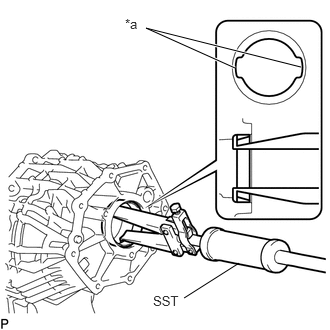
| *a | Groove of the Rear Transmission Case |
Using SST, remove the rear output shaft bearing (outer) from the rear transmission case.
- SST
- 09308-00010
- NOTICE:
-
Do not damage the contact surfaces of the rear transmission case.
- HINT:
-
Align the groove of the rear transmission case with the claws of SST.
33261K
44.REMOVE SHIFT AND SELECT LEVER SHAFT NEEDLE ROLLER BEARING
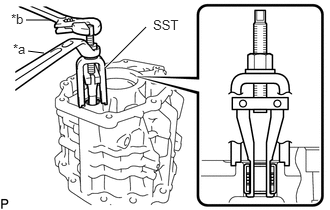
| *a | Turn |
| *b | Hold |
Using SST, remove the shift and select lever shaft needle roller bearing from the rear transmission case sub-assembly.
- SST
- 09319-60020
33242L
45.REMOVE SHIFT FORK SHAFT BEARING
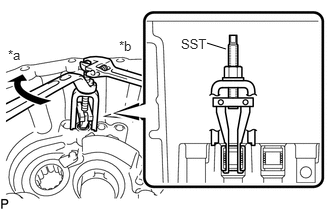
| *a | Turn |
| *b | Hold |
Using SST, remove the 2 shift fork shaft bearings (rear side) from the rear transmission case sub-assembly.
- SST
- 09319-60020
33261K
46.REMOVE SHIFT AND SELECT LEVER SHAFT NEEDLE ROLLER BEARING
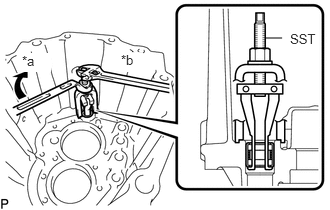
| *a | Turn |
| *b | Hold |
Using SST, remove the shift and select lever shaft needle roller bearing (front side) from the front transmission case sub-assembly.
- SST
- 09319-60020
33242L
47.REMOVE SHIFT FORK SHAFT BEARING
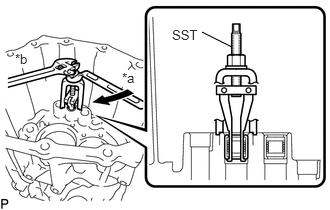
| *a | Turn |
| *b | Hold |
Using SST, remove the 2 shift fork shaft bearings (front side) from the front transmission case sub-assembly.
- SST
- 09319-60020
33261C
48.REMOVE SHIFT AND SELECT LEVER SHAFT
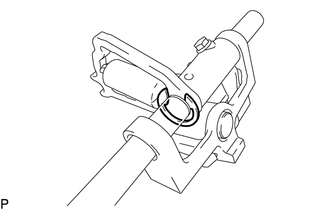
Using a snap ring expander, remove the e-ring from the shift and select lever shaft.
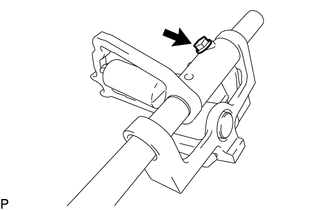
Remove the bolt from the inner select lever.
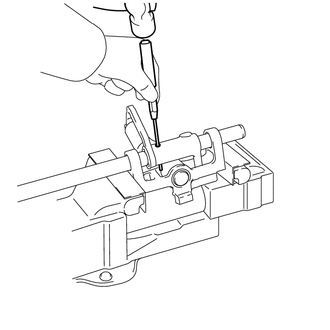
Using a 5 mm pin punch and hammer, tap out the straight pin.
Remove the shift interlock plate sub-assembly and inner select lever (shift and select cam, No. 2 lock ball pin and select return No. 1 compression spring) from the shift and select lever shaft.
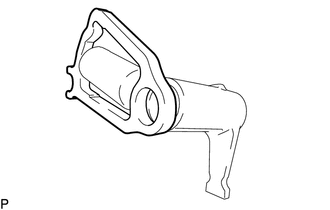
Remove the shift and select cam, No. 2 lack ball pin, select return No. 1 compression spring from the inner select lever.
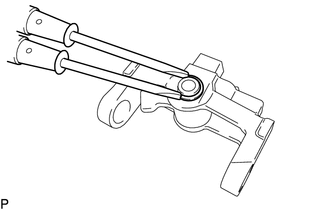
Using 2 screwdrivers and a hammer, tap off the snap ring.
- HINT:
-
Use a piece of cloth to prevent the snap ring from flying off.
Remove the shift arm pivot and shift arm together with the needle roller bearing from the shift interlock plate sub-assembly.
33243G
49.REMOVE NEEDLE ROLLER BEARING
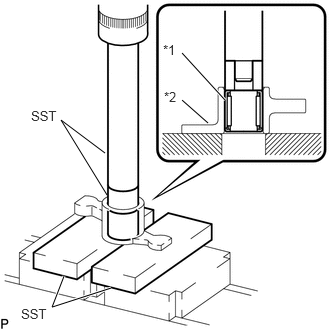
| *1 | Needle Roller Bearing |
| *2 | Shift Arm |
Using SST and a press, remove the needle roller bearing from the shift arm.
- SST
- 09950-60010 (09951-00220)
09950-70010 (09951-07100)
09527-20011
33243A
50.REMOVE NO. 2 GEAR SHIFT FORK SHAFT
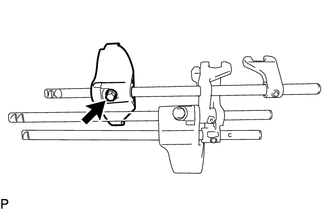
Remove the bolt and No. 2 gear shift fork from the No. 2 gear shift fork shaft.
Remove the No. 2 gear shift fork shaft from the No. 1 gear shift fork head.
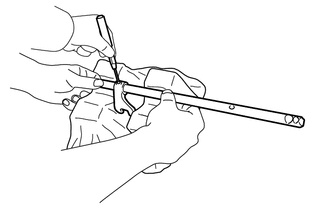
Place a cloth on 2 V-blocks, set the No. 2 gear shift fork shaft on the cloth, and then hold the shaft in place as shown in the illustration.
- CAUTION:
- ·
Perform this procedure with 2 people.
·Make sure to protect the gear shift fork shaft with a cloth before performing this procedure. If the gear shift fork shaft is damaged, shifting operations will worsen.
·Firmly secure the gear shift fork shaft.
Using a 5 mm pin punch and hammer, tap out the slotted pin.
Remove the No. 2 gear shift head from the No. 2 gear shift fork shaft.
33245G
51.REMOVE NO. 4 GEAR SHIFT FORK SHAFT
Remove the No. 4 gear shift fork from the No. 4 gear shift fork shaft.
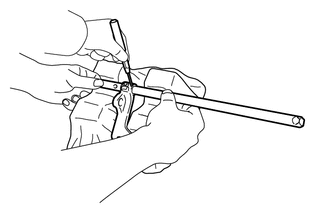
Place a cloth on 2 V-blocks, set the No. 4 gear shift fork shaft on the cloth, and then hold the shaft in place as shown in the illustration.
- CAUTION:
- ·
Perform this procedure with 2 people.
·Make sure to protect the gear shift fork shaft with a cloth before performing this procedure. If the gear shift fork shaft is damaged, shifting operations will worsen.
·Firmly secure the gear shift fork shaft.
Using a 5 mm pin punch and hammer, tap out the slotted pin.
Remove the No. 4 gear shift head from the No. 4 gear shift fork shaft.
33242
52.REMOVE NO. 1 GEAR SHIFT FORK SHAFT
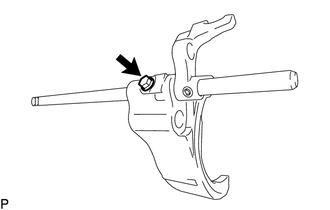
Remove the bolt and No. 1 gear shift fork from the No. 1 gear shift fork shaft.
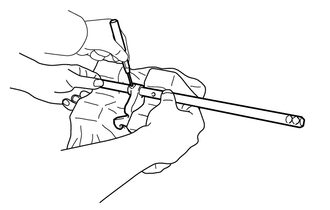
Place a cloth on 2 V-blocks, set the No. 1 gear shift fork shaft on the cloth, and then hold the shaft in place as shown in the illustration.
- CAUTION:
- ·
Perform this procedure with 2 people.
·Make sure to protect the gear shift fork shaft with a cloth before performing this procedure. If the gear shift fork shaft is damaged, shifting operations will worsen.
·Firmly secure the gear shift fork shaft.
Using a 5 mm pin punch and hammer, tap out the slotted pin.
Remove the No. 1 gear shift head from the No. 1 gear shift fork shaft.
33244D
53.REMOVE NO. 3 GEAR SHIFT FORK SHAFT
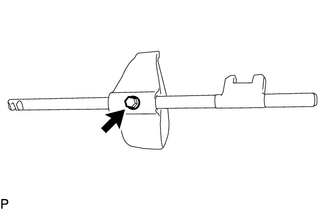
Remove the bolt and No. 3 gear shift fork from the No. 3 gear shift fork shaft.