INTERIOR PANELS / TRIM ROOF HEADLINING(for Double Cab) INSTALLATION
CAUTION / NOTICE / HINT
- HINT:
- ·
Use the same procedure for RHD and LHD vehicles.
·The procedure listed below is for LHD vehicles.
·A bolt without a torque specification is shown in the standard bolt chart.
Click hereGeneral>SPECIFICATIONS>STANDARD BOLT>SPECIFIED TORQUE FOR STANDARD BOLTS
PROCEDURE

 66425A
1.INSTALL REAR NO. 2 SIDE RAIL SPACER LH (w/o Curtain Shield Airbag)
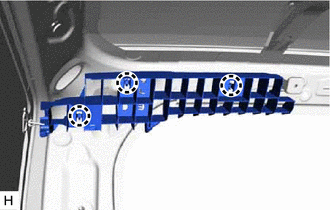
Attach the claw to install the rear No. 2 side rail spacer LH.
66415A
2.INSTALL REAR NO. 2 SIDE RAIL SPACER RH (w/o Curtain Shield Airbag)
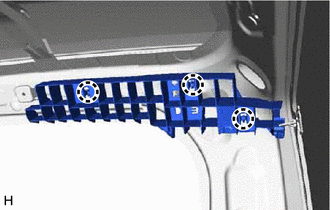
Attach the claw to install the rear No. 2 side rail spacer RH.
66424
3.INSTALL REAR SIDE RAIL SPACER LH (w/o Curtain Shield Airbag)
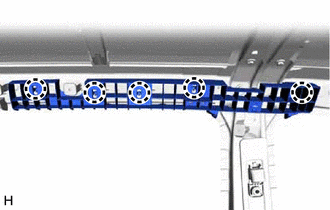
Attach the claw to install the rear side rail spacer LH.
66414A
4.INSTALL REAR SIDE RAIL SPACER RH (w/o Curtain Shield Airbag)
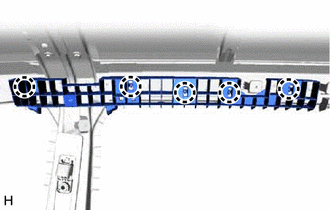
Attach the claw to install the rear side rail spacer RH.
66423
5.INSTALL FRONT SIDE RAIL SPACER LH (w/o Curtain Shield Airbag)
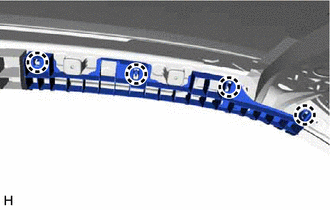
Attach the claw to install the front side rail spacer LH.
66413B
6.INSTALL FRONT SIDE RAIL SPACER RH (w/o Curtain Shield Airbag)
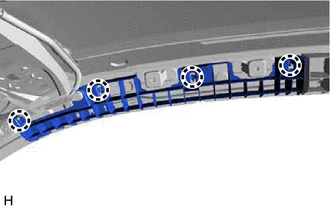
Attach the claw to install the front side rail spacer RH.
63310
7.INSTALL ROOF HEADLINING ASSEMBLY
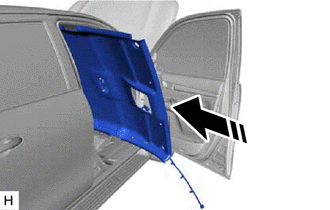

|
Movement Direction |
Insert the roof headlining assembly into the cabin from the front door.
- NOTICE:
- ·
Check that the corners of the roof headlining assembly are not folded, twisted or otherwise deformed and that none of the mounted parts have fallen off.
·Make sure that the roof headlining assembly does not get caught on anything as it may become bent or damaged.
·Do not damage the roof headlining assembly or vehicle interior.
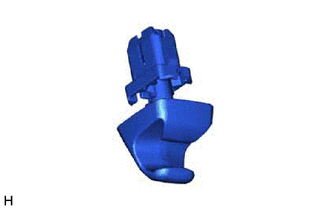
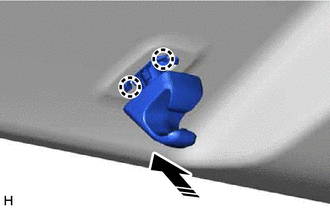
Install the visor holder as shown in the illustration.
|
|
Install in this Direction |
Attach the claw to install the visor holder as shown in the illustration.
- HINT:
-
Use the same procedure for both visor holders.
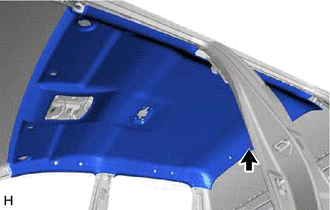
Install the roof headlining assembly with the clip.
Connect the front door opening trim weatherstrip LH and rear door opening trim weatherstrip LH in the range shown in the illustration.
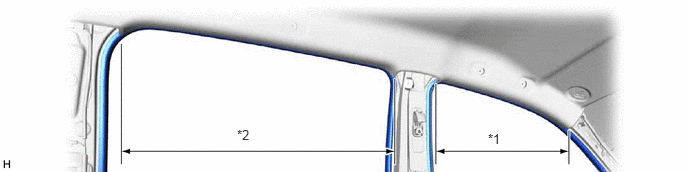
| *1 | Front Door Opening Trim Weatherstrip LH | *2 | Rear Door Opening Trim Weatherstrip LH |
Connect the front door opening trim weatherstrip RH and rear door opening trim weatherstrip RH in the range shown in the illustration.
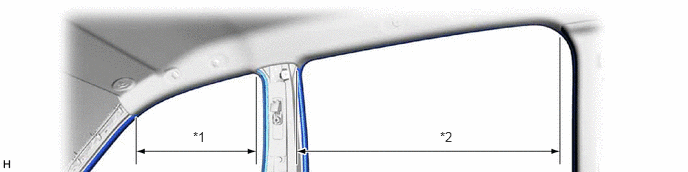
| *1 | Front Door Opening Trim Weatherstrip RH | *2 | Rear Door Opening Trim Weatherstrip RH |
w/ Pre-crash Safety System:
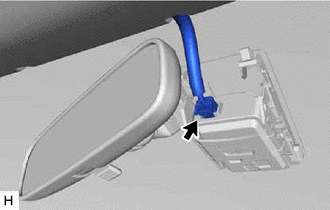
Connect the connector.
w/o Pre-crash Safety System:
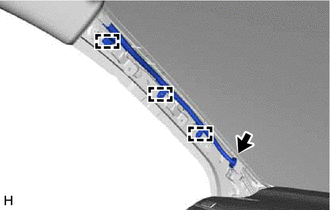
Connect the connector and attach the clamp to the front pillar LH.
w/ Pre-crash Safety System:
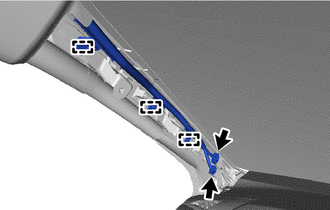
Connect the connector and attach the clamp to he front pillar LH.
63339A
8.INSTALL ROOF HEADLINING SERVICE HOLE COVER (w/o Assist Grip)
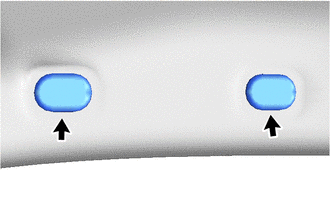
Install the 2 roof headlining service hole covers.
74605A
9.INSTALL COAT HOOK SUB-ASSEMBLY
- HINT:
-
Use the same procedure for both coat hook sub-assemblies.
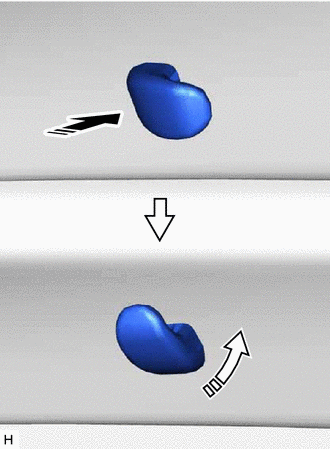
|
|
Install in this Direction (1) |

|
Install in this Direction (2) |
Insert the coat hook sub-assembly and rotate it 90° counterclockwise to install it as shown in the illustration.
74610A
10.INSTALL ASSIST GRIP SUB-ASSEMBLY
- HINT:
-
Use the same procedure for all assist grip sub-assemblies.
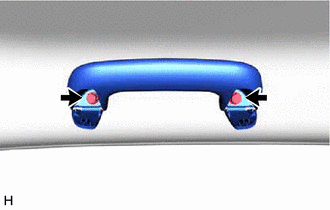
Install the assist grip sub-assembly with the 2 bolts.
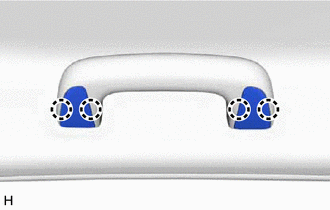
Attach the claw to close the assist grip cover.
74320
11.INSTALL VISOR ASSEMBLY LH
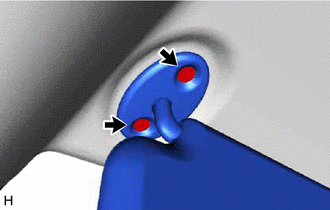
Install the visor assembly LH with the 2 screws.
Connect the visor assembly LH to the visor holder.
74310
12.INSTALL VISOR ASSEMBLY RH
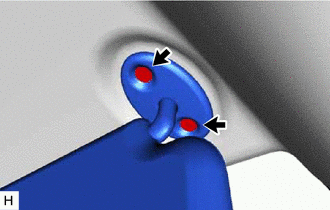
Install the visor assembly RH with the 2 screws.
Connect the visor assembly RH to the visor holder.
74325
13.INSTALL VISOR BRACKET COVER LH
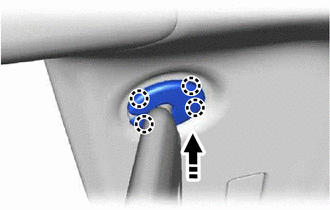
|
|
Install in this Direction |
Attach the claw to install the visor bracket cover LH as shown in the illustration.
74325
14.INSTALL VISOR BRACKET COVER RH
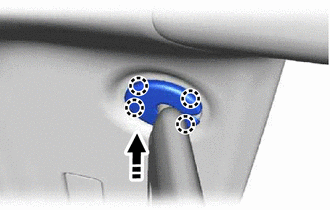
|
|
Install in this Direction |
Attach the claw to install the visor bracket cover RH as shown in the illustration.
86466D
15.INSTALL NO. 1 FORWARD RECOGNITION COVER (w/ Pre-crash Safety System)
81240
16.INSTALL NO. 1 ROOM LIGHT ASSEMBLY
81260A
17.INSTALL MAP LIGHT ASSEMBLY
87810
18.INSTALL INNER REAR VIEW MIRROR ASSEMBLY
62512
19.INSTALL QUARTER INSIDE TRIM BOARD LH
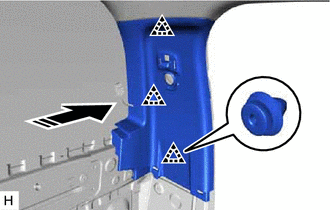
|
|
Install in this Direction |
Attach the clip to install the quarter inside trim board LH as shown in the illustration.
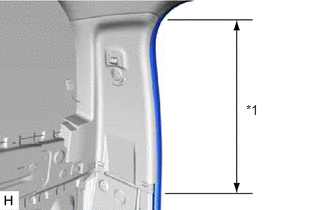
| *1 | Rear Door Opening Trim Weatherstrip LH |
Connect the rear door opening trim weatherstrip LH in the range shown in the illustration.
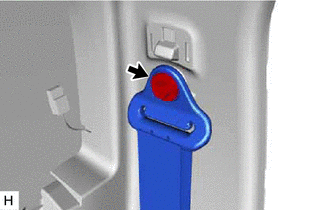
Connect the rear seat outer belt assembly LH with the bolt.
- Torque:
- 42 N*m (428 kgf*cm, 31 ft.*lbf)
62511
20.INSTALL QUARTER INSIDE TRIM BOARD RH
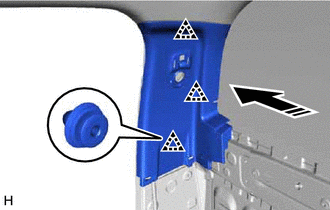
|
|
Install in this Direction |
Attach the clip to install the quarter inside trim board RH as shown in the illustration.
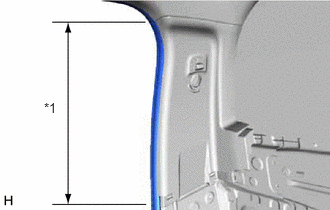
| *1 | Rear Door Opening Trim Weatherstrip RH |
Connect the rear door opening trim weatherstrip RH in the range shown in the illustration.
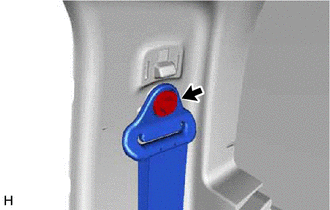
Connect the rear seat outer belt assembly RH with the bolt.
- Torque:
- 42 N*m (428 kgf*cm, 31 ft.*lbf)
73178B
21.INSTALL SEAT BELT ANCHOR COVER CAP
- HINT:
-
Use the same procedure for seat belt anchor cover caps.
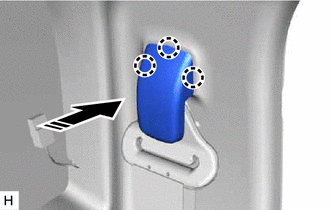
|
|
Install in this Direction |
Attach the claw to install the seat belt anchor cover cap as shown in the illustration.
62514A
22.INSTALL LOWER QUARTER TRIM PANEL LH
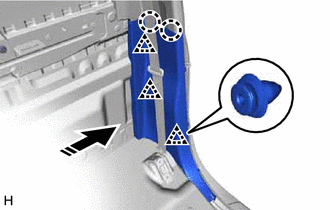
|
|
Installation Direction |
Attach the clip and claw to install the lower quarter trim panel LH as shown in the illustration.
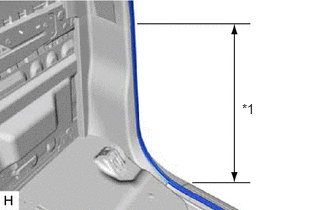
| *1 | Rear Door Opening Trim Weatherstrip LH |
Connect the rear door opening trim weatherstrip LH in the range shown in the illustration.
62513A
23.INSTALL LOWER QUARTER TRIM PANEL RH
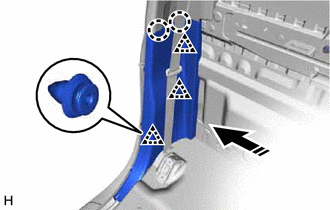
|
|
Install in this Direction |
Attach the clip and claw to install the lower quarter trim panel RH as shown in the illustration.
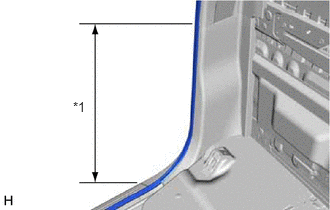
| *1 | Rear Door Opening Trim Weatherstrip RH |
Connect the rear door opening trim weatherstrip RH in the range shown in the illustration.
64261C
24.INSTALL UPPER BACK PANEL GARNISH
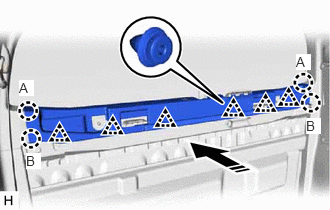
|
|
Install in this Direction |
Attach the clip and claw to install the upper back panel garnish as shown in the illustration.
- HINT:
-
Lower claw A into position and then push claw B toward the rear of the vehicle to attach the claws.
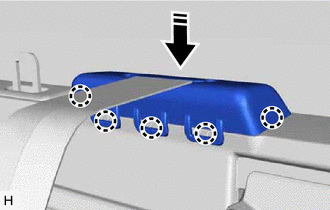
|
|
Install in this Direction |
Attach the claw to connect the belt guide as shown in the illustration.
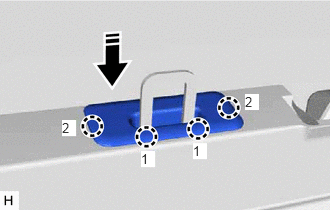
|
|
Install in this Direction |
Attach the claw to install the back panel trim cover as shown in the illustration.
- HINT:
-
Attach the claws in the order shown in the illustration.
73709
25.INSTALL TETHER ANCHOR BRACKET SUB-ASSEMBLY
- HINT:
-
Use the same procedure for both tether anchor bracket sub-assemblies.
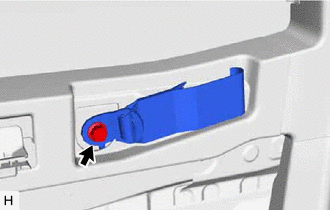
Install the tether anchor bracket sub-assembly with the bolt.
- Torque:
- 42 N*m (428 kgf*cm, 31 ft.*lbf)
71397B
26.INSTALL REAR SEATBACK HOLDER
62412B
27.INSTALL UPPER CENTER PILLAR GARNISH LH
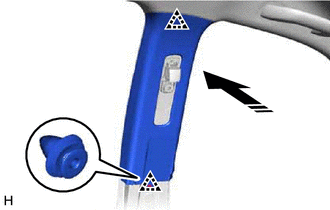
|
|
Install in this Direction |
Attach the clip to install the upper center pillar garnish LH as shown in the illustration.
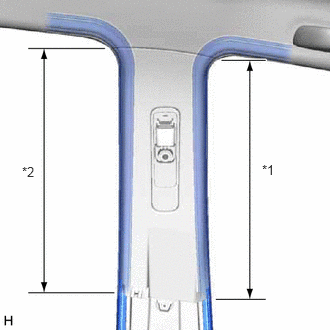
| *1 | Front Door Opening Trim Weatherstrip LH |
| *2 | Rear Door Opening Trim Weatherstrip LH |
Connect the front door opening trim weatherstrip LH and rear door opening trim weatherstrip LH in the range shown in the illustration.
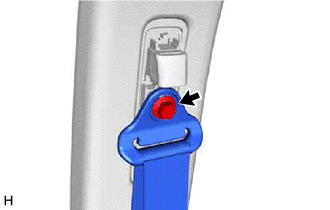
Connect the front seat outer belt assembly LH with the bolt.
- Torque:
- 42 N*m (428 kgf*cm, 31 ft.*lbf)
62411B
28.INSTALL UPPER CENTER PILLAR GARNISH RH
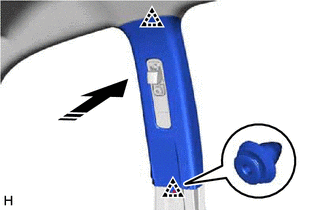
|
|
Install in this Direction |
Attach the clip to install the upper center pillar garnish RH as shown in the illustration.
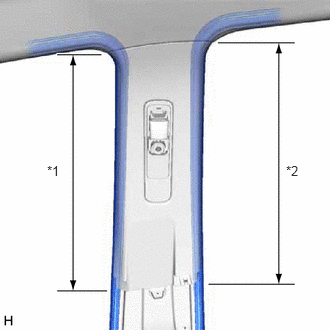
| *1 | Front Door Opening Trim Weatherstrip RH |
| *2 | Rear Door Opening Trim Weatherstrip RH |
Connect the front door opening trim weatherstrip RH and rear door opening trim weatherstrip RH in the range shown in the illustration.
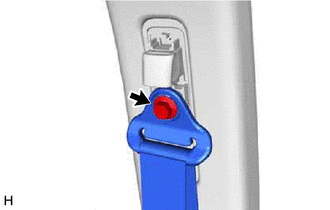
Connect the front seat outer belt assembly RH with the bolt.
- Torque:
- 42 N*m (428 kgf*cm, 31 ft.*lbf)
73178A
29.INSTALL SEAT BELT ANCHOR COVER CAP
- HINT:
-
Use the same procedure for both seat belt anchor cover caps.
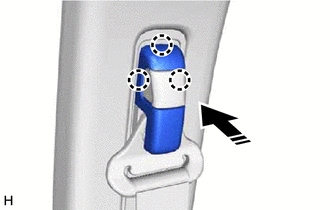
|
|
Install in this Direction |
Attach the claw to install the seat belt anchor cover cap as shown in the illustration.
74680
30.INSTALL PILLAR ASSIST GRIP ASSEMBLY
- HINT:
-
Use the same procedure for both pillar assist grip assemblies.
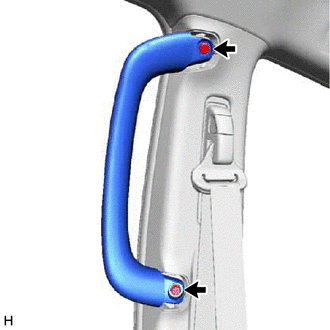
Install the pillar assist grip assembly with the 2 bolts.
74617F
31.INSTALL ASSIST GRIP PLUG LH
- HINT:
-
Use the same procedure for both assist grip plugs.
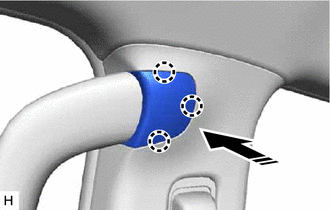
|
|
Install in this Direction |
Attach the claw to install the assist grip plug LH as shown in the illustration.
74617A
32.INSTALL ASSIST GRIP PLUG RH
- HINT:
-
Use the same procedure for both assist grip plugs.
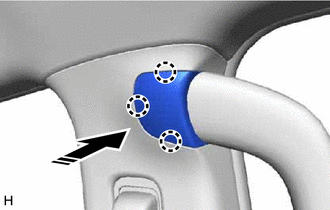
|
|
Install in this Direction |
Attach the claw to install the assist grip plug RH as shown in the illustration.
62414A
33.INSTALL LOWER CENTER PILLAR GARNISH LH
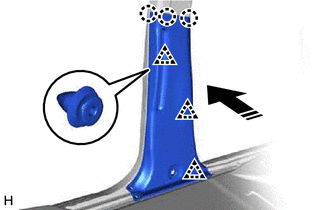
|
|
Install in this Direction |
Attach the clip and claw to install the lower center pillar garnish LH as shown in the illustration.
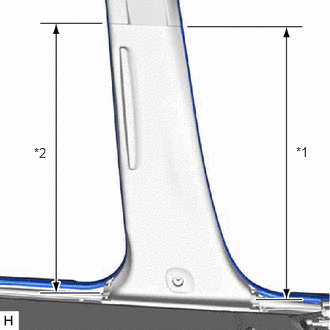
| *1 | Front Door Opening Trim Weatherstrip LH |
| *2 | Rear Door Opening Trim Weatherstrip LH |
Connect the front door opening trim weatherstrip LH and rear door opening trim weatherstrip LH in the range shown in the illustration.
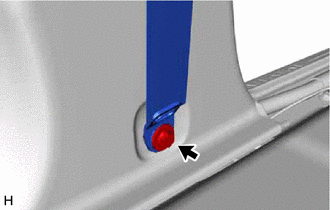
Connect the front seat outer belt assembly LH with the bolt.
- Torque:
- 42 N*m (428 kgf*cm, 31 ft.*lbf)
62413A
34.INSTALL LOWER CENTER PILLAR GARNISH RH
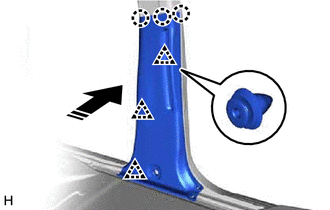
|
|
Install in this Direction |
Attach the clip and claw to install the lower center pillar garnish RH as shown in the illustration.
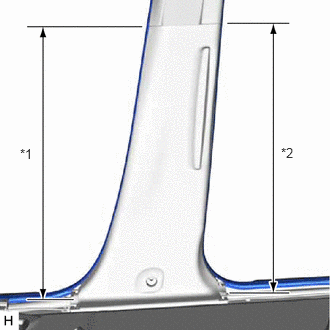
| *1 | Front Door Opening Trim Weatherstrip RH |
| *2 | Rear Door Opening Trim Weatherstrip RH |
Connect the front door opening trim weatherstrip RH and rear door opening trim weatherstrip RH in the range shown in the illustration.
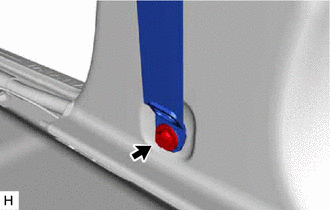
Connect the front seat outer belt assembly RH with the bolt.
- Torque:
- 42 N*m (428 kgf*cm, 31 ft.*lbf)
67918E
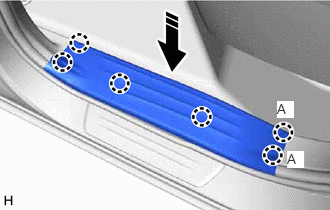
35.INSTALL REAR DOOR SCUFF PLATE LH
|
|
Install in this Direction |
Attach the claw to install the rear door scuff plate LH as shown in the illustration.
- HINT:
-
Attach claw A shown in the illustration first.
67917C
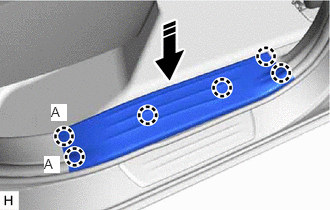
36.INSTALL REAR DOOR SCUFF PLATE RH
|
|
Install in this Direction |
Attach the claw to install the rear door scuff plate RH as shown in the illustration.
- HINT:
-
Attach claw A shown in the illustration first.
67914B
37.INSTALL FRONT DOOR SCUFF PLATE LH
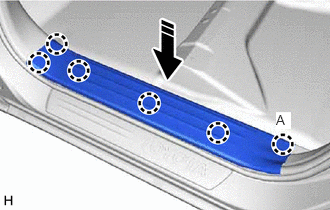
|
|
Install in this Direction |
Attach the claw to install the front door scuff plate LH as shown in the illustration.
- HINT:
-
Attach claw A shown in the illustration first.
67913B
38.INSTALL FRONT DOOR SCUFF PLATE RH
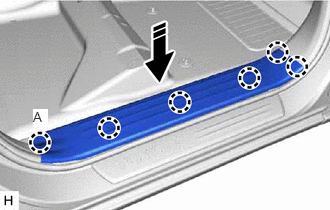
|
|
Install in this Direction |
Attach the claw to install the front door scuff plate RH as shown in the illustration.
- HINT:
-
Attach claw A shown in the illustration first.
62212
39.INSTALL FRONT PILLAR GARNISH LH
62211
40.INSTALL FRONT PILLAR GARNISH RH
74610A
41.INSTALL ASSIST GRIP SUB-ASSEMBLY (w/ Assist Grip)
58811A
42.INSTALL FRONT CONSOLE BOX (w/o Console Box Lid)
58901A
43.INSTALL REAR CONSOLE BOX SUB-ASSEMBLY (w/ Rear Console Box)
58810J
44.INSTALL CONSOLE BOX ASSEMBLY (w/ Console Box Lid)
45.INSTALL REAR SEAT ASSEMBLY
for Seat Cushion 60/40 Split Type:
Click hereVehicle Interior>SEAT>REAR SEAT ASSEMBLY(for Seat Cushion 60/40 Split Type)>INSTALLATION
for Seat Cushion Bench Type:
Click hereVehicle Interior>SEAT>REAR SEAT ASSEMBLY(for Seat Cushion Bench Type)>INSTALLATION
46.INSTALL FRONT SEAT ASSEMBLY LH
for Manual Seat:
Click hereVehicle Interior>SEAT>FRONT SEAT ASSEMBLY(for Manual Seat)>INSTALLATION
for Power Seat:
Click hereVehicle Interior>SEAT>FRONT SEAT ASSEMBLY(for Power Seat)>INSTALLATION
for Bench Seat Type:
Click hereVehicle Interior>SEAT>FRONT SEAT ASSEMBLY(for Bench Seat Type)>INSTALLATION
47.INSTALL FRONT SEAT ASSEMBLY RH
48.CONNECT CABLE TO NEGATIVE BATTERY TERMINAL (w/ Airbag System)
- NOTICE:
-
When disconnecting the cable, some systems need to be initialized after the cable is reconnected.
-
Click hereGeneral>INTRODUCTION>REPAIR INSTRUCTION>INITIALIZATION
49.CHECK SRS WARNING LIGHT (w/ Airbag System)