STEERING COLUMN STEERING WHEEL INSTALLATION
PROCEDURE

 45184
1.INSTALL LOWER STEERING WHEEL BOSS COVER
Attach the 2 guide pins and 4 claws to install the lower steering wheel boss cover.
2.ADJUST SPIRAL CABLE
45100
3.INSTALL STEERING WHEEL ASSEMBLY
Align the matchmarks on the steering wheel assembly and steering main shaft.
Install the steering wheel set nut.
- Torque:
- 50 N*m (510 kgf*cm, 37 ft.*lbf)
84632
4.INSTALL CRUISE CONTROL MAIN SWITCH (w/ Cruise Control System)
45116
5.INSTALL NO. 1 STEERING WHEEL ORNAMENT (w/o Steering Pad Switch)
Attach the 6 guide pins and 2 claws to install the No. 1 steering wheel ornament.
Install the 2 screws.
84250A
6.INSTALL STEERING PAD SWITCH ASSEMBLY (w/ Steering Pad Switch)
45130
7.INSTALL HORN BUTTON ASSEMBLY (w/o Airbag System)
Connect the horn wire.
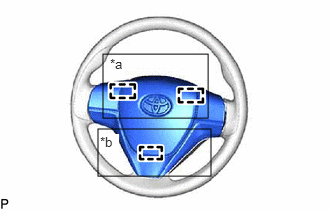
| *a | Upper Pin |
| *b | Lower Pin |
Press the horn button assembly with both hands to attach the upper pin to the spring.
Press the horn button assembly with both hands to attach the lower pin to the spring.
- NOTICE:
-
After installation, try to pull the horn button assembly and check that the horn button assembly is securely installed.
45186
8.INSTALL LOWER NO. 2 STEERING WHEEL COVER (w/o Airbag System)
Attach the guide and claw to install the lower No. 2 steering wheel cover.
45130
9.INSTALL STEERING WHEEL PAD ASSEMBLY (w/ Airbag System)
10.INSPECT STEERING WHEEL CENTER POINT
11.CONNECT CABLE TO NEGATIVE BATTERY TERMINAL
- NOTICE:
-
When disconnecting the cable, some systems need to be initialized after the cable is reconnected.
-
Click hereGeneral>INTRODUCTION>REPAIR INSTRUCTION>INITIALIZATION
45130
12.INSPECT HORN BUTTON ASSEMBLY
With the horn button assembly installed to the vehicle, perform a visual check. If any of the defects mentioned below are found, replace the horn button assembly with a new one:
Cuts, minute cracks or marked discoloration on the horn button assembly top surface or in the grooved portion.
Make sure that the horn sounds.
- HINT:
-
If the horn does not sound, inspect the horn system.
-
Click hereVehicle Exterior>HORN>HORN SYSTEM>PROBLEM SYMPTOMS TABLE
13.CHECK SRS WARNING LIGHT
for Type A: Click hereVehicle Interior>SUPPLEMENTAL RESTRAINT SYSTEMS>AIRBAG SYSTEM(for Type A)>DIAGNOSIS SYSTEM
for Type B: Click hereVehicle Interior>SUPPLEMENTAL RESTRAINT SYSTEMS>AIRBAG SYSTEM(for Type B)>DIAGNOSIS SYSTEM
for Type C: Click hereVehicle Interior>SUPPLEMENTAL RESTRAINT SYSTEMS>AIRBAG SYSTEM(for Type C)>DIAGNOSIS SYSTEM