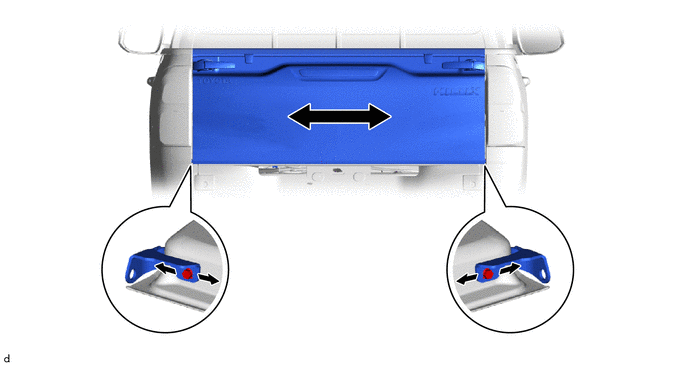
BODY WELD POINT FIT STANDARD / ADJUSTMENT METHOD ADJUSTMENT
INSPECT HOOD SUB-ASSEMBLY
Check that the clearance measurements of areas A to D are within the standard ranges.
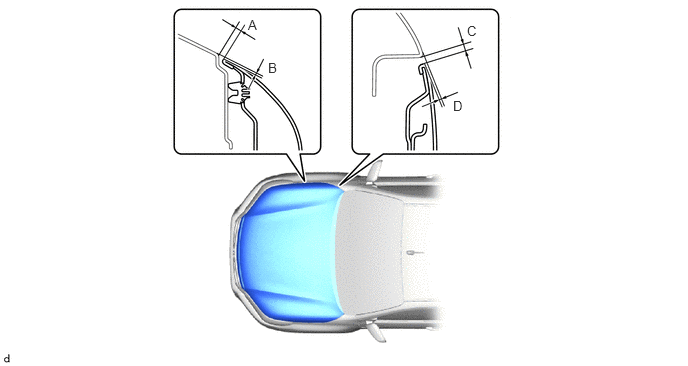
- Standard:
Area Specified Condition Area Specified Condition A 4.0 to 7.0 mm (0.157 to 0.276 in.) B -0.9 to 2.1 mm (-0.035 to 0.083 in.) C 3.5 to 6.5 mm (0.138 to 0.256 in.) D -1.0 to 2.0 mm (-0.039 to 0.079 in.)
- HINT:
-
Centering bolts are used to mount the hood hinge to the vehicle body and hood. The hood cannot be adjusted with the centering bolts on. Substitute the centering bolts for standard bolts when making adjustments.
ADJUST HOOD SUB-ASSEMBLY
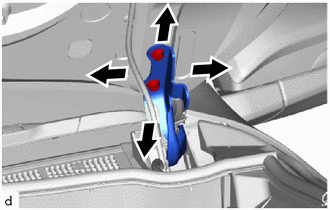
Adjust the hood position.
Loosen the 4 hinge bolts on the hood and adjust the hood position.
Move the hood and adjust the clearance between the hood and front fender.
Tighten the 4 hinge bolts on the hood after the adjustment.
- Torque:
- 13 N*m (133 kgf*cm, 10 ft.*lbf)
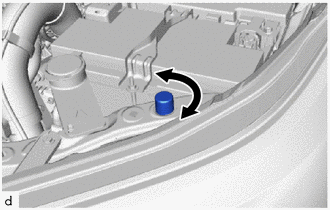
Adjust the cushion rubbers so that the hood and fender are aligned.
- HINT:
-
Raise or lower the front end of the hood by turning the cushion rubber.
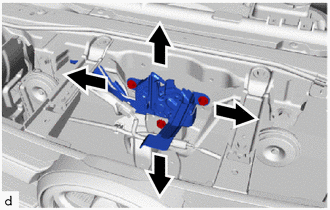
Adjust the hood lock.
Loosen the 3 bolts.
Adjust the hood lock position so that the striker can enter it smoothly.
Tighten the 3 bolts after the adjustment.
- Torque:
- 11 N*m (112 kgf*cm, 8 ft.*lbf)
INSPECT FRONT DOOR PANEL SUB-ASSEMBLY LH
Check that the clearance measurements of areas A to J are within the standard ranges.
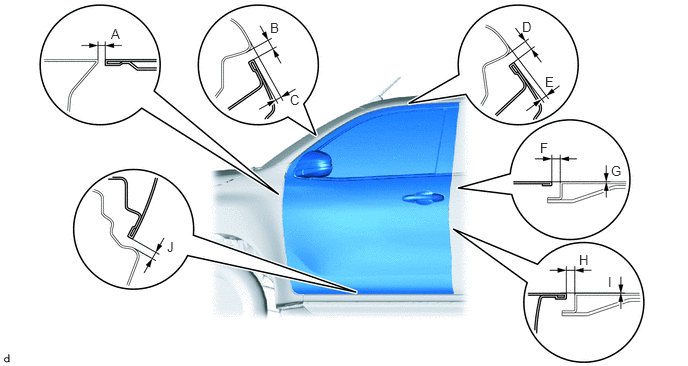
- Standard Clearance:
A 2.8 to 5.8 mm (0.110 to 0.228 in.) B 3.2 to 6.2 mm (0.126 to 0.244 in.) C *1: 2.4 to 5.4 mm (0.094 to 0.213 in.)
*4: 2.2 to 5.2 mm (0.087 to 0.205 in.)D 3.2 to 6.2 mm (0.126 to 0.244 in.) E 2.5 to 5.5 mm (0.098 to 0.217 in.) F *2: 3.2 to 6.2 mm (0.126 to 0.244 in.)
*3: 2.8 to 5.8 mm (0.110 to 0.228 in.)G -1.5 to 1.5 mm (-0.059 to 0.059 in.) H *2: 3.2 to 6.2 mm (0.126 to 0.244 in.)
*3: 2.8 to 5.8 mm (0.110 to 0.228 in.)I -1.5 to 1.5 mm (-0.059 to 0.059 in.) J 4.2 to 7.2 mm (0.165 to 0.283 in.)
*1: for Single Cab, Smart Cab
*2: for Smart Cab, Double Cab
*3: for Single Cab
*4: for Double Cab
- HINT:
- ·
Use the same procedure for the RH and LH sides.
·The procedure listed below is for the LH side.
·Centering bolts are used to mount the door hinge to the vehicle body and door. The door cannot be adjusted with the centering bolts on. Substitute the centering bolts for standard bolts when making adjustments.
ADJUST FRONT DOOR PANEL SUB-ASSEMBLY LH
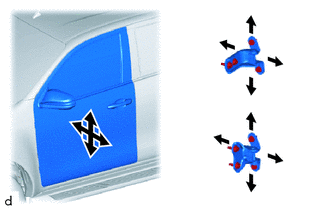
Using SST, loosen the hinge bolts on the body and adjust the door position.
- SST
- 09812-00010
Tighten the hinge bolts on the body after the adjustment.
- Torque:
- 26 N*m (265 kgf*cm, 19 ft.*lbf)
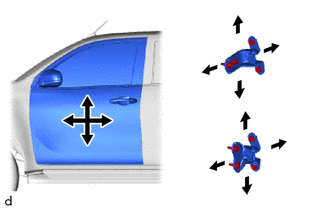
Loosen the hinge bolts on the door and adjust the door position.
Tighten the hinge bolts on the door after the adjustment.
- Torque:
- 21 N*m (214 kgf*cm, 15 ft.*lbf)
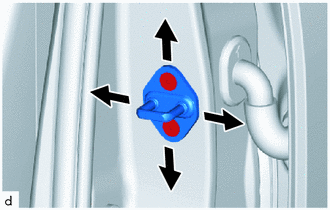
Using a T40 "TORX" socket wrench, adjust the striker position by slightly loosening the striker mounting screws and hitting the striker with a plastic-faced hammer.
Using a T40 "TORX" socket wrench, tighten the striker mounting screws after the adjustment.
- Torque:
- 23 N*m (235 kgf*cm, 17 ft.*lbf)
INSPECT REAR DOOR PANEL SUB-ASSEMBLY LH (for Double Cab)
Check that the clearance measurements of areas A to M are within the standard ranges.
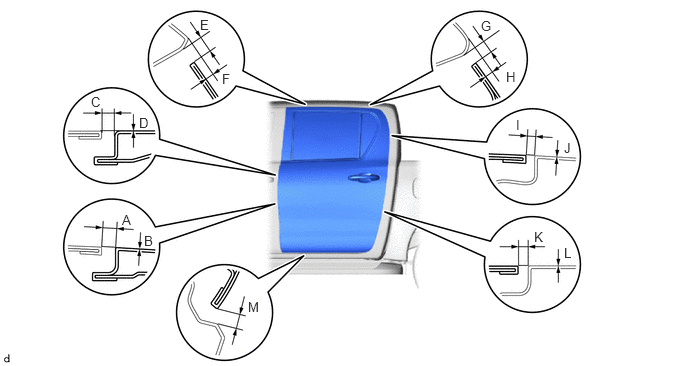
- Standard Clearance:
Area Measurement Area Measurement A 3.2 to 6.2 mm (0.126 to 0.244 in.) B -1.5 to 1.5 mm (-0.059 to 0.059 in.) C 3.2 to 6.2 mm (0.126 to 0.244 in.) D -1.5 to 1.5 mm (-0.059 to 0.059 in.) E 3.2 to 6.2 mm (0.126 to 0.244 in.) F 1.8 to 4.8 mm (0.071 to 0.189 in.) G 3.2 to 6.2 mm (0.126 to 0.244 in.) H 0.4 to 3.4 mm (0.016 to 0.134 in.) I 2.8 to 5.8 mm (0.110 to 0.228 in.) J -1.5 to 1.5 mm (-0.059 to 0.059 in.) K 2.8 to 5.8 mm (0.110 to 0.228 in.) L -1.5 to 1.5 mm (-0.059 to 0.059 in.) M 4.2 to 7.2 mm (0.165 to 0.283 in.) - -
- HINT:
- ·
Use the same procedure for the RH and LH sides.
·The procedure listed below is for the LH side.
·Centering bolts are used to mount the door hinge to the vehicle body and door. The door cannot be adjusted with the centering bolts on. Substitute the centering bolts for standard bolts when making adjustments.
ADJUST REAR DOOR PANEL SUB-ASSEMBLY LH (for Double Cab)
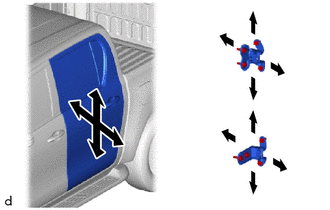
Using SST, loosen the hinge bolts on the body and adjust the door position.
- SST
- 09812-00010
Tighten the hinge bolts on the body after the adjustment.
- Torque:
- 26 N*m (265 kgf*cm, 19 ft.*lbf)
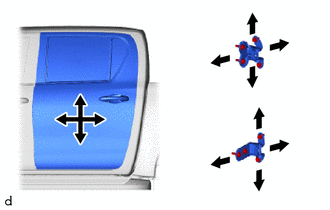
Loosen the hinge bolts on the door and adjust the door position.
Tighten the hinge bolts on the door after the adjustment.
- Torque:
- 21 N*m (214 kgf*cm, 15 ft.*lbf)
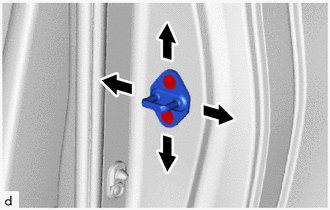
Using a T40 "TORX" socket wrench, adjust the striker position by slightly loosening the striker mounting screws and hitting the striker with a plastic-faced hammer.
- Torque:
- 23 N*m (235 kgf*cm, 17 ft.*lbf)
INSPECT ACCESS PANEL PANEL SUB-ASSEMBLY LH (for Smart Cab)
Check that the clearance measurements of areas A to I are within the standard ranges.
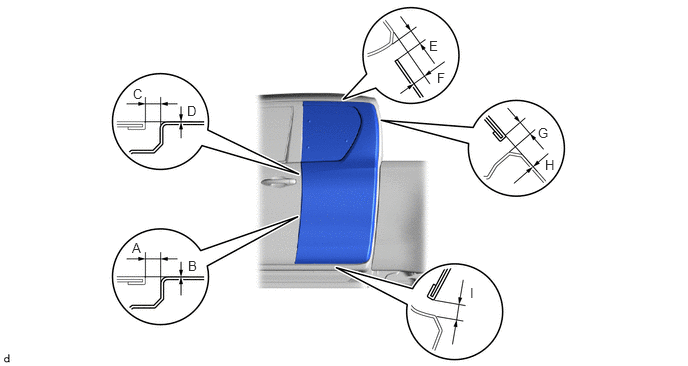
- Standard Clearance:
Area Measurement Area Measurement A 3.2 to 6.2 mm (0.126 to 0.244 in.) B -1.5 to 1.5 mm (-0.059 to 0.059 in.) C 3.2 to 6.2 mm (0.126 to 0.244 in.) D -1.5 to 1.5 mm (-0.059 to 0.059 in.) E 3.2 to 6.2 mm (0.126 to 0.244 in.) F 2.5 to 5.5 mm (0.098 to 0.217 in.) G 3.2 to 6.2 mm (0.126 to 0.244 in.) H -1.5 to 1.5 mm (-0.059 to 0.059 in.) I 4.2 to 7.2 mm (0.165 to 0.283 in.) - -
- HINT:
- ·
Use the same procedure for the RH and LH sides.
·The procedure listed below is for the LH side.
·Centering bolts are used to mount the door hinge to the vehicle body and door. The door cannot be adjusted with the centering bolts on. Substitute the centering bolts for standard bolts when making adjustments.
ADJUST ACCESS PANEL PANEL SUB-ASSEMBLY LH (for Smart Cab)
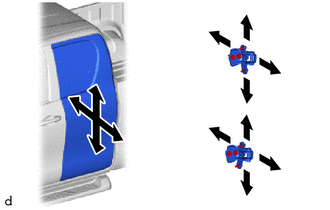
Using SST, loosen the hinge bolts on the body and adjust the access panel position.
- SST
- 09812-00010
Tighten the hinge bolts on the body after the adjustment.
- Torque:
- 26 N*m (265 kgf*cm, 19 ft.*lbf)
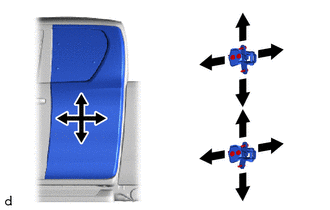
Loosen the hinge bolts on the access panel and adjust the access panel position.
Tighten the hinge bolts on the access panel after the adjustment.
- Torque:
- 26 N*m (265 kgf*cm, 19 ft.*lbf)
Remove the roof side rail garnish LH
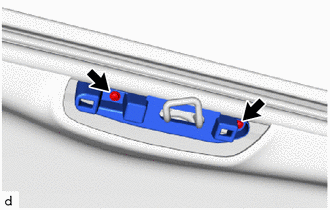
Remove the 2 screws and roof side rail garnish insert LH.
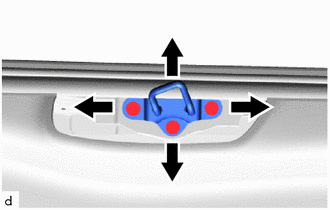
Using a T40 "TORX" socket wrench, adjust the striker position by slightly loosening the striker mounting screws and hitting the striker with a plastic-faced hammer and brass bar.
- Torque:
- 23 N*m (235 kgf*cm, 17 ft.*lbf)
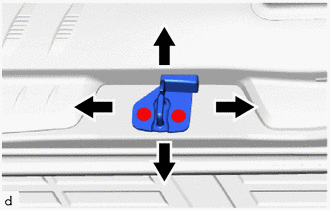
Using a T40 "TORX" socket wrench, adjust the striker position by slightly loosening the striker mounting screws and hitting the striker with a plastic-faced hammer.
- Torque:
- 23 N*m (235 kgf*cm, 17 ft.*lbf)
Install the roof side rail garnish insert LH with the 2 screws.
Install the roof side rail garnish LH.
INSPECT REAR BODY TAIL GATE ASSEMBLY (for A Deck)
Check that the clearance measurements of areas A to H are within the standard ranges.
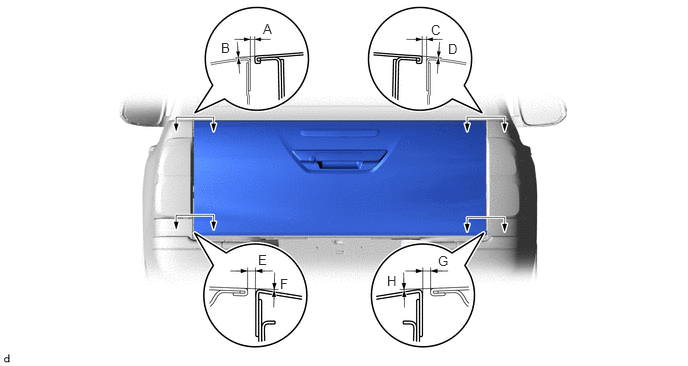
- Standard:
Area Specified Condition Area Specified Condition A *1:4.7 to 5.0 mm (0.185 to 0.197 in.)
*2:4.85 to 5.15 mm (0.191 to 0.203 in.)B -1.5 to 1.5 mm (-0.059 to 0.059 in.) C *1:4.7 to 5.0 mm (0.185 to 0.197 in.)
*2:4.85 to 5.15 mm (0.191 to 0.203 in.)D -1.5 to 1.5 mm (-0.059 to 0.059 in.) E *1:4.7 to 5.0 mm (0.185 to 0.197 in.)
*2:4.85 to 5.15 mm (0.191 to 0.203 in.)F -1.5 to 1.5 mm (-0.059 to 0.059 in.) G *1:4.7 to 5.0 mm (0.185 to 0.197 in.)
*2:4.85 to 5.15 mm (0.191 to 0.203 in.)H -1.5 to 1.5 mm (-0.059 to 0.059 in.)
*1: for Standard Body
*2: for Wide Body
ADJUST REAR BODY TAIL GATE ASSEMBLY (for A Deck)
Loosen the hinge bolts on the rear body tail gate assembly.
Adjust the rear body tail gate assembly by moving it left and right so that the clearance measurements are within the specified ranges.
Tighten the hinge bolts on the rear body tail gate assembly after the adjustment.
- Torque:
- 25 N*m (255 kgf*cm, 18 ft.*lbf)
INSPECT REAR BODY TAIL GATE ASSEMBLY (for J Deck)
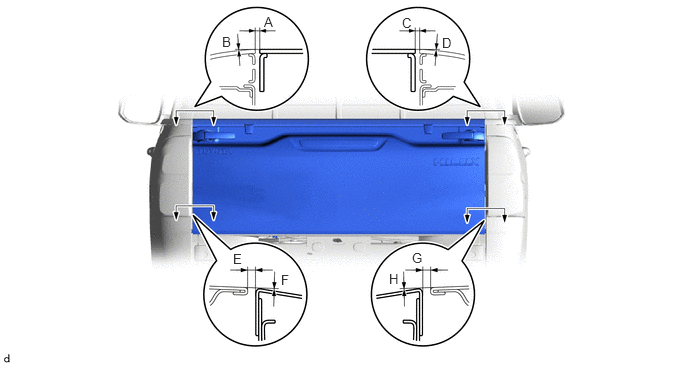
Check that the clearance measurements of areas A to H are within the standard ranges.
- Standard:
Area Specified Condition Area Specified Condition A 4.7 to 5.0 mm (0.185 to 0.197 in.) B -1.5 to 1.5 mm (-0.059 to 0.059 in.) C 4.7 to 5.0 mm (0.185 to 0.197 in.) D -1.5 to 1.5 mm (-0.059 to 0.059 in.) E 4.7 to 5.0 mm (0.185 to 0.197 in.) F -1.5 to 1.5 mm (-0.059 to 0.059 in.) G 4.7 to 5.0 mm (0.185 to 0.197 in.) H -1.5 to 1.5 mm (-0.059 to 0.059 in.)
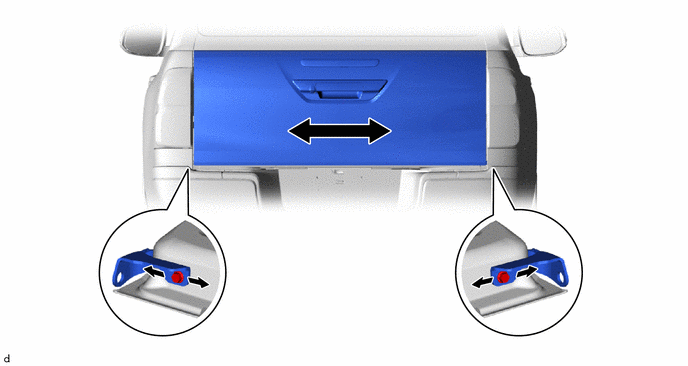
ADJUST REAR BODY TAIL GATE ASSEMBLY (for J Deck)
Loosen the hinge bolts on the rear body tail gate assembly.
Adjust the rear body tail gate assembly by moving it left and right so that the clearance measurements are within the specified ranges.
Tighten the hinge bolts on the rear body tail gate assembly after the adjustment.
- Torque:
- 25 N*m (255 kgf*cm, 18 ft.*lbf)