FRONT SUSPENSION FRONT LOWER SUSPENSION ARM(for 2WD) INSTALLATION
CAUTION / NOTICE / HINT
- HINT:
- ·
Use the same procedure for the RH and LH sides.
·The procedure listed below is for the LH side.
PROCEDURE

 43340A
1.INSTALL FRONT LOWER BALL JOINT ASSEMBLY LH
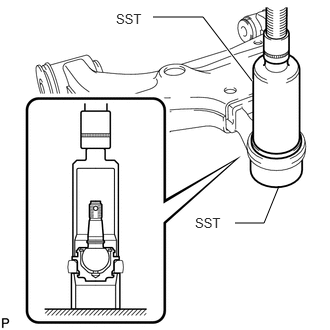
Using SST and press, press in a new lower ball joint.
- SST
- 09226-10010
09631-32020
Install a new snap ring.
- NOTICE:
-
Make sure the snap ring is securely installed in the groove.
48654F
2.INSTALL FRONT LOWER NO. 1 ARM BUSH LH
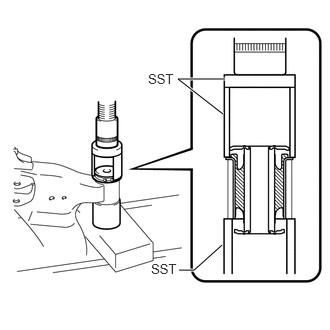
Using SST and a press, install a new front lower No. 1 arm bush LH.
- SST
- 09710-14013 (09710-00021)
09710-20011 (09710-06041)
09950-60010 (09951-00610)
48655E
3.INSTALL FRONT LOWER NO. 2 ARM BUSH LH
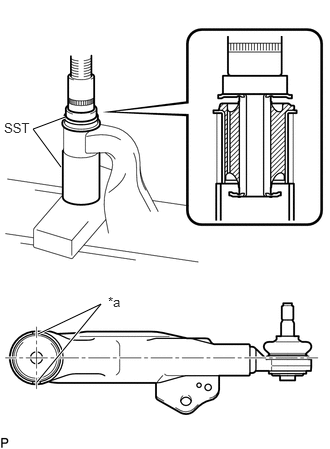
| *a | Bush Positioning Protrusion |
Using SST and a press, press in a new front lower No. 2 arm bush LH.
- SST
- 09710-14013 (09710-00021)
09950-60010 (09951-00650)
- NOTICE:
-
Press the bush while making sure the bush positioning protrusions are perpendicular to the lower arm as shown in the illustration.
48626
4.INSTALL FRONT LOWER BALL JOINT ATTACHMENT LH
Install the front lower ball joint attachment LH with a new nut and a new cotter pin.
- Torque:
- 140 N*m (1428 kgf*cm, 103 ft.*lbf)
48069
5.TEMPORARILY INSTALL FRONT LOWER NO. 1 SUSPENSION ARM SUB-ASSEMBLY LH
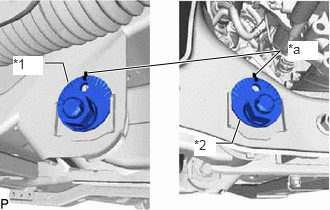
| *1 | No. 1 Camber Adjusting Cam |
| *2 | No. 2 Camber Adjusting Cam |
| *a | Matchmark |
Temporarily install the front lower No. 1 suspension arm sub-assembly LH, and No. 1 and No. 2 camber adjusting cams with the 2 camber adjusting cams and 2 nuts.
Align the matchmarks on the No. 1 camber adjusting cam and No. 2 camber adjusting cam with the corresponding matchmarks on the vehicle frame.
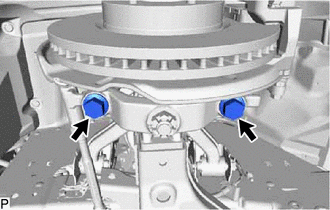
Install the front lower ball joint attachment LH with the 2 bolts.
- Torque:
- 160 N*m (1632 kgf*cm, 118 ft.*lbf)
48304
6.INSTALL FRONT NO. 1 SPRING BUMPER SUB-ASSEMBLY
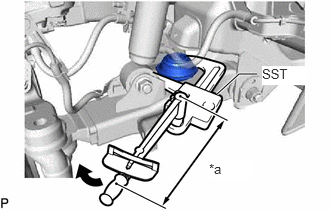
| *a | Torque Wrench Fulcrum Length |
Using SST, install the front No. 1 spring bumper sub-assembly to the front lower No. 1 suspension arm sub-assembly LH.
- SST
- 09922-10010
- Torque:
- Specified tightening torque : 31 N*m (316 kgf*cm, 23 ft.*lbf)
- HINT:
- ·
Calculate the torque wrench reading when changing the fulcrum length of the torque wrench.
Click hereGeneral>INTRODUCTION>REPAIR INSTRUCTION>PRECAUTION
·When using SST (fulcrum length of 112.5 mm (4.4291 in.)) + torque wrench (fulcrum length of 300 mm (11.8110 in.)): 22.5 N*m (229 kgf*cm, 17 ft.*lbf)
7.TEMPORARILY INSTALL FRONT SHOCK ABSORBER WITH COIL SPRING
Temporarily install the front shock absorber with coil spring with the bolt and nut.
48810
8.CONNECT FRONT STABILIZER LINK ASSEMBLY LH
Connect the front stabilizer link assembly LH to the front lower No. 1 suspension arm sub-assembly LH with the nut.
- Torque:
- 78 N*m (795 kgf*cm, 58 ft.*lbf)
- HINT:
-
If the ball joint turns together with the nut, use a 6 mm hexagon wrench to hold the stud in place.
89543
9.CONNECT FRONT SPEED SENSOR LH
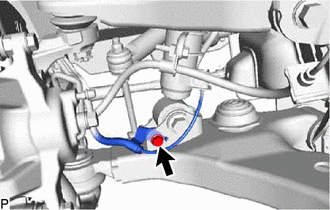
Connect the front speed sensor LH with the bolt.
- Torque:
- 32 N*m (326 kgf*cm, 24 ft.*lbf)
10.INSTALL FRONT WHEEL
11.STABILIZE SUSPENSION
48069
12.TIGHTEN FRONT LOWER NO. 1 SUSPENSION ARM SUB-ASSEMBLY LH
Tighten the 2 nuts.
- Torque:
- 210 N*m (2141 kgf*cm, 155 ft.*lbf)
13.TIGHTEN FRONT SHOCK ABSORBER WITH COIL SPRING
Fix the nut in place and tighten the bolt.
- Torque:
- 110 N*m (1122 kgf*cm, 81 ft.*lbf)
- NOTICE:
-
Do not tighten the nut.
14.INSPECT AND ADJUST FRONT WHEEL ALIGNMENT