2TR-FE FUEL FUEL INJECTOR INSPECTION
PROCEDURE

 1.INSPECT FUEL INJECTOR ASSEMBLY
Measure the resistance according to the value(s) in the table below.
- Standard Resistance:
Tester Connection Condition Specified Condition 1 - 2 20°C (68°F) 11.6 to 12.4 Ω
If the result is not as specified, replace the fuel injector assembly.
23250
2.INSPECT INJECTION VOLUME AND LEAKAGE
Check the injection volume.
- CAUTION:
- ·
This test involves high-pressure fuel and electricity.
·Take every precaution regarding safe handling of both the fuel and the electrical parts.
·Perform this test in a safe area and avoid any sparks and flames.
·Do not smoke.
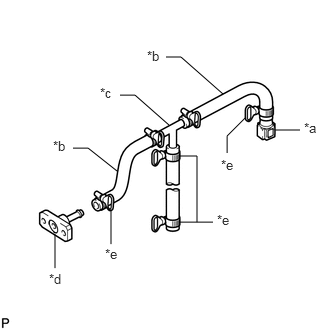
| *a | SST (Fuel Tube Connector) |
| *b | SST (Hose) |
| *c | SST (3 Way) |
| *d | SST (Union No. 7) |
| *e | SST (Hose Band) |
Assemble SST as shown in the illustration.
- SST
- 09268-31014 (09268-41091, 09268-41120, 09268-41500, 09268-41700, 95336-08070)
Discharge the fuel system pressure.
Click hereEngine / Hybrid System>2TR-FE FUEL>FUEL SYSTEM>PRECAUTION
Remove the No. 1 fuel hose from the fuel filter assembly.
Click hereEngine / Hybrid System>2TR-FE FUEL>FUEL FILTER>REPLACEMENT
Remove the 2 bolts and disconnect the fuel pressure regulator assembly from the fuel delivery pipe.
- NOTICE:
-
Do not disconnect the No. 2 fuel hose from the fuel pressure regulator assembly.
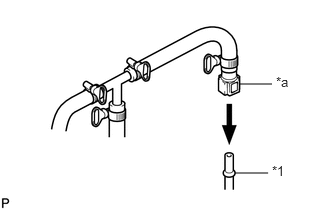
| *1 | Fuel Filter |
| *a | SST (Fuel Tube Connector) |
Connect SST to the fuel filter assembly.
- SST
- 09268-31014 (09268-41500)
- CAUTION:
-
Always read the precautions before connecting the fuel tube connector (quick type).
-
Click hereEngine / Hybrid System>2TR-FE FUEL>FUEL SYSTEM>PRECAUTION
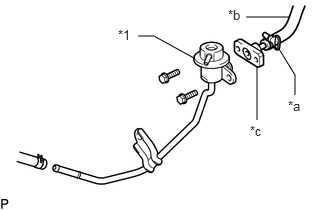
| *1 | Fuel Pressure Regulator Assembly |
| *a | SST (Hose Band) |
| *b | SST (Hose) |
| *c | SST (Union No. 7) |
Connect SST to the fuel pressure regulator assembly with the 2 bolts.
- SST
- 09268-31014 (09268-41091, 09268-41700, 95336-08070)
- Torque:
- 9.0 N*m (92 kgf*cm, 80 in.*lbf)
Install the O-ring to the fuel injector assembly.
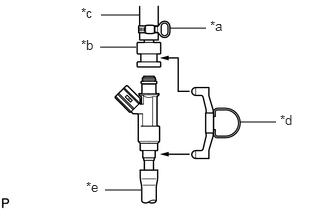
| *a | SST (Hose Band) |
| *b | SST (Adaptor) |
| *c | SST (Hose) |
| *d | SST (Clamp) |
| *e | Vinyl Tube |
Assemble SST as shown in the illustration.
- SST
- 09268-31014 (09268-41110, 09268-41310, 09268-41700, 95336-08070)
- NOTICE:
-
Make sure that SST (adapter) and SST (clamp) are not loose and do not rattle.
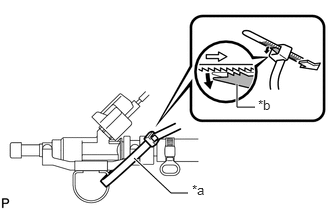
| *a | SST (Tie Band) |
| *b | Lock |
Pass SST (tie band) through the loop on the handle of SST (clamp) to secure SST (clamp) to SST (adapter).
- SST
- 09268-31014 (09268-41800)
- NOTICE:
- ·
As SST (tie band) does not completely prevent SST (clamp) from becoming loose, do not subject the parts to any impacts while using them.
·Before using SST (tie band), make sure that there is no deterioration, damage or cracks. If there are any abnormalities, replace SST.
- HINT:
-
When removing SST (tie band), disengage the lock.
Check that SST (clamp) and SST (adapter) cannot be easily separated.
Install a vinyl tube to the fuel injector assembly.
Put the fuel injector assembly into a graduated cylinder.
- NOTICE:
-
Install a suitable vinyl tube to the injector to contain any gasoline spray.
Operate the fuel pump.
Click hereEngine / Hybrid System>2TR-FE FUEL>FUEL SYSTEM>ON-VEHICLE INSPECTION
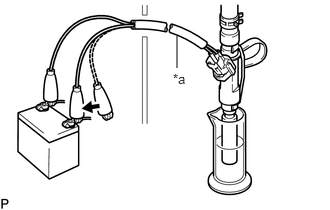
| *a | SST (EFI Inspection Wire H) |

|
Connect |
Connect SST (EFI inspection wire H) to the fuel injector assembly and the battery for 15 seconds, and measure the injection volume with a graduated cylinder. Test each injector 2 or 3 times.
- SST
- 09842-30080
- Standard injection volume:
82 to 99 cc (5.0 to 6.0 cu in.) per 15 seconds
- Difference between each injector:
17 cc (1.0 cu in.) or less
If the result is not as specified, replace the fuel injector assembly.
Check the leakage.
In the condition above, disconnect the test probes of SST (EFI inspection wire H) from the battery and check the fuel leakage rate from the fuel injector assembly.
- Fuel leakage:
1 drop or less per 25 minutes