LIGHTING (EXT) LIGHTING SYSTEM Hazard Warning Switch Circuit
DESCRIPTION
When the combination meter assembly receives a hazard warning switch signal, the flasher IC turns on and hazard control is performed.
WIRING DIAGRAM
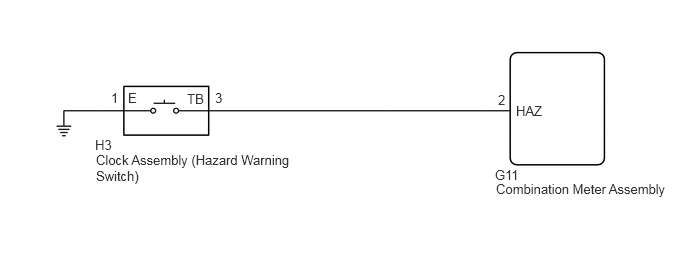
CAUTION / NOTICE / HINT
- NOTICE:
-
When replacing the combination meter assembly, make sure to replace it with a new one.
PROCEDURE
Using the GTS, read the Data List.
Click hereVehicle Exterior>LIGHTING (EXT)>LIGHTING SYSTEM>DATA LIST / ACTIVE TEST
- Body Electrical > Combination Meter > Data List
-
Tester Display Measurement Item Range Normal Condition Diagnostic Note Hazard Flasher Switch Hazard warning switch signal ON or OFF ON: Hazard warning switch on
OFF: Hazard warning switch off-
- Body Electrical > Combination Meter > Data List
-
Tester Display Hazard Flasher Switch - 50003 122 99
- Result:
Proceed to OK NG
OK
NG
Remove the clock assembly (hazard warning switch).
Click hereVehicle Interior>METER / GAUGE / DISPLAY>CLOCK>REMOVAL
Inspect the clock assembly (hazard warning switch).
Click hereVehicle Interior>METER / GAUGE / DISPLAY>CLOCK>INSPECTION
- Result:
Proceed to OK NG
OK
NG
Disconnect the H3 clock assembly (hazard warning switch) connector.
Disconnect the G11 combination meter assembly connector.
Measure the resistance according to the value(s) in the table below.
- Standard Resistance:
Tester Connection Condition Specified Condition H3-3 (TB) - G11-2 (HAZ) Always Below 1 Ω H3-1 (E) - Body ground Always Below 1 Ω H3-3 (TB) - Body ground Always 10 kΩ or higher
- Result:
Proceed to OK NG
OK
NG