SEAT FRONT SEAT ASSEMBLY(for Bench Seat Type) REASSEMBLY
CAUTION / NOTICE / HINT
- CAUTION:
- ·
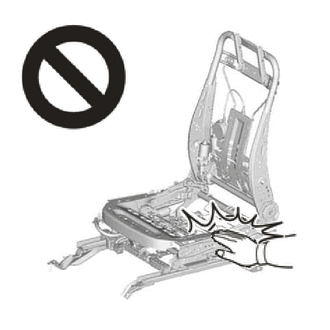
Wear protective gloves. Sharp areas on the parts may injure your hands.
·There is risk of injury.
·If the front seat side airbag was deployed, replace the front seat airbag assembly, separate type front seatback frame sub-assembly, separate type front seatback cover and separate type front seatback pad with the necessary parts in accordance with the extent of the collision damage.
·Replace any other damaged parts as necessary.
PROCEDURE

 1.INSTALL SEAT COVER WIRE
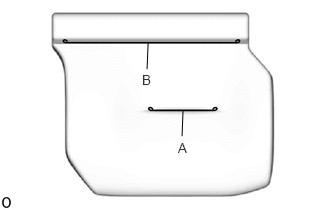
Install the seat cover wire.
- HINT:
- ·
Wire 1000 mm (3.28 ft.) or longer and shaped wire are available as supplied parts.
- ·
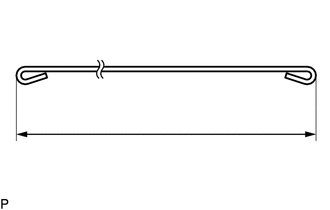
For wire 1000 mm (3.28 ft.) or less in length, cut or shape 1000 mm (3.28 ft.) wire into the dimensions shown in the illustration.
- ·
Make sure to read the precautions before preparing the wire.
Click hereVehicle Interior>SEAT>FRONT SEAT ASSEMBLY(for Manual Seat)>PRECAUTION
| A | 270 mm (10.63 in.) |
| B | 510 mm (16.73 ft.) |
- HINT:
-
-
The dimensions shown in the illustration are the lengths.
71072S
2.INSTALL SEPARATE TYPE FRONT SEAT CUSHION COVER
- HINT:
- ·
When installing the seat cover, refer to the precautions in order to prevent wrinkles from forming.
Click hereVehicle Interior>SEAT>FRONT SEAT ASSEMBLY(for Manual Seat)>PRECAUTION
- ·
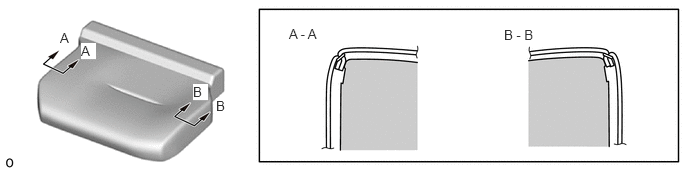
Align the seam allowance in a single direction as shown in the illustration.
 0.625,0.313 0.781,0.479 0.156,0.167 10 true A 0.844,0.448 1,0.615 0.156,0.167 10 true A 2.01,0.875 2.167,1.042 0.156,0.167 10 true B 2.25,1.021 2.406,1.188 0.156,0.167 10 true B 3.01,0.271 3.781,0.469 0.771,0.198 10 false A - A 5.25,0.281 6.021,0.479 0.771,0.198 10 false B - B
Set the separate type front seat cushion cover.
Using hog ring pliers, install the separate type front seat cushion cover to the separate type front seat cushion pad with 7 new hog rings in the order indicated in the illustration.
- NOTICE:
-
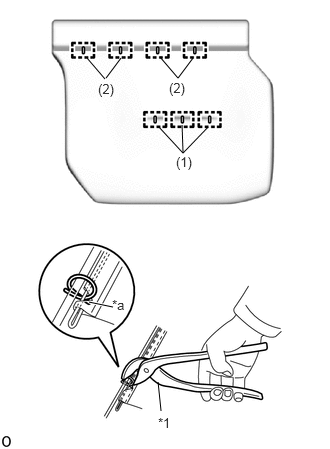 1.854,0.813 2.01,0.604 false 1.104,0.813 1.26,0.604 false 1.854,0.813 1.667,0.594 false 1.094,0.823 0.906,0.604 false 1.906,1.594 1.646,1.313 false 1.906,1.594 2.167,1.323 false 1.906,1.594 1.896,1.302 false 1.677,4.281 1.646,3.979 false 1.177,3.198 0.927,3.146 true 1.76,0.833 2.219,1.031 0.458,0.198 10 false (2) 1.833,1.604 2.292,1.802 0.458,0.198 10 false (1) 1.021,0.844 1.479,1.042 0.458,0.198 10 false (2) 1.646,4.323 1.958,4.521 0.313,0.198 10 false *1 1.167,3.094 1.479,3.292 0.313,0.198 10 false *a
*1 Hog Ring Pliers *a Cutout
- ·
Be careful not to damage the separate type front seat cushion cover.
- ·
Be sure to securely install the hog rings as shown in the illustration while preventing wrinkles from forming on the separate type front seat cushion cover.
- HINT:
-
Install the hog rings at the cutouts if they are there.
3.INSTALL SEAT CUSHION COVER WITH PAD
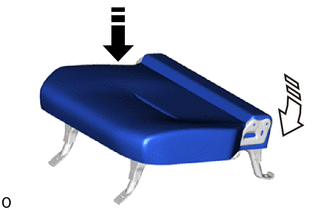

|
Install in this Direction (1) |

|
Install in this Direction (2) |
Push in installation direction (1) shown in the illustration to temporarily install the seat cushion cover with pad.
Push in the rear end of the seat cushion cover with pad in installation direction (2) shown in the illustration.
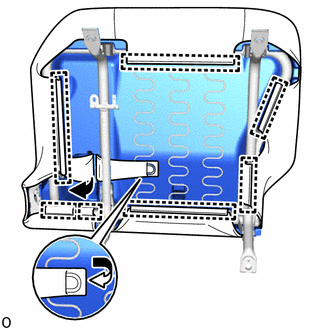
While rotating in the attach the J hook to install the seatback cover with pad.
Connect the 2 straps of the separate type front seat cushion cover for the front seat cushion frame sub-assembly LH.
Attach the connector clamp.
Connect the connector.
4.INSTALL SEAT COVER WIRE
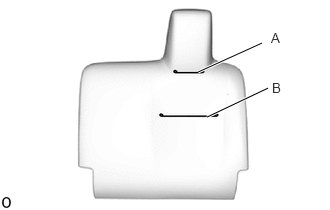
Install the seat cover wire.
- HINT:
- ·
Wire 1000 mm (3.28 ft.) or longer and shaped wire are available as supplied parts.
- ·
For wire 1000 mm (3.28 ft.) or less in length, cut or shape 1000 mm (3.28 ft.) wire into the dimensions shown in the illustration.
- ·
Make sure to read the precautions before preparing the wire.
Click hereVehicle Interior>SEAT>FRONT SEAT ASSEMBLY(for Manual Seat)>PRECAUTION
| A | 150 mm (5.91 in.) |
| B | 270 mm (10.63 in.) |
- HINT:
-
-
The dimensions shown in the illustration are the lengths.
71074S
5.INSTALL SEPARATE TYPE FRONT SEATBACK COVER
- HINT:
- ·
When installing the seat cover, refer to the precautions in order to prevent wrinkles from forming.
Click hereVehicle Interior>SEAT>FRONT SEAT ASSEMBLY(for Manual Seat)>PRECAUTION
- ·
Align the seam allowance in a single direction as shown in the illustration.
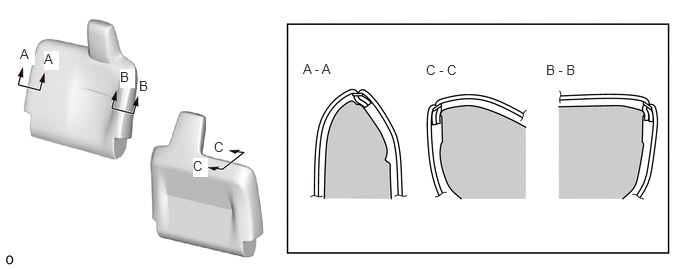 0.208,0.479 0.365,0.677 0.156,0.198 10 true A 0.458,0.531 0.615,0.729 0.156,0.198 10 true A 1.25,0.719 1.406,0.917 0.156,0.198 10 true B 1.448,0.813 1.604,1.01 0.156,0.198 10 true B 2.229,1.448 2.385,1.646 0.156,0.198 10 true C 2.01,1.646 2.167,1.844 0.156,0.198 10 true C 3.156,0.635 3.927,0.833 0.771,0.198 10 false A - A 5.688,0.646 6.458,0.844 0.771,0.198 10 false B - B 4.438,0.646 5.208,0.844 0.771,0.198 10 false C - C
Set the separate type front seatback cover.
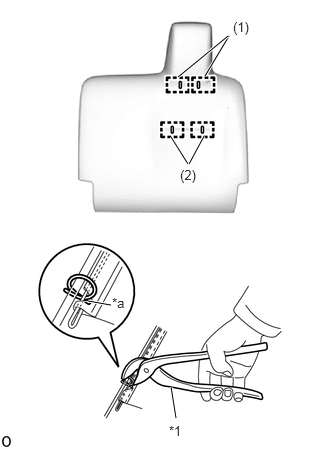
| *1 | Hog Ring Pliers |
| *a | Cutout |
Using hog ring pliers, install the separate type front seatback cover to the separate type front seatback pad LH with 4 new hog rings in the order indicated in the illustration.
- NOTICE:
- ·
Be careful not to damage the separate type front seatback cover.
- ·
Be sure to securely install the hog rings as shown in the illustration while preventing wrinkles from forming on the separate type front seatback cover.
- HINT:
-
Install the hog rings at the cutouts if they are there.
6.INSTALL SEATBACK COVER WITH PAD
|
|
Install in this Direction (1) |
|
|
Install in this Direction (2) |
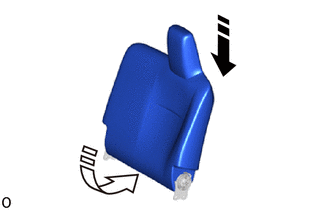
Push in installation direction (1) shown in the illustration to temporarily install the seatback cover with pad.
Push in the rear end of the seatback cover with pad in installation direction (2) shown in the illustration.
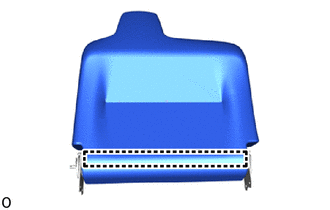
Attach the J hook to install the seatback cover with pad.
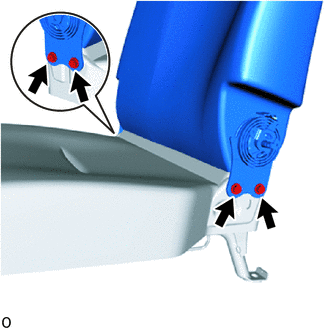
Install the 4 bolts and front seatback assembly.
- Torque:
- 42 N*m (428 kgf*cm, 31 ft.*lbf)
71862
7.INSTALL FRONT SEAT INNER CUSHION SHIELD LH
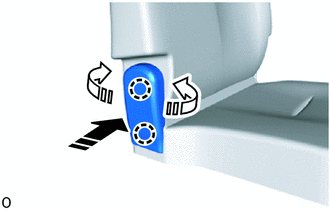
|
|
Install in this Direction (1) |
|
|
Install in this Direction (2) |
Push in installation direction (1) shown in the illustration to attach the claw.
Push in installation direction (2) shown in the illustration to attach the claw and install the front seat inner cushion shield LH.
71812D
8.INSTALL FRONT SEAT CUSHION SHIELD LH
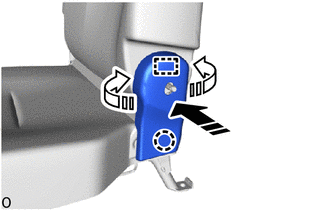
|
|
Install in this Direction (1) |
|
|
Install in this Direction (2) |
Push in installation direction (1) shown in the illustration to attach the claw.
Push in installation direction (2) shown in the illustration to attach the guide and install the front seat cushion shield LH.
72526E
9.INSTALL RECLINING ADJUSTER RELEASE HANDLE LH
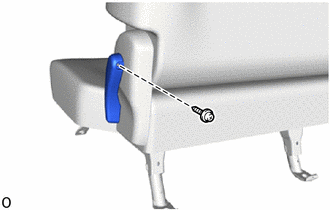
Install the screw and reclining adjuster release handle LH.