INTERIOR PANELS / TRIM UPPER INSTRUMENT PANEL REASSEMBLY
CAUTION / NOTICE / HINT
- HINT:
- ·
Use the same procedure for RHD and LHD vehicles.
·The procedure listed below is for LHD vehicles.
PROCEDURE

 73960A
1.INSTALL INSTRUMENT PANEL PASSENGER WITHOUT DOOR AIRBAG ASSEMBLY (w/ Front Passenger Airbag)
55368C
2.INSTALL METER MOUNTING BRACKET
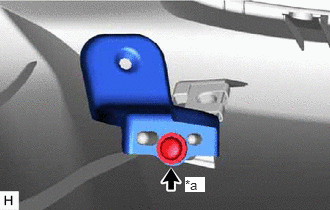
| *a | Screw <D> |
for LH Side:
Install the meter mounting bracket with the screw <D>.
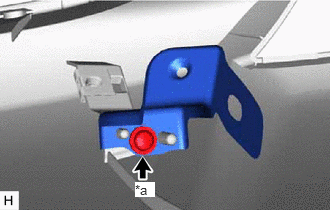
| *a | Screw <D> |
for RH Side:
Install the meter mounting bracket with the screw <D>.
55359C
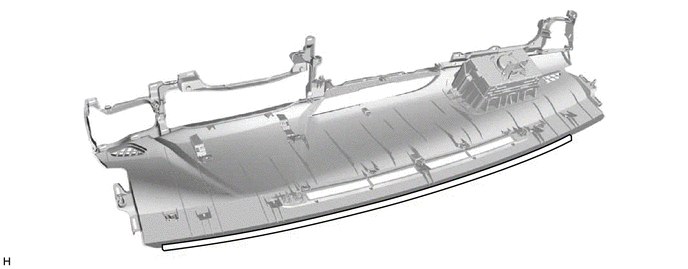
3.INSTALL NO. 5 INSTRUMENT PANEL CUSHION
- NOTICE:
-
Installing the part with double-sided tape residue still remaining can cause poor adhesion. Therefore, using a cloth or other material, clean the part until the residue is completely removed (when reusing the upper instrument panel sub-assembly).
Remove the peeling paper from a new No. 5 instrument panel cushion and press firmly to install the No. 5 instrument panel cushion in the position shown in the illustration.
55355
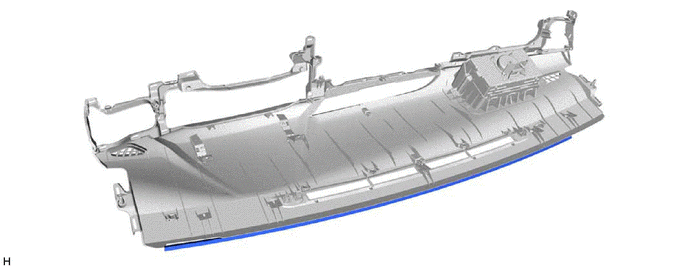
4.INSTALL NO. 1 INSTRUMENT PANEL CUSHION
- NOTICE:
-
Installing the part with double-sided tape residue still remaining can cause poor adhesion. Therefore, using a cloth or other material, clean the part until the residue is completely removed (when reusing the upper instrument panel sub-assembly).
Remove the peeling paper from a new No. 1 instrument panel cushion and press firmly to install the No. 1 instrument panel cushion in the position shown in the illustration.
55356C
5.INSTALL NO. 2 INSTRUMENT PANEL CUSHION
- NOTICE:
-
Installing the part with double-sided tape residue still remaining can cause poor adhesion. Therefore, using a cloth or other material, clean the part until the residue is completely removed (when reusing the upper instrument panel sub-assembly).
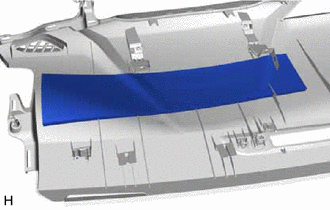
Remove the peeling paper from a new No. 2 instrument panel cushion and press firmly to install the No. 2 instrument panel cushion in the position shown in the illustration.
55357B
6.INSTALL NO. 3 INSTRUMENT PANEL CUSHION
- NOTICE:
-
Installing the part with double-sided tape residue still remaining can cause poor adhesion. Therefore, using a cloth or other material, clean the part until the residue is completely removed (when reusing the upper instrument panel sub-assembly).
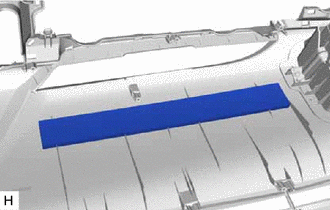
Remove the peeling paper from a new No. 3 instrument panel cushion and press firmly to install the No. 3 instrument panel cushion in the position shown in the illustration.
55358K
7.INSTALL NO. 4 INSTRUMENT PANEL CUSHION
- NOTICE:
-
Installing the part with double-sided tape residue still remaining can cause poor adhesion. Therefore, using a cloth or other material, clean the part until the residue is completely removed (when reusing the upper instrument panel sub-assembly).
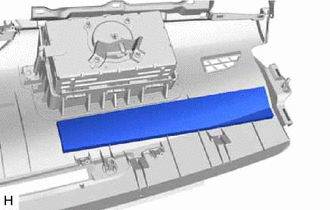
Remove the peeling paper from a new No. 4 instrument panel cushion and press firmly to install the No. 4 instrument panel cushion in the position shown in the illustration.
82142
8.INSTALL NO. 2 INSTRUMENT PANEL WIRE
w/o Front Passenger Airbag:
Connect the connector and attach the clamp to install the No. 2 instrument panel wire.
w/ Front Passenger Airbag:
Connect the airbag connector to the instrument panel passenger without door airbag assembly.
- NOTICE:
-
When connecting any airbag connector, take care not to damage the airbag wire harness.
Push in the connector lock to install the airbag connector.
Connect the connector and attach the clamp to install the No. 2 instrument panel wire.
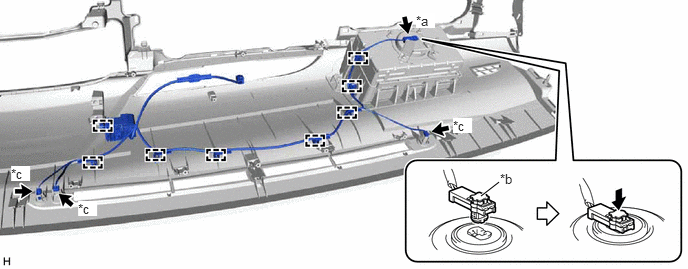
| *a | Airbag Connector | *b | Connector Lock |
| *c | Connector | - | - |
55670A
9.INSTALL CENTER INSTRUMENT PANEL REGISTER ASSEMBLY
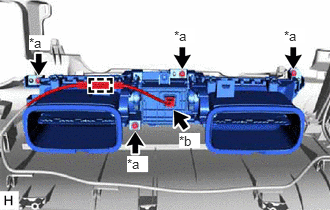
| *a | Screw <D> |
| *b | Connector |
Install the center instrument panel register assembly with the 4 screws <D>.
Connect the connector and attach the clamp.
55844
10.INSTALL NO. 2 HEATER TO REGISTER DUCT
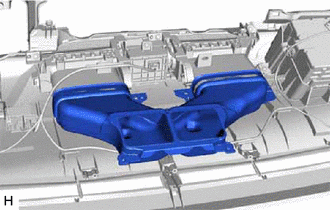
Install the No. 2 heater to register duct.
55085
11.INSTALL NO. 2 HEATER TO REGISTER DUCT SUB-ASSEMBLY
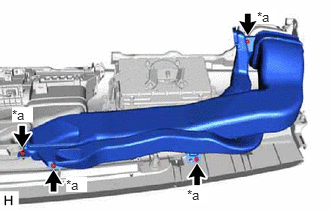
| *a | Screw <D> |
Install the No. 2 heater to register duct sub-assembly with the 4 screws <D>.
55084E
12.INSTALL NO. 1 HEATER TO REGISTER DUCT SUB-ASSEMBLY
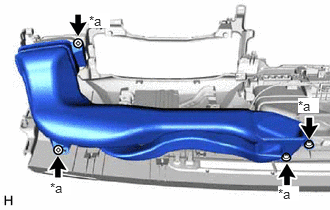
| *a | Screw <D> |
Install the No. 1 heater to register duct sub-assembly with the 4 screws <D>.
55950G
13.INSTALL DEFROSTER NOZZLE ASSEMBLY
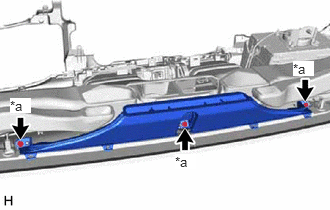
| *a | Screw <D> |
Install the defroster nozzle assembly with the 3 screws <D>.