1KD-FTV ENGINE CONTROL ECD SYSTEM Turbocharger Oil Leak and White Smoke
DESCRIPTION
| Oil Leak Type | Description | Main Trouble Area |
|---|---|---|
| Internal oil leak
(White smoke) |
Oil leak from bearing housing to compressor housing (intake side) or turbine housing (exhaust side) through seal rings.
Internal oil leak is not visible from outside of turbocharger. If oil leak occurs from turbine side seal, large amount of white smoke will be emitted from exhaust pipe. |
·
Compressor side seal ring ·
Turbine side seal ring ·
Clogging of oil drain ·
Shaft breakage ·
Shaft and bearing seizure ·
Compressor impeller damage ·
Low quality fuel |
| External oil leak | Oil leak from inside of turbocharger to outside of turbocharger (e.g. from FIPG seal, oil pipe flange or oil pipe union).
Includes oil leak visible from outside of turbocharger. |
·
FIPG sealing part ·
Oil pipe flange ·
Oil pipe union ·
Hose connection of intake pipe |
- HINT:
- ·
Turbocharger oil leaks are classified into 2 types. One is an internal oil leak, and the other is an external oil leak.
·When oil leaks and smoke occur, sometimes the turbocharger is mistakenly replaced, even though the turbocharger is not the cause of the problem.
·When there are oil marks on the surface of the compressor housing, or oil in the compressor inlet or outlet, the problem may mistakenly be determined to be a turbocharger oil leak.
·Each part of the turbocharger is shown below.
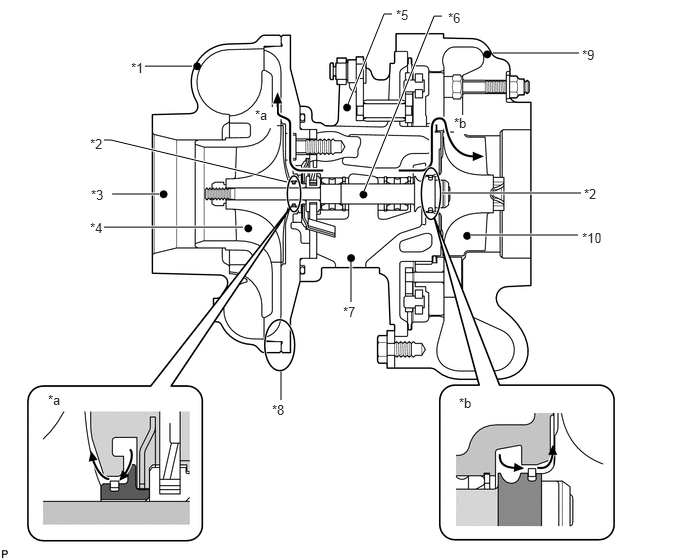
| *1 | Compressor Housing | *2 | Seal Ring |
| *3 | Compressor Inlet | *4 | Compressor Impeller |
| *5 | Bearing Housing | *6 | Turbine Shaft |
| *7 | Oil Drain (Outlet) | *8 | FIPG Sealing Part |
| *9 | Turbine Housing | *10 | Turbine Wheel |
| *a | Internal Oil Leak to Compressor Housing | *b | Internal Oil Leak to Turbine Housing |
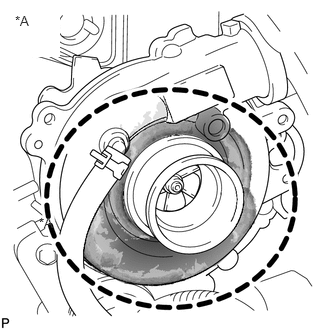
| *A | Fig. 1 |
- HINT:
- ·
Above illustration is an example.
·If the oil stain is similar to the one shown in the illustration (fig. 1), it may be oil spray from parts surrounding the turbocharger or oil leaking from the air cleaner hose. Therefore, this kind of oil stain on the outer surface of the turbocharger is not an oil leak from the turbocharger (external oil leak), and is not related to white smoke. For identification of an actual turbocharger outer oil leak, check only the sealing part shown below.
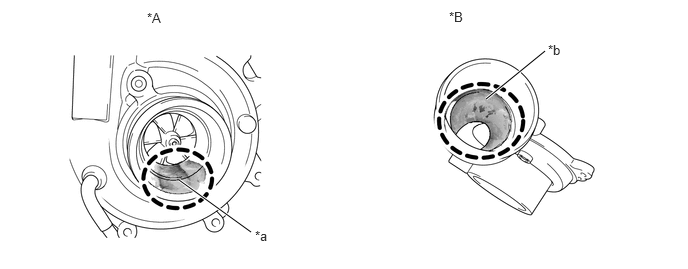
| *A | Fig. 2 | *B | Fig. 3 |
| *a | Oil Existence at Compressor Inlet (Max. 5 cm3) | *b | Oil Existence at Compressor Outlet |
- HINT:
- ·
Above illustration is an example.
·A certain amount of oil is contained in the intake system because blow-by gas containing oil mist is returned to the intake system by the PCV. Therefore, the oil amount at the compressor inlet shown in the left figure (fig. 2) is normal and not an oil leak from the turbocharger (internal oil leak). Also, oil at the compressor outlet as shown in fig. 3 is normal.
In addition, the compressor impeller surface may blacken due to blow-by gas but this is not abnormal.
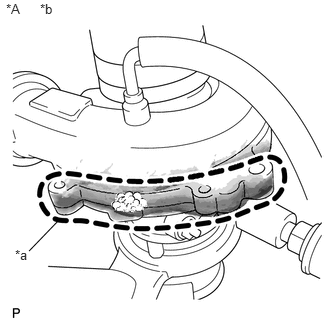
| *A | Fig. 4 |
| *a | In the case of an actual oil leak, oil leaks from the sealed part |
| *b | Oil Leak Check Point (FIPG Sealing Part) |
- HINT:
- ·
Above illustration is an example.
·This is an illustration (fig. 4) of an air leak test performed by applying soapy water to the area of the leak. Bubbles indicate the leak point.
Faults and Symptoms of Turbocharger Parts
| Main fault | Seal ring breakage |
| Symptoms | ·
Oil leak to compressor housing ·
Excessive oil consumption |
| Note | ·
In case of compressor seal ring failure, large amount of oil would be found between compressor outlet and intercooler, and between intercooler and intake manifold, but not found at compressor inlet. ·
If large amount of oil is found at compressor inlet, it is not from turbocharger and may indicate a problem in the PCV system. |
| Main fault | Seal ring breakage |
| Symptoms | ·
Oil leak to turbine housing ·
Large amount of white smoke from exhaust pipe ·
Excessive oil consumption |
| Note | ·
In case of turbine seal ring failure, large amount of white smoke would be emitted continuously. ·
If white smoke is emitted only just after engine start (and it disappears later), or small amount of white smoke is emitted intermittently, it is not from turbocharger. It is due to failure of other parts. ·
If wet oil is found at turbine inlet, it is not from turbocharger. It is due to problem in other parts. |
| Main fault | Oil drain clogging by coked oil |
| Symptoms | Large amount of white smoke from exhaust pipe |
- HINT:
- ·
Oil coking is caused by insufficient oil maintenance.
·If the oil drain is clogged by coked oil, oil cannot be drained smoothly, and it overflows from the bearing housing to the compressor housing and turbine housing. This results in a large amount of white smoke from the exhaust pipe.
If any solid (coked oil) is visually confirmed inside the bearing housing, it can be assumed to be the cause of internal oil leak.
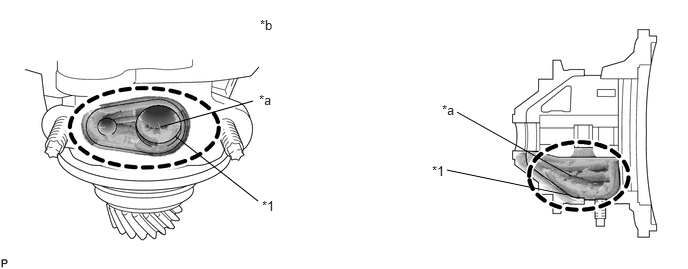 1.823,1.417 2.688,2.094 false 5.917,2.031 4.656,1.771 false 1.667,1.323 2.635,1.052 false 5.948,1.833 4.76,1.167 false 2.698,0.958 2.906,1.135 0.208,0.177 10 false *a 2.729,2.063 2.896,2.24 0.167,0.177 10 false *1 2.708,0.177 2.906,0.417 0.198,0.24 10 false *b 4.604,1.063 4.813,1.24 0.208,0.177 10 false *a 4.5,1.698 4.667,1.875 0.167,0.177 10 false *1
*1 Oil Drain - - *a Coked Oil *b Oil Drain Clogged with Coked Oil
- HINT:
-
Above illustration is an example.
| Main fault | ·
Breakage ·
Seizure |
| Symptoms | ·
Shaft does not rotate ·
Oil leak to compressor housing ·
Large amount of white smoke from exhaust pipe ·
Lack of power ·
Turbocharger noise changes |
| Note | ·
In case of turbine shaft failure, lack of power due to lack of boost pressure will be felt. ·
In cold conditions, shaft rotation can feel somewhat clingy due to viscosity of oil. Be sure not to mistake it for unsmooth shaft rotation. |
| Main fault | Breakage |
| Symptoms | ·
Shaft does not rotate ·
Oil leak to compressor housing ·
Lack of power |
| Note | ·
In case of compressor impeller failure, large amount of oil would be found between compressor outlet and intercooler, and between intercooler and intake manifold, but not found at compressor inlet. ·
Oil is blocked by boost pressure at compressor seal ring. Therefore, if boost pressure does not increase due to breakage of compressor impeller, oil flows out to compressor housing. |
| Symptoms | Oil leak from FIPG sealing part |
| Note | ·
If oil stain is separated from FIPG sealing part, it can be determined to be due to oil spray from other parts surrounding turbocharger. ·
If oil stain is traced to hose connection part, it can be determined to be due to hose connection failure. |
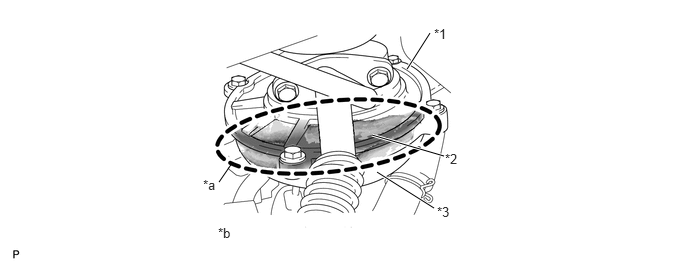
| *1 | Compressor Back Plate | *2 | FIPG Sealing Part |
| *3 | Compressor Housing | - | - |
| *a | Oil Leak | *b | Oil Leak from FIPG Sealing Part |
- HINT:
-
Above illustration is an example.
| Symptoms | Oil leak from hose connection between hose and compressor housing |
| Note | If oil stain is traced to hose connection part, it can be determined to be due to hose connection failure. |
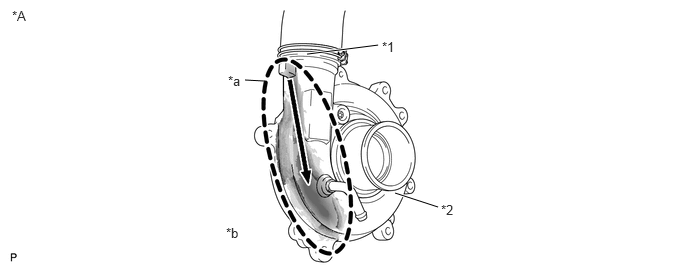
| *A | Fig. 5 | - | - |
| *1 | Compressor Outlet | *2 | Compressor Housing |
| *a | Trace of Oil Leak from Hose Connection Part | *b | Oil Leak from Hose Connection Part |
- HINT:
-
Above illustration is an example.
PROCEDURE
Check whether the oil leak is an internal or external oil leak.
- HINT:
-
White smoke is not related to an external oil leak.
Oil Leak Type Oil Leak Type Internal oil leak
(White smoke)Oil leak from bearing housing to compressor housing (intake side) or turbine housing (exhaust side) through seal rings.
Internal oil leak is not visible from outside of turbocharger.
If oil leak occurs from turbine side seal, large amount of white smoke will be emitted from exhaust pipe.External oil leak Oil leak from inside of turbocharger to outside of turbocharger (e.g. from FIPG seal, oil pipe flange or oil pipe union).
Includes oil leaks visible from outside of turbocharger.
- Result:
Result Proceed to External oil leak A Internal oil leak B
A
B
Replace the part which is leaking oil.
- Result:
Proceed to NEXT
NEXT
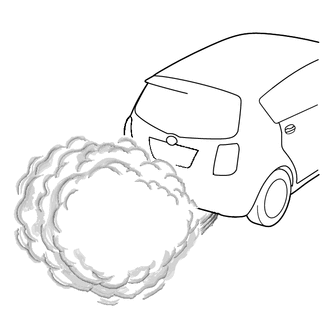
Fully depress the accelerator pedal, and then release it.
Check whether white smoke is emitted or not when racing the engine.
- CAUTION:
-
Be sure not to check for white smoke indoors.
- Result:
Result Proceed to White smoke is emitted A White smoke is not emitted B
A
B
Connect the GTS to the DLC3.
Turn the ignition switch to ON and turn the GTS on.
Enter the following menus: Powertrain / Engine / Trouble Codes.
- Powertrain > Engine > Trouble Codes
- 50001 234
Read the DTCs.
- Result:
Result Proceed to No DTCs are output A DTCs related to engine are output B
A
B
Check whether the white smoke is emitted only just after engine start and disappears later, or not.
- HINT:
- ·
If white smoke appears for only a short period of time immediately after the engine is started, the white smoke is not from the turbocharger.
·If the turbocharger is the cause of the problem, regardless of whether the engine is cold or warmed up, there will be a large amount of white smoke to the extent that visibility is obstructed for a few meters in the area of the smoke (as shown in the illustration).
·Depending on whether there is oil mixed with the fuel, or whether there is unburned fuel present, the smell of the exhaust gas differs. When oil is mixed in, the exhaust gas smells like burning oil.
- Result:
Result Proceed to Yes (white smoke is emitted only just after engine start) A No (white smoke is always and continuously emitted) B
A
B
Check whether the white smoke is emitted only in cold weather when the temperature is less than 0°C (32°F).
- HINT:
- ·
If the white smoke is emitted only in cold conditions, the smoke is not from the turbocharger and may be the smoke of unburned fuel.
·If misfiring occurs, unburned fuel is emitted.
- Result:
Result Proceed to Yes (white smoke is emitted in only cold conditions) A No (white smoke is emitted in both cold and warm conditions) B
A
B
Inspect the glow plug assembly.
Click hereEngine / Hybrid System>1KD-FTV STARTING>GLOW PLUG>ON-VEHICLE INSPECTION
- Result:
Proceed to OK NG
OK
NG
Read the injector compensation codes.
Click hereEngine / Hybrid System>1KD-FTV ENGINE CONTROL>ECD SYSTEM>REGISTRATION
- OK:
Compensation codes stored in the ECM match compensation codes of the installed fuel injectors.
- HINT:
- ·
If those do not match, register correct compensation code.
·If necessary, perform "Pilot Quantity Learning".
Click hereEngine / Hybrid System>1KD-FTV ENGINE CONTROL>ECD SYSTEM>REGISTRATION
- Result:
Proceed to OK NG
OK
NG
Check the fuel system.
Click hereEngine / Hybrid System>1KD-FTV ENGINE CONTROL>ECD SYSTEM>SYSTEM DESCRIPTION
- Result:
Proceed to OK NG
OK
NG
Check the cylinder compression pressure.
Click hereEngine / Hybrid System>1KD-FTV ENGINE MECHANICAL>ENGINE>ON-VEHICLE INSPECTION
- HINT:
- ·
According to vehicle models, Active Test function "Check the Cylinder Compression" is available. This Active Test helps determine whether a cylinder has compression loss or not.
·If it is difficult to judge the low compression pressure, perform the conventional compression pressure measurement.
1.Connect the GTS to the DLC3.
2.Turn the ignition switch to ON and turn the GTS on.
3.Enter the following menus: Powertrain / Engine / Active Test / Check the Cylinder Compression / Data List / Compression / Engine Speed of Cyl #1 to #4.
4.Press the RIGHT or LEFT button to change the Check the Cylinder Compression to ON.
5.Crank the engine until the monitor item values Engine speed of Cyl #1 to #4 and Av Engine Speed of All Cyl change.
6.Check the engine speed.
- Standard:
The values of Engine Speed Cyl #1 to #4 are within 10 rpm of each other.
7.When cranking, if the speed of a cylinder is approximately 100 rpm more than the other cylinders, there is probably a complete loss of compression in that cylinder.
- HINT:
- ·
If any of following malfunctions occurs, white smoke is emitted.
1.Nozzle seat sealing failure
2.Piston cracking
3.Piston rings breakage
·To check whether the pistons and piston rings have a malfunction, remove the oil level dipstick. If oil sprays out, the pressure inside the crankcase has risen which indicates that there is a malfunction in a piston or piston ring.
- Result:
Proceed to OK NG
OK
NG
Replace the turbocharger sub-assembly.
Click hereEngine / Hybrid System>1KD-FTV INTAKE / EXHAUST>EXHAUST MANIFOLD W/ TURBOCHARGER>REMOVAL
- Result:
Proceed to NEXT
NEXT
Check whether the white smoke problem has been successfully repaired by starting the engine.
- Result:
Proceed to NEXT
NEXT
Remove the air cleaner hose from the compressor inlet (remove the compressor inlet elbow if necessary).
Check whether an excessive amount of oil is present or not, and whether excessive oil deposits are attached to the compressor impeller or not.
- HINT:
- ·
A certain amount of oil may be present as shown in fig. 2 in "Description", because a certain amount of oil mist is contained in the PCV gas and this oil accumulates just before the compressor inlet.
·If an excessive amount of oil is present at the compressor inlet, there may be a problem in the PCV system.
Reinstall the air cleaner hose (compressor inlet elbow).
- Result:
Proceed to NEXT
NEXT
Remove the air hose from the compressor outlet.
Check whether or not an excessive amount of oil or excessive oil deposits are present at the compressor outlet.
- HINT:
-
A certain amount of oil may be present as shown in fig. 3 in "Description", because a certain amount of oil mist is contained in the PCV gas.
- Result:
Result Proceed to Excessive amount of oil present at both compressor inlet and outlet C Excessive amount of oil present only at compressor outlet B Excessive amount of oil not present at compressor inlet and outlet A
Reinstall the air hose.
A
B
C
Remove the turbocharger from the engine.
Click hereEngine / Hybrid System>1KD-FTV INTAKE / EXHAUST>EXHAUST MANIFOLD W/ TURBOCHARGER>REMOVAL
Check whether an excessive amount of wet oil or excessive oil deposits are present at the turbine inlet.
- HINT:
-
Be sure not to mistake carbon soot for oil.
- Result:
Proceed to NEXT
NEXT
Check whether an excessive amount of wet oil or excessive oil deposits are present at the turbine outlet.
- HINT:
- ·
Be sure not to mistake carbon soot for oil.
·If the turbocharger shaft is tilted, some amount of oil will flow out from the bearing housing. Therefore, be sure not to mistake oil that flowed out from the bearing housing during or after the removal of the turbocharger for oil that was present before the removal of the turbocharger.
·If an excessive amount of oil or excessive oil deposits are present at the turbine inlet, this oil is coming from the exhaust port of the cylinders, and may indicate a problem in 1 or more cylinders.
- Result:
Result Proceed to Excessive amount of oil present at both turbine inlet and outlet B Excessive amount of oil present only at turbine outlet A
A
B
Replace the turbocharger sub-assembly.
Click hereEngine / Hybrid System>1KD-FTV INTAKE / EXHAUST>INTAKE MANIFOLD>REMOVAL
- Result:
Proceed to NEXT
NEXT
Check whether the oil leakage problem has been successfully repaired.
- Result:
Proceed to NEXT
NEXT