5L-E ENGINE MECHANICAL ENGINE ON-VEHICLE INSPECTION
CAUTION / NOTICE / HINT
- CAUTION:
-
-
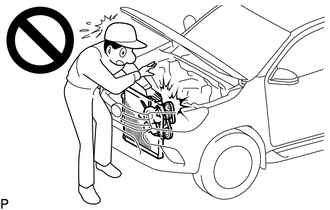
To prevent injury due to contact with an operating fan and generator V belt or cooling fan, keep your hands and clothing away from the fan and generator V belt and cooling fans when working in the engine compartment with the engine running.
PROCEDURE

 1.INSPECT ENGINE COOLANT
2.INSPECT ENGINE OIL
28800
3.INSPECT BATTERY
17801
4.INSPECT AIR CLEANER FILTER ELEMENT SUB-ASSEMBLY
Remove the air cleaner filter element sub-assembly from the air cleaner case sub-assembly.
Check that the air cleaner filter element sub-assembly is not excessively dirty.
If the air cleaner filter element sub-assembly is excessively dirty, replace the air cleaner filter element sub-assembly.
If cleaning the air cleaner filter element sub-assembly, blow compressed air to clean it.
- NOTICE:
- ·
Do not start the engine with the air cleaner filter element sub-assembly removed, as this may damage the engine.
·When using an air cleaner filter element sub-assembly that uses compressed air, wear safety glasses and a dust mask in order to protect your health.
- HINT:
-
When an excessive amount of dirt is present, replace the air cleaner filter element sub-assembly.
Reinstall the air cleaner filter element sub-assembly to the air cleaner case sub-assembly.
5.INSPECT INJECTION TIMING
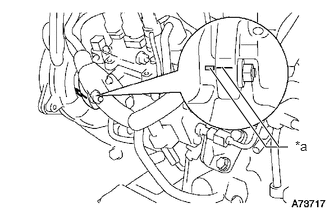
| *a | Matchmark |
Using a mirror, check that the matchmarks of the injection pump flange and timing belt case sub-assembly are aligned.
6.ADJUST INJECTION TIMING
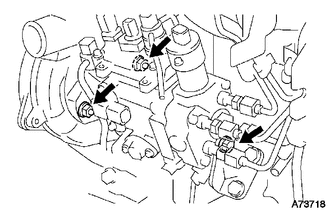
Loosen the following nuts and bolts.
The bolt holding the injection pump assembly to the No. 1 injection pump stay.
The 2 nuts holding the injection pump assembly to the timing belt case sub-assembly.
Align the matchmark by slightly tilting the injection pump assembly.
Tighten the following nuts and bolts.
The 2 nuts holding the injection pump assembly to the timing belt case sub-assembly.
- Torque:
- 20.5 N*m (209 kgf*cm, 15 ft.*lbf)
The bolt holding the injection pump assembly to the No. 1 injection pump stay.
- Torque:
- 26 N*m (265 kgf*cm, 19 ft.*lbf)
7.INSPECT ENGINE IDLE SPEED
Warm up and stop the engine.
When using the GTS:
- HINT:
- ·
For more information about the GTS, refer to its operator's manual.
·If the GTS is not available, use a tachometer as a substitute.
Connect the GTS to the DLC3.
Start the engine and idle it.
Enter the following menus: Powertrain / Engine and ECT / Data List / Engine Speed.
- Powertrain > Engine > Data List
-
Tester Display Engine Speed - 50003 234 9
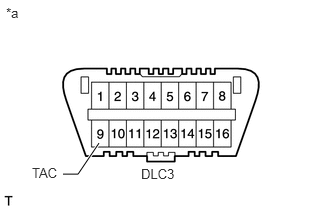
| *a | Front view of DLC3 |
When not using the GTS:
Connect a tester probe of a tachometer to terminal 9 (TAC) of the DLC3 with SST.
- SST
- 09843-18040
Start the engine and idle it.
Inspect the engine idle speed.
- Standard idle speed:
650 to 750 rpm
- NOTICE:
- ·
Turn all the electrical systems and A/C off.
·When checking the idle speed, move the shift lever to neutral.
Turn the ignition switch off.
Disconnect the GTS or tachometer tester probe from the DLC3.
8.INSPECT MAXIMUM ENGINE SPEED
Start the engine.
Fully depress the accelerator pedal.
Check the maximum engine speed.
- Maximum engine speed:
4850 to 4950 rpm
9.INSPECT COMPRESSION
- HINT:
-
If there is a lack of power, excessive oil consumption or poor fuel economy is suspected. Measure the compression pressure.
Warm up and stop the engine.
Remove the glow plugs.
Disconnect the spill control valve connector.
Inspect the cylinder compression pressure.
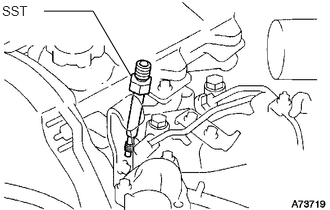
Install SST (attachment) to the glow plug hole.
- SST
- 09992-19015 (09992-10070)
- Torque:
- 13 N*m (133 kgf*cm, 10 ft.*lbf)
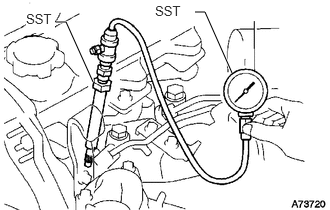
Connect SST (gauge assembly) to SST (attachment D).
- SST
- 09992-19015 (09992-10010)
Fully open the throttle valve, and start the engine.
While cranking the engine, measure the compression pressure.
- Standard compression pressure:
3138 kPa (32.0 kgf/cm2, 455 psi) or higher
- Minimum pressure:
1961 kPa (20.0 kgf/cm2, 284 psi)
- Difference between each cylinder:
490 kPa (5.0 kgf/cm2, 71 psi) or less
- NOTICE:
- ·
Use a fully-charged battery so the engine speed can be increased to 250 rpm or more.
·Inspect the other cylinders in the same way.
·Measure the compression as quickly as possible.
If the cylinder compression is low, pour a small amount of engine oil into the cylinder through the injector holes, and then inspect it again.
If adding oil increases the compression pressure, the piston rings and/or cylinder bore may be worn or damaged.
If the pressure stays low, the valve may be stuck or seated improperly, or there may be leakage from the gasket.
Remove SST.
Reinstall the glow plugs.
Reconnect the spill control valve connector.