2GD-FTV ENGINE MECHANICAL ENGINE UNIT INSTALLATION
CAUTION / NOTICE / HINT
- NOTICE:
- ·
When replacing the parts in the following chart (A), replace the No. 1 injection pipe sub-assembly, No. 2 injection pipe sub-assembly and/or fuel inlet pipe sub-assembly with new ones.
Replaced Parts (A) Pipes Requiring New Replacement Injector assembly (including shuffling the injector assemblies between the cylinders) ·No. 1 injection pipe sub-assembly
·No. 2 injection pipe sub-assembly
·Common rail assembly
·Cylinder block sub-assembly
·Cylinder head sub-assembly
·Cylinder head gasket
·Timing chain case assembly
·No. 1 injection pipe sub-assembly
·No. 2 injection pipe sub-assembly
·Fuel inlet pipe sub-assembly
Supply pump assembly Fuel inlet pipe sub-assembly
·After removing the No. 1 injection pipe sub-assembly, No. 2 injection pipe sub-assembly and/or fuel inlet pipe sub-assembly, clean them with a brush and compressed air.
·The injector assembly is a precision instrument. Do not use the injector assembly if it is struck or dropped.
·The supply pump assembly is a precision instrument. Do not use the supply pump assembly if it is struck or dropped.
·The common rail assembly is a precision instrument. Do not use the common rail assembly if it is struck or dropped.
·Hold the supply pump assembly itself during removal and installation. Do not hold the pre-stroke control valve or fuel pipe, etc.
·Hold the common rail assembly itself during removal and installation. Do not hold the pressure discharge valve or fuel pressure sensor, etc.
·Make sure foreign matter does not enter the fuel path.
PROCEDURE

 13471
1.INSTALL CRANKSHAFT PULLEY
11382C
2.INSTALL CAMSHAFT OIL SEAL RETAINER
- NOTICE:
-
If the camshaft oil seal retainer is dropped, replace it with a new one.
Before installing a new camshaft oil seal retainer, clean the installation surface of the No. 3 camshaft bearing cap and cylinder head sub-assembly and remove any foreign matter.
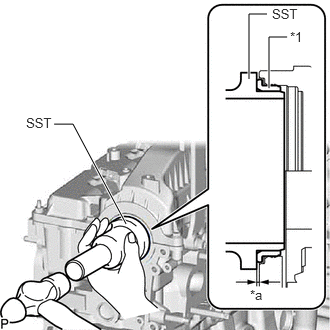
| *1 | Camshaft Oil Seal Retainer |
| *a | Depth |
Using SST and a hammer, tap in a new camshaft oil seal retainer to the No. 3 camshaft bearing cap and cylinder head sub-assembly as shown in the illustration.
- SST
- 09223-46011
- Standard depth:
-0.5 to 0.8 mm (-0.0197 to 0.0315 in.)
29300
3.INSTALL VACUUM PUMP ASSEMBLY
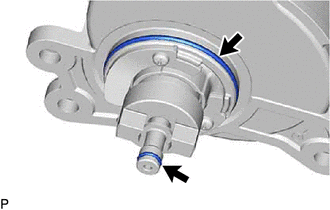
Coat 2 new O-rings with engine oil, and install them to the vacuum pump assembly.
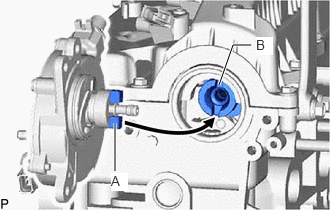
Install the vacuum pump assembly so that the coupling teeth of the vacuum pump assembly labeled A and the groove of the No. 2 camshaft labeled B can engage.
Install the vacuum pump assembly to the cylinder head sub-assembly with the 3 bolts.
- Torque:
- 21 N*m (214 kgf*cm, 15 ft.*lbf)
25706
4.INSTALL NO. 1 VACUUM TRANSMITTING PIPE SUB-ASSEMBLY
Install the No. 1 vacuum transmitting pipe sub-assembly to the cylinder head sub-assembly with the 3 bolts.
- Torque:
- 10 N*m (102 kgf*cm, 7 ft.*lbf)
Connect the No. 1 vacuum transmitting hose to the vacuum pump assembly.
16620
5.INSTALL V-RIBBED BELT TENSIONER ASSEMBLY
16603
6.INSTALL NO. 1 IDLER PULLEY SUB-ASSEMBLY
16331A
7.INSTALL THERMOSTAT
16321
8.INSTALL WATER INLET
Install the water inlet to the timing chain cover sub-assembly with the 3 bolts.
- Torque:
- 13 N*m (133 kgf*cm, 10 ft.*lbf)
16304
9.INSTALL WATER OUTLET SUB-ASSEMBLY
Install a new gasket and the water outlet sub-assembly to the timing chain cover sub-assembly with the 4 bolts and 2 nuts.
- Torque:
- 10 N*m (102 kgf*cm, 7 ft.*lbf)
16207
10.INSTALL NO. 2 WATER BY-PASS PIPE SUB-ASSEMBLY
Install the No. 2 water by-pass pipe sub-assembly to the engine water pump assembly and water inlet with the 2 bolts.
- Torque:
- 10 N*m (102 kgf*cm, 7 ft.*lbf)
Connect the No. 3 water by-pass hose to the water outlet sub-assembly, and slide the clamp to secure the hose.
83530
11.INSTALL ENGINE OIL PRESSURE SWITCH ASSEMBLY
15407
12.TEMPORARILY INSTALL TURBO OIL INLET PIPE SUB-ASSEMBLY
17141
13.TEMPORARILY INSTALL EXHAUST MANIFOLD WITH TURBOCHARGER SUB-ASSEMBLY
15474
14.INSTALL TURBO OIL OUTLET PIPE
17293
15.TEMPORARILY INSTALL TURBOCHARGER STAY
17141
16.TIGHTEN EXHAUST MANIFOLD WITH TURBOCHARGER SUB-ASSEMBLY
17293
17.TIGHTEN TURBOCHARGER STAY
16284
18.CONNECT NO. 1 AND NO. 2 TURBO WATER HOSE
16268
19.INSTALL NO. 1 WATER BY-PASS PIPE
Install a new gasket and the No. 1 water by-pass pipe to the timing chain cover sub-assembly with the 3 bolts.
- Torque:
- 10 N*m (102 kgf*cm, 7 ft.*lbf)
- HINT:
-
Make sure that the claw of the gasket faces the No. 1 water by-pass pipe.
16279
20.INSTALL NO. 3 WATER BY-PASS PIPE
12261
21.INSTALL PCV HOSE
25051
22.INSTALL EXHAUST MANIFOLD CONVERTER SUB-ASSEMBLY
23.INSTALL NO. 2 EXHAUST PIPE SUPPORT STAY
17271
24.INSTALL NO. 1 TURBO INSULATOR
17167
25.INSTALL NO. 1 EXHAUST MANIFOLD HEAT INSULATOR
89422C
26.INSTALL ENGINE COOLANT TEMPERATURE SENSOR
88431
27.INSTALL NO. 1 COMPRESSOR MOUNTING BRACKET
- NOTICE:
-
Install the No. 1 compressor mounting bracket exactly as described in the procedures below to properly secure and prevent damage to the fan and generator V belt.
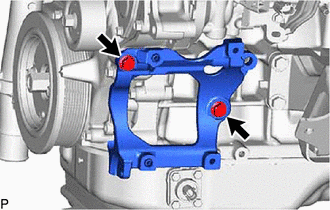
Temporarily install the No. 1 compressor mounting bracket to the cylinder block sub-assembly with the 2 bolts.
- HINT:
-
Temporarily install the No. 1 compressor mounting bracket with the 2 bolts so that the No. 1 compressor mounting bracket can be moved by hand.
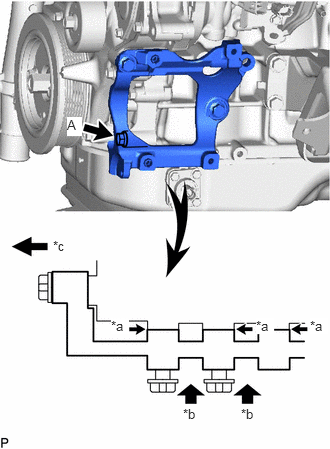
| *a | No Clearance |
| *b | Push |
| *c | Front |
Push the No. 1 compressor mounting bracket toward the cylinder block sub-assembly as shown in the illustration and tighten bolt A.
- Torque:
- 39 N*m (398 kgf*cm, 29 ft.*lbf)
- HINT:
-
Make sure there is no clearance between the cylinder block sub-assembly and No. 1 compressor mounting bracket as shown in the illustration.
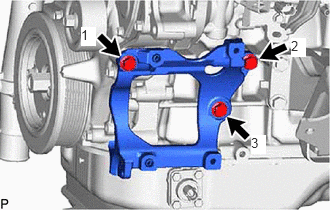
Uniformly tighten the 3 bolts in the order shown in the illustration.
- Torque:
- 39 N*m (398 kgf*cm, 29 ft.*lbf)
16025
28.INSTALL NO. 5 WATER BY-PASS PIPE SUB-ASSEMBLY
Install a new gasket and the No. 5 water by-pass pipe sub-assembly to the cylinder block sub-assembly with the 3 bolts.
- Torque:
- 25 N*m (255 kgf*cm, 18 ft.*lbf)
- HINT:
-
Make sure that the claw of the gasket faces the No. 5 water by-pass pipe sub-assembly.
23780
29.INSTALL NO. 3 NOZZLE LEAKAGE PIPE
Install the No. 3 nozzle leakage pipe to the cylinder block sub-assembly with the 2 nuts.
- Torque:
- 21 N*m (214 kgf*cm, 15 ft.*lbf)
44781
30.INSTALL HOSE BRACKET
Install the hose bracket to the cylinder head sub-assembly with the 2 bolts.
- Torque:
- 10 N*m (102 kgf*cm, 7 ft.*lbf)
19850
31.INSTALL GLOW PLUG ASSEMBLY
19871
32.INSTALL NO. 1 GLOW PLUG CONNECTOR
23810A
33.INSTALL COMMON RAIL ASSEMBLY
23701
34.TEMPORARILY INSTALL NO. 1 AND NO. 2 INJECTION PIPE SUB-ASSEMBLY
23670
35.TIGHTEN INJECTOR ASSEMBLY
23701
36.TIGHTEN NO. 1 AND NO. 2 INJECTION PIPE SUB-ASSEMBLY
37.INSTALL WIRING HARNESS CLAMP BRACKET
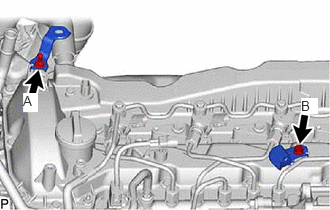
Install the 2 wiring harness clamp brackets to the cylinder head cover sub-assembly with the 2 bolts.
- Torque:
- for bolt A : 10 N*m (102 kgf*cm, 7 ft.*lbf)
- for bolt B : 8.4 N*m (86 kgf*cm, 74 in.*lbf)
23760
38.INSTALL NOZZLE LEAKAGE PIPE ASSEMBLY
39.INSTALL WIRING HARNESS CLAMP BRACKET
17111
40.INSTALL INTAKE MANIFOLD
23770
41.INSTALL NO. 2 NOZZLE LEAKAGE PIPE ASSEMBLY
23804C
42.INSTALL FUEL INLET PIPE SUB-ASSEMBLY
23271H
43.INSTALL NO. 1 FUEL HOSE
23273H
44.INSTALL NO. 2 FUEL HOSE
23243B
45.INSTALL FUEL PUMP MOTOR WIRE
22803
46.INSTALL FUEL INJECTION PUMP COVER SUB-ASSEMBLY
17118
47.INSTALL MANIFOLD STAY
48.INSTALL WIRING HARNESS CLAMP BRACKET
23812D
49.INSTALL NO. 2 FUEL PIPE
Install the No. 2 fuel pipe to the manifold stay with the bolt.
- Torque:
- 10 N*m (102 kgf*cm, 7 ft.*lbf)
Connect the No. 1 fuel hose to the No. 2 fuel pipe, and slide the clamp to secure the hose.
11409
50.INSTALL ENGINE OIL LEVEL DIPSTICK GUIDE
25681
51.INSTALL NO. 1 EGR COOLER AND NO. 2 EGR VALVE ASSEMBLY WITH ELECTRIC EGR CONTROL VALVE ASSEMBLY
16209
52.INSTALL NO. 4 WATER BY-PASS PIPE SUB-ASSEMBLY
Install the No. 4 water by-pass pipe sub-assembly to the intake manifold with the 2 bolts.
- Torque:
- 10 N*m (102 kgf*cm, 7 ft.*lbf)
Connect the water hose to the No. 2 EGR valve assembly, and slide the clamp to secure the hose.
Connect the No. 7 water by-pass hose to the No. 4 water by-pass pipe sub-assembly, and slide the clamp to secure the hose.
Connect the No. 6 water by-pass hose to the No. 4 water by-pass pipe sub-assembly, and slide the clamp to secure the hose.
25804
53.INSTALL VACUUM CONTROL VALVE SET
25601
54.INSTALL NO. 1 EGR PIPE SUB-ASSEMBLY
Using an E8 "TORX" socket wrench, install 2 new stud bolts to the exhaust manifold.
- Torque:
- 10 N*m (102 kgf*cm, 7 ft.*lbf)
Install 2 new gaskets and the No. 1 EGR pipe sub-assembly to the exhaust manifold, electric EGR control valve assembly and No. 1 vacuum transmitting pipe sub-assembly with the bolt and 4 new nuts.
- Torque:
- for bolt : 10 N*m (102 kgf*cm, 7 ft.*lbf)
- for nut : 29 N*m (296 kgf*cm, 21 ft.*lbf)
27148A
55.INSTALL CONNECTING WIRE
Attach the 2 clamps and install the connecting wire to the hose bracket.
Connect the connector to the common rail assembly.
16206B
56.INSTALL NO. 3 WATER BY-PASS PIPE SUB-ASSEMBLY
25612
57.INSTALL NO. 2 EGR PIPE
25625
58.INSTALL EGR VALVE BRACKET
89421C
59.INSTALL DIESEL TURBO PRESSURE SENSOR
23265C
60.INSTALL GAS FILTER
16274
61.INSTALL WATER BY-PASS PLUG (w/o Heater)
Install the water by-pass plug to the water outlet sub-assembly, and slide the clamp to secure the plug.
12631A
62.INSTALL ENGINE COVER BRACKET
Install the engine cover bracket to the cylinder head cover sub-assembly and hose bracket with the 2 bolts.
- Torque:
- 21 N*m (214 kgf*cm, 15 ft.*lbf)
16278
63.INSTALL NO. 2 WATER BY-PASS PIPE
26100G
64.INSTALL DIESEL THROTTLE BODY ASSEMBLY
17363K
65.INSTALL INTERCOOLER AIR TUBE
82121
66.INSTALL ENGINE WIRE
12632
67.INSTALL NO. 2 ENGINE COVER BRACKET
44763C
68.INSTALL NO. 2 HOSE TO HOSE TUBE
Install the No. 2 hose to hose tube to the cylinder head cover sub-assembly and hose bracket with the 2 bolts.
- Torque:
- 10 N*m (102 kgf*cm, 7 ft.*lbf)
Connect the union to check valve hose to the vacuum pump assembly, and slide the clamp to secure the hose.