THEFT DETERRENT / KEYLESS ENTRY THEFT DETERRENT SYSTEM Door Courtesy Switch Circuit
DESCRIPTION
The body ECU receives a door open or closed signal from front door courtesy light switch and combination meter assembly.
WIRING DIAGRAM
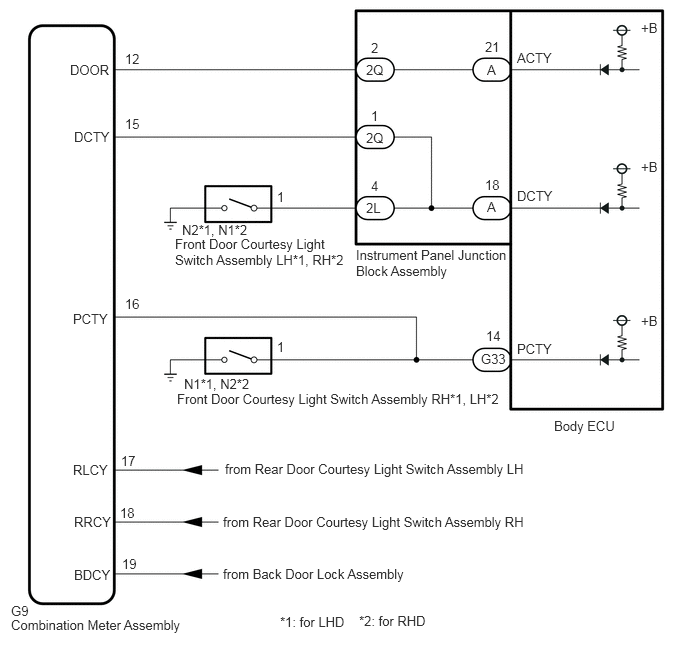
CAUTION / NOTICE / HINT
- NOTICE:
- ·
w/ Door control Battery:
As the door control battery is installed between the vehicle battery and body ECU, first perform the inspections to confirm that there are no malfunctions in the power source circuit for the body ECU before performing this troubleshooting procedure.
Click hereVehicle Interior>DOOR LOCK>POWER DOOR LOCK CONTROL SYSTEM>PRECAUTION
·w/ Automatic Light Control System:
If the body ECU has been replaced, it is necessary to initialize the body ECU.
Click hereGeneral>INTRODUCTION>REPAIR INSTRUCTION>INITIALIZATION
PROCEDURE
Check the meter / gauge system (door courtesy switch) is functioning normally.
Click hereVehicle Interior>METER / GAUGE / DISPLAY>METER / GAUGE SYSTEM>HOW TO PROCEED WITH TROUBLESHOOTING
- Result:
Result OK NG
OK
NG
Remove the body ECU.
for LHD:
Click herePower Source / Network>POWER DISTRIBUTION>MAIN BODY ECU(for LHD)>REMOVAL
for RHD:
Click herePower Source / Network>POWER DISTRIBUTION>MAIN BODY ECU(for RHD)>REMOVAL
Connect the instrument panel junction block assembly connectors.
Disconnect the G9 combination meter assembly connector.
Measure the resistance according to the value(s) in the table below.
- Standard Resistance:
Tester Connection Condition Specified Condition A-18 (DCTY) - Body ground Driver side door closed (OFF) → open (ON) 10 kΩ or higher → Below 1 Ω G33-14 (PCTY) - Body ground Front passenger side door closed (OFF) → open (ON) 10 kΩ or higher → Below 1 Ω
- Result:
Proceed to OK NG (for Driver Side) NG (for Passenger Side)
OK
NG (for Driver Side)
for LHD:
Click herePower Source / Network>POWER DISTRIBUTION>MAIN BODY ECU(for LHD)>REMOVAL
for RHD:
Click herePower Source / Network>POWER DISTRIBUTION>MAIN BODY ECU(for RHD)>REMOVAL
NG (for Passenger Side)
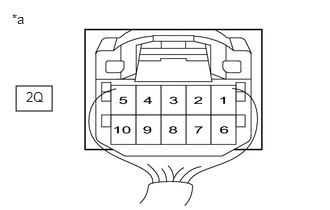
| *a | Component with harness connected
(Instrument Panel Junction Block Assembly) |
Measure the voltage according to the value(s) in the table below.
- Standard Voltage:
Tester Connection Condition Specified Condition 2Q-2 - Body ground All doors closed → any door open 11 to 14 V → Below 1 V
- Result:
Proceed to OK NG
OK
Click hereVehicle Interior>THEFT DETERRENT / KEYLESS ENTRY>THEFT DETERRENT SYSTEM>PROBLEM SYMPTOMS TABLE
NG
Remove the body ECU.
for LHD:
Click herePower Source / Network>POWER DISTRIBUTION>MAIN BODY ECU(for LHD)>REMOVAL
for RHD:
Click herePower Source / Network>POWER DISTRIBUTION>MAIN BODY ECU(for RHD)>REMOVAL
Connect the instrument panel junction block assembly connectors.
Disconnect the G9 combination meter assembly connector.
Measure the resistance according to the value(s) in the table below.
- Standard Resistance:
Tester Connection Condition Specified Condition G9-12 (DOOR) - A-21 (ACTY) Always Below 1 Ω G9-12 (DOOR) - Body ground Always 10 kΩ or higher
- Result:
Result OK NG
OK
NG
Disconnect the combination meter assembly connector.
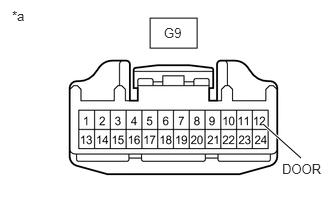
| *a | Front view of wire harness connector
(to Combination Meter Assembly) |
Measure the voltage according to the value(s) in the table below.
- Standard Voltage:
Tester Connection Condition Specified Condition G9-12 (DOOR) - Body ground Always 11 to 14 V
- Result:
Proceed to OK NG
OK
NG
for LHD:
Click herePower Source / Network>POWER DISTRIBUTION>MAIN BODY ECU(for LHD)>REMOVAL
for RHD:
Click herePower Source / Network>POWER DISTRIBUTION>MAIN BODY ECU(for RHD)>REMOVAL
Disconnect the 2Q instrument panel junction block assembly connector.
Disconnect the G9 combination meter assembly connector.
Measure the resistance according to the value(s) in the table below.
- Standard Resistance:
Tester Connection Condition Specified Condition G9-12 (DOOR) - 2Q-2 Always Below 1 Ω G9-12 (DOOR) - Body ground Always 10 kΩ or higher
- Result:
Result OK NG
OK
for LHD:
Click herePower Source / Network>POWER DISTRIBUTION>MAIN BODY ECU(for LHD)>REMOVAL
for RHD:
Click herePower Source / Network>POWER DISTRIBUTION>MAIN BODY ECU(for RHD)>REMOVAL
NG