2TR-FE ENGINE MECHANICAL DRIVE BELT INSTALLATION
PROCEDURE

 1.INSTALL TENSIONER PULLEY
- NOTICE:
-
Perform the following procedure when it is necessary to replace the tensioner pulley.
- HINT:
-
The tensioner pulley service kit consists of a bolt, nut, dust seal and tensioner pulley.
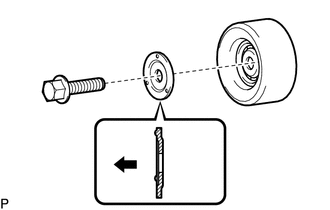
| *1 | Bolt |
| *2 | Tensioner Pulley |
| *3 | Dust Seal |

|
Front |
Install the dust seal and bolt to the tensioner pulley as shown in the illustration.
- NOTICE:
- ·
The dust seal must be oriented correctly when installed. If the dust seal is installed incorrectly, the bearing may be damaged.
·Do not touch the seal surface of the bearing.
- HINT:
-
Be sure to use the bolt and nut from the service kit.
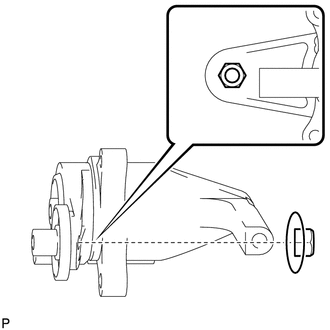
| *1 | Tensioner Arm |
| *a | Flat Face |
Set the nut in place on the tensioner arm so that the flat face of the nut contacts the tensioner arm as shown in the illustration.
- NOTICE:
-
Make sure the nut is not installed backwards.
Tighten the bolt by hand until the flange of the bolt contacts the dust seal and the tensioner pulley is fixed in place.
- NOTICE:
- ·
Perform this procedure while holding the nut in place on the tensioner arm so that it does not fall.
·Do not use any tools.
Tighten the bolt.
- Torque:
- 47 N*m (479 kgf*cm, 35 ft.*lbf)
Install a new O-ring and the engine oil level dipstick guide with the bolt.
- Torque:
- 8.0 N*m (82 kgf*cm, 71 in.*lbf)
Install the engine oil level dipstick.
2.INSTALL FAN AND GENERATOR V BELT
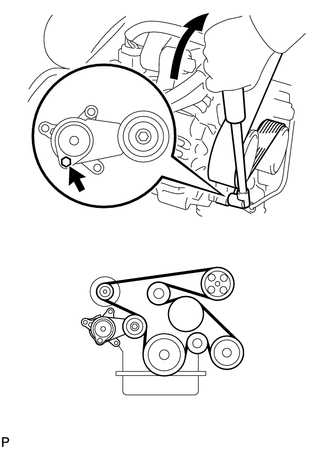
| *1 | Generator |
| *2 | Idler Pulley |
| *3 | Vane Pump |
| *4 | Fan Pulley |
| *5 | Tensioner Pulley |
| *6 | Crankshaft Pulley |
| *7 | No. 1 Idler Pulley |
| *8 | Cooler Compressor |
Install the fan and generator V belt to all the pulleys except the V-ribbed belt tensioner pulley.
Use the hexagon-shaped part indicated by the arrow in the illustration to move the tensioner pulley downward, and then install the fan and generator V belt to the tensioner pulley.
- NOTICE:
- ·
The backside of the fan and generator V belt should face the tensioner pulley.
·Check that the fan and generator V belt is properly installed to each pulley.
3.INSPECT FAN AND GENERATOR V BELT