2TR-FE ENGINE MECHANICAL CYLINDER BLOCK REASSEMBLY
PROCEDURE

 1.INSTALL STUD BOLT
- NOTICE:
-
If a stud bolt is deformed or its threads are damaged, replace it.
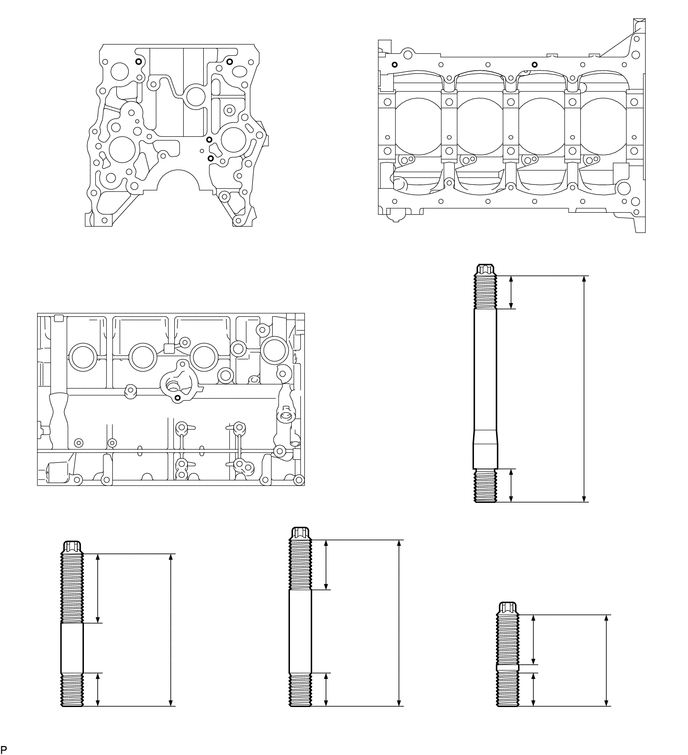 5.563,0.656 5.865,0.313 5.865,0.313 5.969,0.313 true 1.448,0.615 1.917,0.115 1.917,0.115 2.094,0.115 true 2.365,0.625 1.927,0.125 true 4.125,0.646 4.427,0.302 4.427,0.302 4.531,0.302 true 2.198,1.438 2.854,1.104 2.854,1.104 2.979,1.104 true 2.198,1.635 2.854,1.104 true 1.854,4.115 2.604,3.042 2.604,3.042 2.729,3.042 true 1.01,6.073 1.417,5.229 1.417,5.229 1.594,5.229 true 1.01,7.125 1.281,7.51 1.281,7.51 1.427,7.51 true 3.396,7.135 3.656,7.521 3.656,7.521 3.823,7.521 true 3.396,5.844 3.813,5.021 3.813,5.021 3.958,5.021 true 5.323,5.01 5.635,5.396 5.635,5.396 5.771,5.396 true 5.323,3 5.677,2.615 5.677,2.615 5.844,2.615 true 5.552,7.135 5.771,7.51 5.771,7.51 5.885,7.51 true 5.552,6.635 5.781,5.875 5.781,5.875 5.917,5.875 true 0.719,0.135 0.906,0.302 0.188,0.167 10 false *a 0.396,2.823 0.583,2.99 0.188,0.167 10 false *c 3.802,0.104 3.99,0.271 0.188,0.167 10 false *b 2.156,0.031 2.438,0.24 0.281,0.208 10 false A 4.563,0.219 4.802,0.375 0.24,0.156 10 false D 6.063,0.229 6.24,0.385 0.177,0.156 10 false D 3.031,1.01 3.167,1.167 0.135,0.156 10 false B 2.802,2.938 3.052,3.094 0.25,0.156 10 false C 1.698,5.125 2.854,5.302 1.156,0.177 10 false 25 mm (0.984 in.) 1.844,6.396 2.448,6.594 0.604,0.198 10 false 55 mm 1.51,7.417 2.823,7.76 1.313,0.344 10 false 12 mm (0.472 in.) 3.896,7.417 5.146,7.708 1.25,0.292 10 false 12 mm (0.472 in.) 4.031,4.906 4.802,5.229 0.771,0.323 10 false 18 mm 4.229,6.333 4.844,6.521 0.615,0.188 10 false 60 mm 5.823,5.292 7.083,5.563 1.26,0.271 10 false 12 mm (0.472 in.) 5.906,2.51 7.115,2.792 1.208,0.281 10 false 12 mm (0.472 in.) 6.135,3.813 6.802,4 0.667,0.188 10 false 85 mm 5.958,7.406 7.146,7.677 1.188,0.271 10 false 13 mm (0.512 in.) 5.979,5.76 7.115,5.99 1.135,0.229 10 false 18 mm (0.709 in.) 6.385,6.719 7,6.917 0.615,0.198 10 false 33 mm 5.01,5.24 5.146,5.396 0.135,0.156 10 false A 5.229,7.375 5.365,7.521 0.135,0.146 10 false D 0.698,7.375 0.833,7.531 0.135,0.156 10 false B 3.073,7.375 3.208,7.531 0.135,0.156 10 false C 6.125,3.969 6.948,4.219 0.823,0.25 10 false (3.35 in.) 4.042,5.083 4.781,5.417 0.74,0.333 10 false (0.709 in.) 6.396,6.865 7.156,7.063 0.76,0.198 10 false (1.30 in.) 4.229,6.5 4.948,6.76 0.719,0.26 10 false (2.36 in.) 1.833,6.563 2.49,6.781 0.656,0.219 10 false (2.17 in.)
*a Front Side *b Lower Side *c Exhaust Side - -
Using an E8 "TORX" socket wrench, install the stud bolts labeled A.
- Torque:
- 7.5 N*m (76 kgf*cm, 66 in.*lbf)
Using an E7 "TORX" socket wrench, install the stud bolts labeled B and D.
- Torque:
- 7.5 N*m (76 kgf*cm, 66 in.*lbf)
Apply adhesive to the hole for the stud bolt labeled C in the cylinder block. Using an E7 "TORX" socket wrench, install the stud bolt labeled C.
- Torque:
- 7.5 N*m (76 kgf*cm, 66 in.*lbf)
- HINT:
-
When reusing a stud bolt, apply adhesive to the bolt before installing it.
- Adhesive:
Toyota Genuine Adhesive 1344, Three Bond 1344 or equivalent
2.INSTALL CYLINDER BLOCK WATER DRAIN COCK SUB-ASSEMBLY
Apply adhesive to the drain cock.
- Adhesive:
Toyota Genuine Adhesive 1324, Three Bond 1324 or equivalent
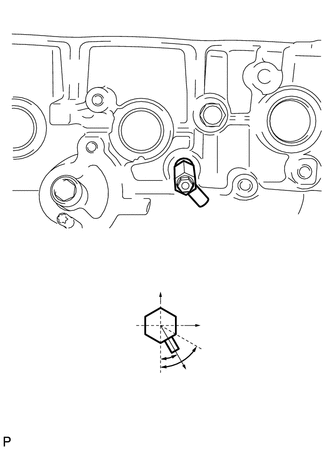
| *1 | Allowable Range |
| *2 | Target Direction |
| *a | Upper Side |
| *b | Front |
Install the cylinder block water drain cock as shown in the illustration.
- Torque:
- 25 N*m (250 kgf*cm, 18 ft.*lbf)
- NOTICE:
- ·
Do not rotate the drain cock more than 1 revolution (360°) after tightening the drain cock to the specified torque.
·Do not loosen the drain cock to adjust it. If an adjustment is necessary, remove the drain cock and reinstall it.
Install the water drain cock plug to the water drain cock sub-assembly.
- Torque:
- 13 N*m (130 kgf*cm, 9 ft.*lbf)
3.INSTALL NO. 1 OIL NOZZLE SUB-ASSEMBLY
Using a 5 mm hexagon wrench, install the oil nozzles.
- Torque:
- 7.0 N*m (71 kgf*cm, 62 in.*lbf)
4.INSTALL NO. 2 BALANCE SHAFT DRIVEN GEAR
Mount the head portion of the balance shaft in a vise.
- NOTICE:
-
Do not damage the balance shaft.
Install the No. 2 balance shaft thrust washer and No. 2 balance shaft driven gear.
Install the bolt.
- Torque:
- 36 N*m (367 kgf*cm, 27 ft.*lbf)
5.INSTALL NO. 2 BALANCE SHAFT
Install the balance shaft to the cylinder block.
- NOTICE:
-
When installing the balance shaft, be sure to support the balance shaft with both hands and avoid scratching the balance shaft bearing on the cylinder block.
Install the 2 bolts.
- Torque:
- 18 N*m (184 kgf*cm, 13 ft.*lbf)
6.INSTALL NO. 1 BALANCE SHAFT DRIVEN GEAR
Mount the head portion of the balance shaft in a vise.
- NOTICE:
-
Do not damage the balance shaft.
Install the No. 1 balance shaft thrust washer, balance shaft thrust spacer, sliding key and No. 1 balance shaft driven gear.
Install the bolt.
- Torque:
- 36 N*m (367 kgf*cm, 27 ft.*lbf)
7.INSTALL NO. 1 BALANCE SHAFT
Install the No. 1 balance shaft to the cylinder block.
- NOTICE:
-
When installing the balance shaft, be sure to support the balance shaft with both hands and avoid scratching the balance shaft bearing on the cylinder block.
Install the bolt.
- Torque:
- 18 N*m (184 kgf*cm, 13 ft.*lbf)
8.INSTALL PISTON WITH PIN SUB-ASSEMBLY
Assemble the piston and connecting rod.
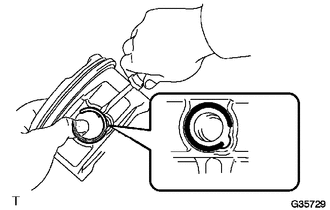
| *1 | Service Hole Cutout Portion |
Using a screwdriver, install a new snap ring at one end of the piston pin hole.
- HINT:
-
Make sure that the end gap of the snap ring is not aligned with the service hole cutout portion of the piston.
Gradually heat the piston to approximately 80 to 90°C (176 to 194°F).
Coat the piston pin with engine oil.
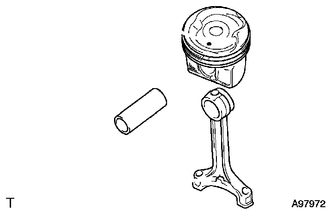
| *1 | Front Mark |
Align the front marks of the piston and connecting rod and push in the piston pin with your thumb.
- HINT:
-
The piston and pin are a matched set.
| *1 | Service Hole Cutout Portion |
Using a screwdriver, install a new snap ring at the other end of the piston pin hole.
- HINT:
-
Make sure that the end gap of the snap ring is not aligned with the service hole cutout portion of the piston.
Check the fitting condition between the piston and piston pin by trying to move the piston back and forth on the piston pin.
9.INSTALL PISTON RING SET
Install the oil ring expander and 2 side rails by hand.
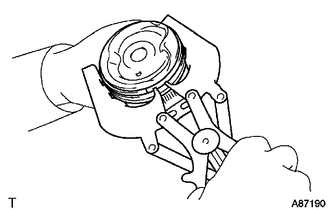
Using a piston ring expander, install the 2 compression rings with the code mark as shown in the illustration.
- HINT:
-
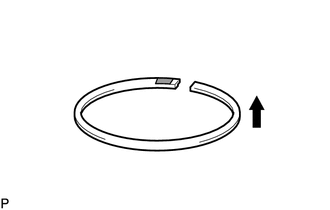 1.708,0.802 1.99,0.5 1.99,0.5 2.146,0.5 false 1.594,1.563 1.594,1.74 false 2.229,0.396 2.542,0.552 0.313,0.156 10 false *1 1.51,1.76 1.823,1.917 0.313,0.156 10 false *2
*1 Code Mark (2N) *2 No. 2 Compression Ring 
Upward
- ·
The No. 1 compression ring is reversible.
·Install the No. 2 compression ring with the code mark (2N) facing upward.
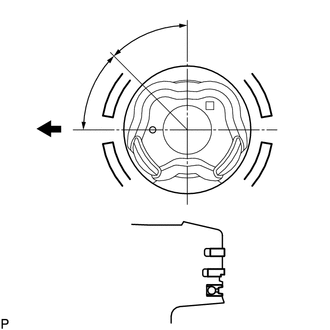
| *1 | No. 1 Compression Ring |
| *2 | No. 2 Compression Ring |
| *3 | Oil Ring |
| *4 | Oil Ring Expander |
| *5 | No. 1 Compression Ring and Oil Ring |
|
|
Front |
Position the piston rings so that the ring ends are as shown in the illustration.
- NOTICE:
-
Do not align the compression ring ends.
10.INSTALL CRANKSHAFT BEARING
- NOTICE:
-
Do not apply engine oil to the contact area or backside of the bearing.
- HINT:
-
The crankshaft bearing cap bolts are tightened in 2 progressive steps.
Clean the main journal and both surfaces of the bearing.
Install the upper bearing.
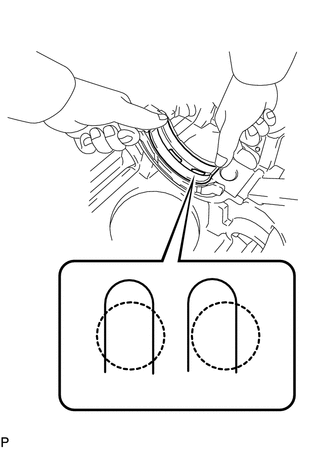
| *1 | Oil Groove |
| *a | CORRECT |
| *b | INCORRECT |
Install the upper bearing to the cylinder block as shown in the illustration.
- Reference (Difference in Dimension of Cylinder Block and Bearing):
Item Specified Condition # 1, 5 journal 3.75 mm (0.148 in.) # 3 journal 1.75 mm (0.0689 in.) # 2, 4 journal 2.75 mm (0.108 in.)
- NOTICE:
- ·
Do not apply engine oil to the bearings or their contact surfaces.
·Both sides of the oil groove in the cylinder block should be visible through the oil feed holes in the bearing. The amount visible on each side of the holes should be equal.
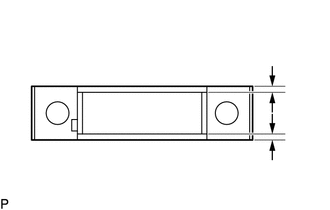
| *1 | Lower Bearing |
| *2 | Bearing Cap |
Install the lower bearing.
Install the lower bearing to the bearing cap.
Using a vernier caliper, measure the distance between the bearing cap edge and lower bearing edge.
- Dimension A - B or B - A:
0.3 mm (0.0118 in.) or less
- Reference (Dimension of A or B):
Item Specified Condition # 1, 5 journal 3.83 mm (0.151 in.) # 3 journal 1.74 mm (0.0685 in.) # 2, 4 journal 2.75 mm (0.108 in.)
- NOTICE:
-
Do not apply engine oil to the bearings or their contact surfaces.
With the upper bearing and lower bearing installed, use a plastic-faced hammer to install the bearing caps to the cylinder block.
- NOTICE:
-
Make sure that the bearing caps are installed in the correct positions and facing in the correct direction.
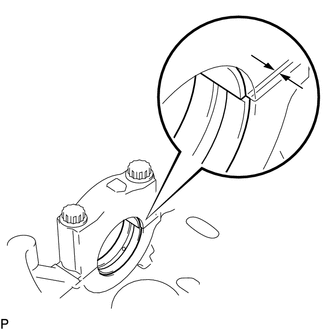
| *1 | Misalignment |
Using a vernier caliper, measure the amount of misalignment between the upper bearing and lower bearing as shown in the illustration.
- Standard misalignment:
0.9 mm (0.0354 in.) or less
Remove the bearing cap.
Apply engine oil to the thrust washers.
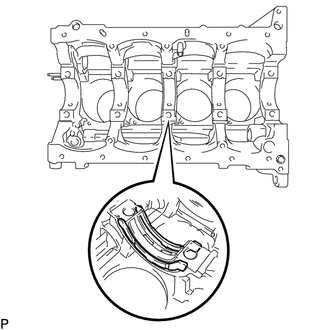
| *1 | Oil Groove |
Install the 2 thrust washers to the No. 3 journal position of the cylinder block with the oil grooves facing outward.
- NOTICE:
-
Be careful when installing the upper and lower thrust washers as they are similar but cannot be interchanged.
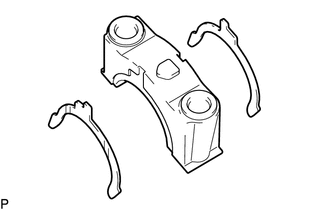
| *1 | Claw |
| *2 | Oil Groove |
Install the 2 thrust washers to the No. 3 bearing cap with the grooves facing outward.
- NOTICE:
-
Be careful when installing the upper and lower thrust washers as they are similar but cannot be interchanged. The lower thrust washers have a claw as shown in the illustration.
Apply engine oil to the lower bearing.
11.INSTALL CRANKSHAFT
Apply engine oil to the upper bearing, and then place the crankshaft on the cylinder block.
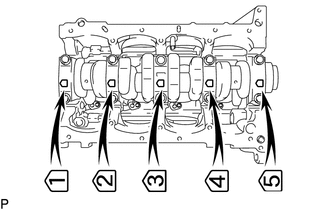
Install the 5 crankshaft bearing caps to their proper locations.
Install the crankshaft bearing cap bolts.
Apply a light coat of engine oil to the threads and under the heads of the bearing cap bolts.
Temporarily install the crankshaft bearing cap bolts.
- HINT:
-
The main bearing cap bolts are tightened in 2 progressive steps.
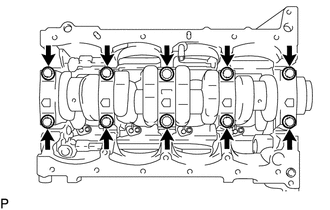
Step 1:
Uniformly tighten the 10 main bearing cap bolts in the sequence shown in the illustration.
- Torque:
- 39 N*m (398 kgf*cm, 29 ft.*lbf)
If any of the main bearing cap bolts does not meet the torque specification, replace the main bearing cap bolt.
Mark the front of the bearing cap bolts with paint.
Step 2:
Tighten the bearing cap bolts 90° in the sequence shown in step 1.
Check that the paint marks are now at a 90° angle to the front.
Check that the crankshaft turns smoothly.
12.INSPECT CRANKSHAFT THRUST CLEARANCE
13.INSTALL CONNECTING ROD BEARING
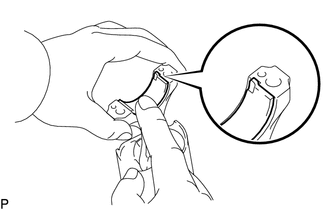
| *1 | Claw |
Align the bearing claw with the groove of the connecting rod or connecting rod cap.
Install the bearings to the connecting rod and connecting rod cap.
- NOTICE:
-
Clean the backside of the bearing and the surface of the connecting rod or connecting rod cap that contacts the bearing.
14.INSTALL PISTON SUB-ASSEMBLY WITH CONNECTING ROD
Apply engine oil to the cylinder walls, the pistons, and the surfaces of the connecting rod bearings.
| *1 | No. 1 Compression Ring |
| *2 | No. 2 Compression Ring |
| *3 | Oil Ring |
| *4 | Oil Ring Expander |
| *5 | No. 1 Compression Ring and Oil Ring |
|
|
Front |
Position the piston rings so that the ring ends are as shown in the illustration.
- NOTICE:
-
Do not align the compression ring ends.
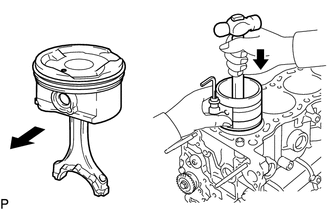
| *1 | Front Mark |
| *a | Front |
Using a piston ring compressor, push the numbered piston and connecting rod assembly into the correct cylinder with the front mark of the piston facing forward.
Match the numbered connecting rod cap with the correct connecting rod.
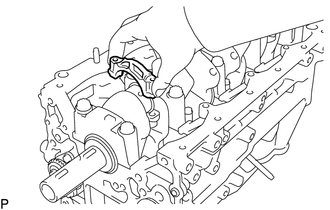
| *1 | Front Mark |
Check that the front mark of the connecting rod cap is facing forward.
Install the connecting rod cap bolts.
- HINT:
-
The connecting rod cap bolts are tightened in 2 progressive steps.
Apply a light coat of engine oil to the threads and under the heads of the connecting rod cap bolts.
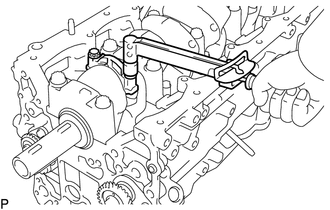
Step 1:
Install and alternately tighten the bolts of the connecting rod cap in several steps.
- Torque:
- 25 N*m (250 kgf*cm, 18 ft.*lbf)
Mark the front of each connecting rod cap bolt with paint.
Step 2:
Tighten the cap bolts 90° as shown.
Check that the paint marks are now at a 90° angle to the front.
Check that the crankshaft turns smoothly.
15.INSPECT CONNECTING ROD THRUST CLEARANCE