WIPER / WASHER FRONT WIPER MOTOR INSPECTION
PROCEDURE

 1.INSPECT WINDSHIELD WIPER MOTOR ASSEMBLY (for LHD)
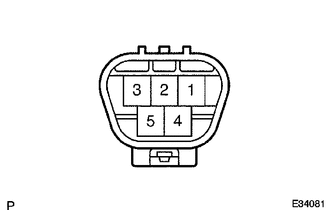
| *a | Component without harness connected
(Windshield Wiper Motor Assembly) |
Check the LO operation.
Connect the battery's positive (+) lead to terminal 1 (+1) and the negative (-) lead to terminal 5 (E), and check that the motor operates at low speed (LO).
- OK:
Motor operates at low speed (LO).
If the result is not as specified, replace the motor assembly.
Check the HI operation.
Connect the battery's positive (+) lead to terminal 4 (+2) and the negative (-) lead to terminal 5 (E), and check that the motor operates at high speed (HI).
- OK:
Motor operates at high speed (HI).
If the result is not as specified, replace the motor assembly.
Check the automatic stop operation.
Connect the battery's positive (+) lead to terminal 1 (+1) and the negative (-) lead to terminal 5 (E). With the motor rotating at low speed (LO), disconnect terminal 1 (+1) to stop the wiper motor operation at any position other than the automatic stop position.
Using SST, connect terminals 3 (+S) and 1 (+1). Then connect the battery's positive (+) lead to terminal 2 (B) to restart the motor operation at low speed (LO).
- SST
- 09843-18040
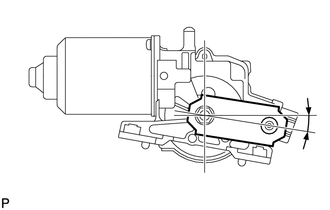
| *a | Automatic Stop Position |
Check that the motor stops automatically at the automatic stop position.
| Standard Area | Standard Condition |
|---|---|
| A | 14° to -1° |
- OK:
Refer to the illustration.
If the result is not as specified, replace the motor assembly.
2.INSPECT WINDSHIELD WIPER MOTOR ASSEMBLY (for RHD)
| *a | Component without harness connected
(Windshield Wiper Motor Assembly) |
Check the LO operation.
Connect the battery's positive (+) lead to terminal 5 (+1) and the negative (-) lead to terminal 4 (E), and check that the motor operates at low speed (LO).
- OK:
Motor operates at low speed (LO).
If the result is not as specified, replace the motor assembly.
Check the HI operation.
Connect the battery's positive (+) lead to terminal 3 (+2) and the negative (-) lead to terminal 4 (E), and check that the motor operates at high speed (HI).
- OK:
Motor operates at high speed (HI).
If the result is not as specified, replace the motor assembly.
Check the automatic stop operation.
Connect the battery's positive (+) lead to terminal 5 (+1) and the negative (-) lead to terminal 4 (E). With the motor rotating at low speed (LO), disconnect terminal 5 (+1) to stop the wiper motor operation at any position other than the automatic stop position.
Using SST, connect terminals 1 (+S) and 5 (+1). Then connect the battery's positive (+) lead to terminal 2 (B) to restart the motor operation at low speed (LO).
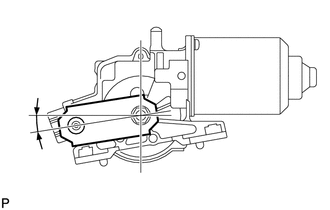
| *a | Automatic Stop Position |
Check that the motor stops automatically at the automatic stop position.
| Standard Area | Standard Condition |
|---|---|
| A | 14° to -1° |
- OK:
Refer to illustration on left.
If the result is not as specified, replace the motor assembly.