WIPER / WASHER WIPER SWITCH INSPECTION
PROCEDURE

 1.INSPECT WIPER AND WASHER SWITCH ASSEMBLY (for LHD)
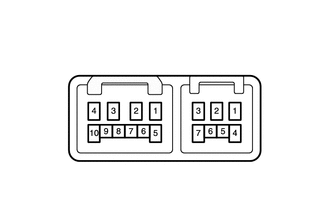
| *a | Component without harness connected
(Wiper and Washer Switch Assembly) |
Check the front wiper switch.
Measure the resistance according to the value(s) in the table below.
- Standard Resistance:
Tester Connection Switch Condition Specified Condition B-3 (+1) - B-2 (+B) MIST Below 1 Ω B-3 (+1) - B-1 (+S) OFF Below 1 Ω B-3 (+1) - B-1 (+S) INT Below 1 Ω B-3 (+1) - B-2 (+B) LO Below 1 Ω B-4 (+2) - B-2 (+B) HI Below 1 Ω
Check the windshield washer switch.
Measure the resistance according to the value(s) in the table below.
- Standard Resistance:
Tester Connection Switch Condition Specified Condition A-3 (WF) - A-2 (EW) OFF 10 kΩ or higher A-3 (WF) - A-2 (EW) ON Below 1 Ω
If the result is not as specified, replace the switch assembly.
Check the rear wiper and washer switch.
Measure the resistance according to the value(s) in the table below.
- Standard Resistance:
Tester Connection Switch Condition Specified Condition A-2 (EW) - B-5 (WR) WASH
Rear wiper switch rotated from ON position and heldBelow 1 Ω A-2 (EW) - B-5 (WR) OFF 10 kΩ or higher A-7 (+1R) - B-5 (WR) OFF 10 kΩ or higher A-2 (EW) - A-7 (+1R) OFF 10 kΩ or higher A-2 (EW) - A-7 (+1R) ON Below 1 Ω A-2 (EW) - B-5 (WR) WASH
Rear wiper switch rotated from ON position and heldBelow 1 Ω A-7 (+1R) - B-5 (WR) WASH
Rear wiper switch rotated from ON position and heldBelow 1 Ω A-2 (EW) - A-7 (+1R) WASH
Rear wiper switch rotated from ON position and heldBelow 1 Ω
Check the intermittent operation.
Connect a voltmeter's positive (+) lead to terminal B-3 (+1) and the negative (-) lead to terminal A-2 (EW).
Connect the battery's positive (+) lead to terminal B-2 (+B) and the negative (-) lead to terminals A-2 (EW) and B-1 (+S).
Turn the wiper switch to the INT position.
Connect the battery's positive (+) lead to terminal B-1 (+S) for 5 seconds.
Connect the battery's negative (-) lead to terminal B-1 (+S). operate the intermittent wiper relay and check the voltage between terminals B-3 (+1) and A-2 (EW).
- OK:
Refer to the illustration below.
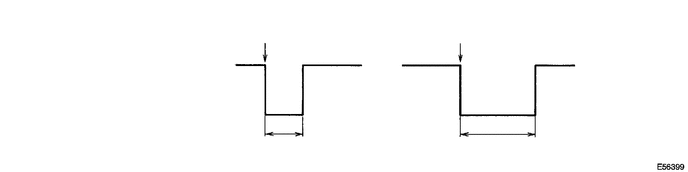
| *a | Voltage between terminals B-3 (+1) and A-2 (EW) | *b | Battery negative lead is connected to terminal B-1 (+S) |
| *c | Battery negative lead is connected to terminal B-1 (+S) | *d | 1.6 +/-1 second (interval is short) |
| *e | 10.7 +/-5 second (interval is long) | - | - |
If the result is not as specified, replace the switch assembly.
Check the washer operation.
Turn the wiper switch off.
Connect the battery's positive (+) lead to terminal B-2 (+B) and the negative (-) lead to terminals B-1 (+S) and A-2 (EW).
Connect the voltmeter's positive (+) lead to terminal B-3 (+1) and the negative (-) lead to terminal A-2 (EW).
Turn the washer switch on and off, and check the voltage between terminals B-3 (+1) and A-2 (EW).
- OK:
Refer to the illustration below.

| *1 | Washer Switch | - | - |
| *a | Voltage between terminals A-2 (EW) and B-3 (+1) | - | - |
If the result is not as specified, replace the switch assembly.
2.INSPECT WIPER AND WASHER SWITCH ASSEMBLY (for RHD)
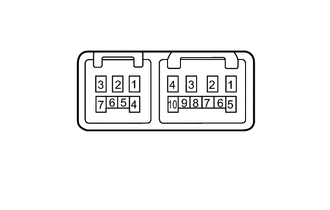
| *a | Component without harness connected
(Wiper and Washer Switch Assembly) |
Check the front wiper switch.
Measure the resistance according to the value(s) in the table below.
- Standard Resistance:
Tester Connection Switch Condition Specified Condition B-2 (+1) - B-3 (+B) MIST Below 1 Ω B-2 (+1) - B-4 (+S) OFF Below 1 Ω B-2 (+1) - B-4 (+S) INT Below 1 Ω B-2 (+1) - B-3 (+B) LO Below 1 Ω B-1 (+2) - B-2 (+B) HI Below 1 Ω
Check the windshield washer switch.
Measure the resistance according to the value(s) in the table below.
- Standard Resistance:
Tester Connection Switch Condition Specified Condition A-1 (WF) - A-2 (EW) OFF 10 kΩ or higher A-1 (WF) - A-2 (EW) ON Below 1 Ω
If the result is not as specified, replace the switch assembly.
Check the rear wiper and washer switch.
Measure the resistance according to the value(s) in the table below.
- Standard Resistance:
Tester Connection Switch Condition Specified Condition A-2 (EW) - B-10 (WR) WASH
(Rear wiper switch ON position side)Below 1 Ω A-2 (EW) - B-10 (WR) OFF 10 kΩ or higher A-4 (+1R) - B-10 (WR) OFF 10 kΩ or higher A-2 (EW) - A-4 (+1R) OFF 10 kΩ or higher A-2 (EW) - A-4 (+1R) ON Below 1 Ω A-2 (EW) - B-10 (WR) WASH
(Rear wiper switch ON position side)Below 1 Ω A-4 (+1R) - B-10 (WR) WASH
(Rear wiper switch ON position side)Below 1 Ω A-2 (EW) - A-4 (+1R) WASH
(Rear wiper switch ON position side)Below 1 Ω
Check the intermittent operation.
Connect the voltmeter's positive (+) lead to terminal B-2 (+1) and the negative (-) lead to terminal A-2 (EW).
Connect the battery's positive (+) lead to terminal B-3 (+B) and the negative (-) lead to terminals A-2 (EW) and B-4 (+S).
Turn the wiper switch to the INT position.
Connect the battery's positive (+) lead to terminal B-4 (+S) for 5 seconds.
Connect the battery's negative (-) lead to terminal B-4 (+S). Operate the intermittent wiper relay and check the voltage between terminals B-2 (+1) and A-2 (EW).
- OK:
Refer to the illustration below.
| *a | Voltage between terminals B-2 (+1) and A-2 (EW) | *b | Battery negative lead is connected to terminal B-4 (+S) |
| *c | Battery negative lead is connected to terminal B-4 (+S) | *d | 1.6 +/-1 second (interval is short) |
| *e | 10.7 +/-5 second (interval is long) | - | - |
If the result is not as specified, replace the switch assembly.
Check the washer operation.
Turn the wiper switch OFF.
Connect the battery's positive (+) lead to terminal B-3 (+B) and the negative (-) lead to terminals B-4 (+S) and A-2 (EW).
Connect the voltmeter's positive (+) lead to terminal B-2 (+1) and the negative (-) lead to terminal A-2 (EW).
Turn the washer switch ON and OFF, and check the voltage between terminals B-2 (+1) and A-2 (EW).
- OK:
Refer to illustration below.
| *1 | Washer Switch | - | - |
| *a | Voltage between terminals A-2 (EW) and B-2 (+1) | - | - |
If the result is not as specified, replace the switch assembly.