REASSEMBLY
Removal / installation · Vehicles built from Aug 2013
| 1. INSTALL MAGNETIC CLUTCH ASSEMBLY |

Place the cooler compressor in a vise.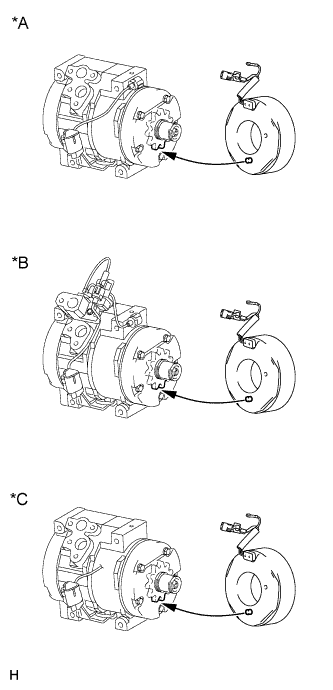

Install the magnet clutch stator with the parts shown in the illustration aligned.
Text in Illustration *A
except Model Code KDJ150L-GKFEYV, KDJ150L-GKAEYV
*B
Model Code KDJ150L-GKFEYV, KDJ150L-GKAEYV
*C
for Cold Area Specification Vehicles
Using a snap ring expander, install a new snap ring with the chamfered side facing up.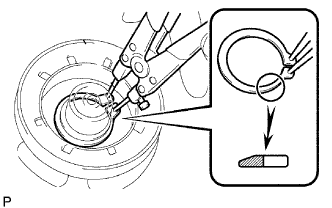
- NOTICE:
- Take care not to damage the seal cover of the bearing when installing the snap ring.
Connect the connector.
Using a snap ring expander, install the magnet clutch rotor and a new snap ring with the chamfered side facing up.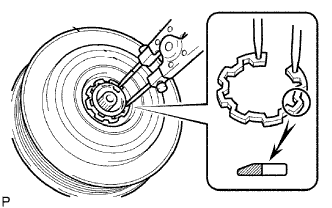
- NOTICE:
- Do not expand the snap ring by more than 30.5 mm (1.20 in.) when installing it.
- Do not damage the seal cover of the bearing when installing the snap ring.
- Do not expand the snap ring by more than 30.5 mm (1.20 in.) when installing it.
Install the magnet clutch washer and magnet clutch hub.
- NOTICE:
- Do not change the combination of the magnet clutch washers used before disassembly.
Using SST, install the magnet clutch hub and magnet clutch washers with the bolt.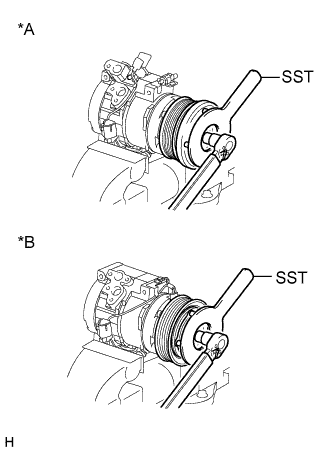
- SST
- 09985-00270
Text in Illustration *A
except Cold Area Specification Vehicles
*B
for Cold Area Specification Vehicles
- Torque:
- 18 N*m{ 184 kgf*cm , 13 ft.*lbf }
- NOTICE:
- Make sure that there is no foreign matter or oil on the compressor shaft, bolt and clutch hub.
| 2. INSTALL COOLER COMPRESSOR BRACKET |
Install the cooler bracket with the screw.
Attach the clamp.
| 3. INSPECT MAGNETIC CLUTCH CLEARANCE |
Set a dial indicator to the magnet clutch hub.
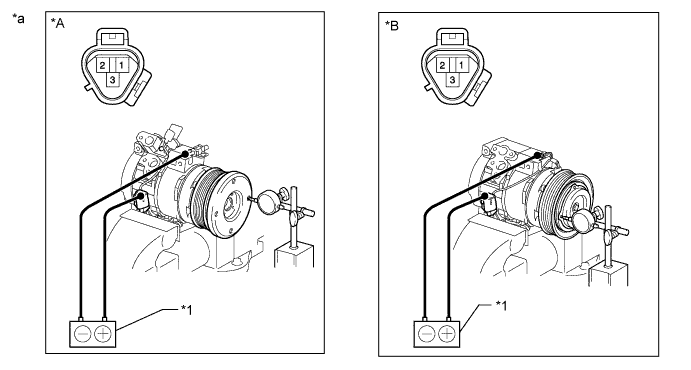
Text in Illustration *A
except Cold Area Specification Vehicles
*B
for Cold Area Specification Vehicles
*1
Battery
-
-
*a
Component without harness connected
(Magnet Clutch Assembly)
-
-
Connect the battery positive (+) lead to terminal 3 of the magnet clutch connector. Turn the magnet clutch on and off by connecting and disconnecting the battery negative (-) lead to and from the ground wire and measure the clearance.
- Standard clearance:
- 0.35 to 0.60 mm (0.013 to 0.024 in.)
- NOTICE:
- Adjustment should be performed with 3 magnet clutch washers or less.
| 4. ADJUST COMPRESSOR OIL |
When replacing the compressor and magnetic clutch with a new one, gradually discharge the refrigerant gas from the service valve and drain the following amount of oil from the new cooler compressor before installation.
- Standard:
- for Single Air Conditioning System:
- (The amount of oil inside a new cooler compressor: 120 to 135 cc (4.1 to 4.6 fl. oz.)) - (The amount of oil remaining in the removed cooler compressor) = (The amount of oil to be removed when replacing the compressor)
- for Dual Air Conditioning System:
- (The amount of oil inside a new cooler compressor: 180 to 195 cc (6.1 to 6.6 fl. oz.)) - (The amount of oil remaining in the removed cooler compressor) = (The amount of oil to be removed when replacing the compressor)
- NOTICE:
- When checking the compressor oil level, follow the A/C system precautions.
- Since compressor oil remains in the pipes of the vehicle, if a new compressor is installed without removing some oil from the compressor, the oil amount becomes excessive. Excessive oil prevents heat exchange in the refrigerant cycle and causes refrigeration system failure.
- If the volume of oil remaining in the removed cooler compressor is small, check for oil leakage.
- Be sure to use ND-OIL 8 for compressor oil.
- When checking the compressor oil level, follow the A/C system precautions.