ADJUSTMENT
Removal / installation · Vehicles built from Aug 2013
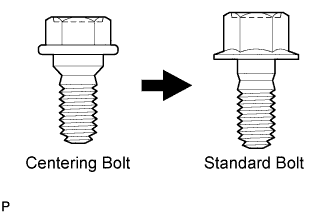

- HINT:
- Use the same procedure for the RH and LH sides.
- The procedure listed below is for the LH side.
- Centering bolts are used to mount the door hinge to the vehicle body and door. The door cannot be adjusted with the centering bolts installed on it. Substitute the centering bolts with standard bolts when making adjustments.
- The specified torque for standard bolts is shown in the standard bolt chart (Click here).
- Use the same procedure for the RH and LH sides.
| 1. INSPECT FRONT DOOR |

for 5 Door:
Check that the clearance measurements of areas A through P are within the standard range.
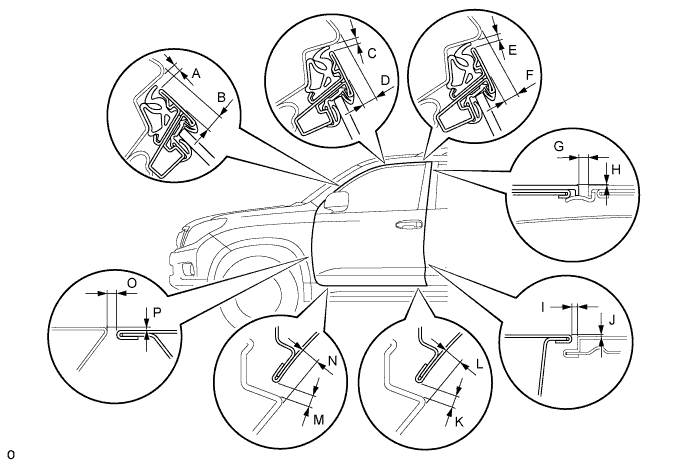
- Standard:
Area
Measurement
Area
Measurement
A
3.60 to 6.60 mm (0.142 to 0.260 in.)
B
6.50 to 9.50 mm (0.256 to 0.374 in.)
C
3.70 to 6.70 mm (0.146 to 0.264 in.)
D
3.70 to 6.70 mm (0.146 to 0.264 in.)
E
3.70 to 6.70 mm (0.146 to 0.264 in.)
F
4.60 to 7.60 mm (0.181 to 0.299 in.)
G
2.5 to 6.5 mm (0.0984 to 0.256 in.)
H
-2.0 to 2.0 mm (-0.0787 to 0.0787 in.)
I
3.0 to 6.0 mm (0.118 to 0.236 in.)
J
-1.5 to 1.5 mm (-0.0591 to 0.0591 in.)
K
4.05 to 7.05 mm (0.159 to 0.278 in.)
L
4.45 to 7.45 mm (0.175 to 0.293 in.)
M
4.05 to 7.05 mm (0.159 to 0.278 in.)
N
4.35 to 7.35 mm (0.171 to 0.289 in.)
O
2.7 to 5.7 mm (0.106 to 0.224 in.)
P
-1.5 to 1.5 mm (-0.0591 to 0.0591 in.)
for 3 Door:
Check that the clearance measurements of areas A through P are within the standard range.
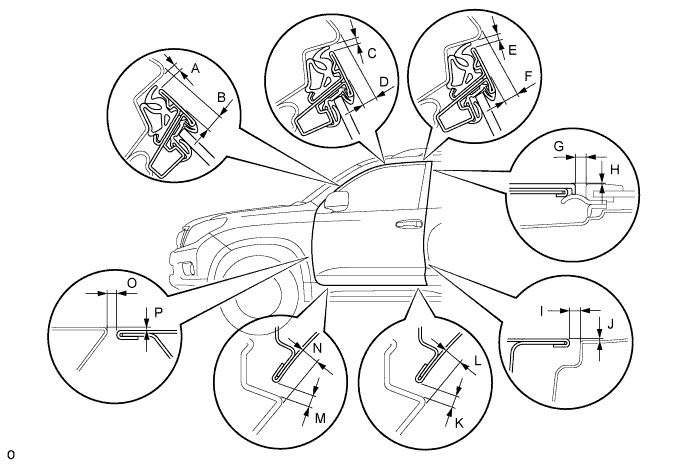
- Standard:
Area
Measurement
Area
Measurement
A
3.60 to 6.60 mm (0.142 to 0.260 in.)
B
6.50 to 9.50 mm (0.256 to 0.374 in.)
C
3.70 to 6.70 mm (0.146 to 0.264 in.)
D
3.70 to 6.70 mm (0.146 to 0.264 in.)
E
3.70 to 6.70 mm (0.146 to 0.264 in.)
F
4.60 to 7.60 mm (0.181 to 0.299 in.)
G
3.5 to 6.5 mm (0.138 to 0.256 in.)
H
-1.5 to 1.5 mm (-0.0591 to 0.0591 in.)
I
2.7 to 5.7 mm (0.106 to 0.224 in.)
J
-1.5 to 1.5 mm (-0.0591 to 0.0591 in.)
K
4.05 to 7.05 mm (0.159 to 0.278 in.)
L
4.45 to 7.45 mm (0.175 to 0.293 in.)
M
4.05 to 7.05 mm (0.159 to 0.278 in.)
N
4.35 to 7.35 mm (0.171 to 0.289 in.)
O
2.7 to 5.7 mm (0.106 to 0.224 in.)
P
-1.5 to 1.5 mm (-0.0591 to 0.0591 in.)
| 2. DISCONNECT CABLE FROM NEGATIVE BATTERY TERMINAL |
- CAUTION:
- Wait at least 90 seconds after disconnecting the cable from the negative (-) battery terminal to disable the SRS system.
- NOTICE:
- After turning the ignition switch off, waiting time may be required before disconnecting the cable from the battery terminal. Therefore, make sure to read the disconnecting the cable from the battery terminal notice before proceeding with work (Click here).
- When disconnecting the cable, some systems need to be initialized after the cable is reconnected (Click here).
- After turning the ignition switch off, waiting time may be required before disconnecting the cable from the battery terminal. Therefore, make sure to read the disconnecting the cable from the battery terminal notice before proceeding with work (Click here).
| 3. ADJUST FRONT DOOR |
Using SST, loosen the hinge bolts on the vehicle body and adjust the door position.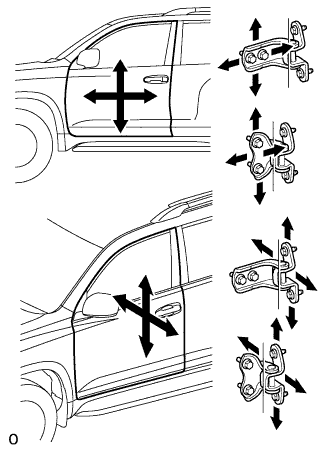
- SST
- 09812-00010
Tighten the hinge bolts on the vehicle body.
- Torque:
- 26 N*m{ 265 kgf*cm , 19 ft.*lbf }
Loosen the hinge bolts on the door and adjust the door position.
Tighten the hinge bolts on the door.
- Torque:
- 26 N*m{ 265 kgf*cm , 19 ft.*lbf }
Using a T40 "TORX" socket wrench, slightly loosen the striker mounting screws.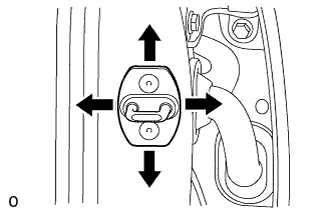
Using a brass bar and hammer, hit the striker to adjust its position.
Using a T40 "TORX" socket wrench, tighten the striker mounting screws.
- Torque:
- 23 N*m{ 235 kgf*cm , 17 ft.*lbf }
| 4. CONNECT CABLE TO NEGATIVE BATTERY TERMINAL |
- NOTICE:
- When disconnecting the cable, some systems need to be initialized after the cable is reconnected (Click here).
| 5. CHECK SRS WARNING LIGHT |
Check the SRS warning light (Click here).