REPLACEMENT
Removal / installation · Vehicles built from Aug 2013
| 1. REPLACE INTAKE VALVE GUIDE BUSH |

Heat the cylinder head to 80 to 100°C (176 to 212°F).
Place the cylinder head on wooden blocks.
Using SST and a hammer, tap out the guide bush.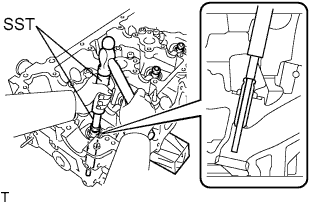

- SST
- 09201-01055
09950-70010 (09951-07100)
Using a caliper gauge, measure the bush bore diameter of the cylinder head.
- Standard Bush Bore Diameter:
Item
Specified Condition
STD
10.285 to 10.306 mm (0.405 to 0.406 in.)
O/S 0.05
10.335 to 10.356 mm (0.407 to 0.408 in.)
If the bush bore diameter of the cylinder head is more than 10.356 mm (0.408 in.), replace the cylinder head.
Select a new valve guide bush.
- New Valve Guide Bush:
Item
Specified Condition
Bush Bore Diameter
10.333 to 10.344 mm (0.4068 to 0.4072 in.)
10.383 to 10.394 mm (0.4088 to 0.4092 in.)
Use Bush
STD
O/S 0.05
- HINT:
- Standard bush length: 43.0 to 44.0 mm (1.69 to 1.73 in.)
Heat the cylinder head to 80 to 100°C (176 to 212°F).
Place the cylinder head on wooden blocks.
Using SST and a hammer, tap in a new valve guide bush to the specified protrusion height.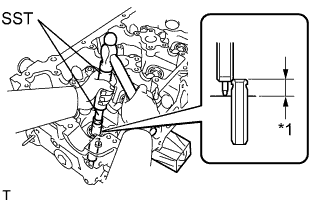
- SST
- 09201-01055
09950-70010 (09951-07100)
- Standard protrusion height:
- 9.8 to 10.2 mm (0.386 to 0.402 in.)
Text in Illustration *1
Height
Using a sharp 5.5 mm reamer, ream the valve guide bush to obtain the standard clearance between the guide bush and valve stem.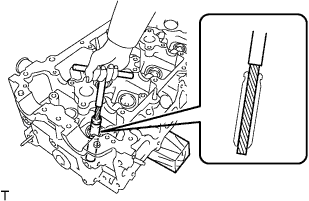
- Standard oil clearance:
- 0.025 to 0.060 mm (0.000984 to 0.00236 in.)
| 2. REPLACE EXHAUST VALVE GUIDE BUSH |
Heat the cylinder head to 80 to 100°C (176 to 212°F).
Place the cylinder head on wooden blocks.
Using SST and a hammer, tap out the guide bush.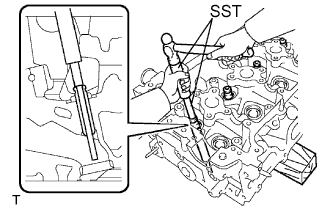
- SST
- 09201-01055
09950-70010 (09951-07100)
Using a caliper gauge, measure the bush bore diameter of the cylinder head.
- Standard Bush Bore Diameter:
Item
Specified Condition
STD
10.285 to 10.306 mm (0.405 to 0.406 in.)
O/S 0.05
10.335 to 10.356 mm (0.407 to 0.408 in.)
If the bush bore diameter of the cylinder head is more than 10.356 mm (0.408 in.), replace the cylinder head.
Select a new valve guide bush.
- New Valve Guide Bush:
Item
Specified Condition
Bush Bore Diameter
10.333 to 10.344 mm (0.4068 to 0.4072 in.)
10.383 to 10.394 mm (0.4088 to 0.4092 in.)
Use Bush
STD
O/S 0.05
- HINT:
- Standard bush length: 43.0 to 44.0 mm (1.69 to 1.73 in.)
Heat the cylinder head to 80 to 100°C (176 to 212°F).
Place the cylinder head on wooden blocks.
Using SST and a hammer, tap in a new valve guide bush to the specified protrusion height.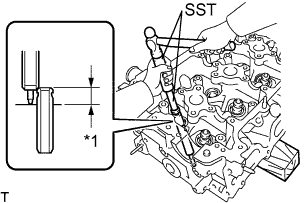
- SST
- 09201-01055
09950-70010 (09951-07100)
- Standard protrusion height:
- 7.6 to 8.0 mm (0.299 to 0.315 in.)
Text in Illustration *1
Height
Using a sharp 5.5 mm reamer, ream the valve guide bush to obtain the standard clearance between the guide bush and valve stem.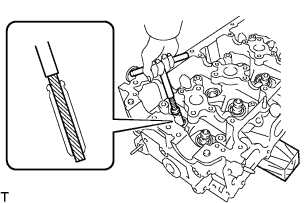
- Standard oil clearance:
- 0.030 to 0.065 mm (0.00118 to 0.00256 in.)
| 3. REPLACE CAMSHAFT BEARING CAP SETTING RING PIN |
- NOTICE:
-
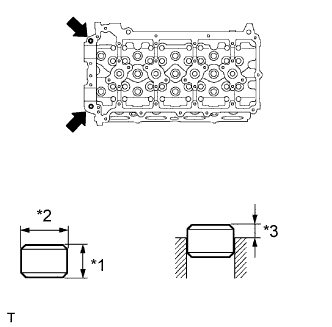
- It is not necessary to remove a ring pin unless it is being replaced.
Remove the ring pins.
Using a plastic-faced hammer, tap in a new ring pin until the pin stops.
- Standard Ring Pin:
Item
Height
Width
Protrusion Height
Ring pin
7 mm (0.276 in.)
10 mm (0.394 in.)
2.5 to 3.8 mm (0.0984 to 0.150 in.)
Text in Illustration *1
Height
*2
Width
*3
Protrusion Height
| 4. REPLACE NO. 1 TIGHT PLUG |
- NOTICE:
-
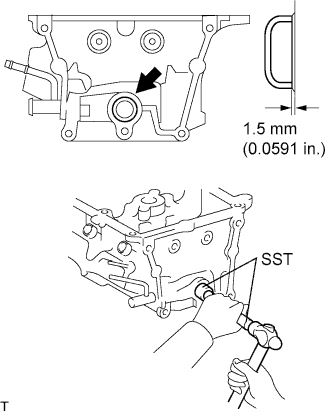
- If coolant leaks from the tight plug or the plug is corroded, replace it.
Apply adhesive to the tight plug hole of the cylinder head.
- Adhesive:
- Toyota Genuine Adhesive 1324, Three Bond 1324 or equivalent.
Using SST and a hammer, tap in a new tight plug to the cylinder head as shown in the illustration.
- SST
- 09950-60010
(09951-00250)
09950-70010 (09951-07100)