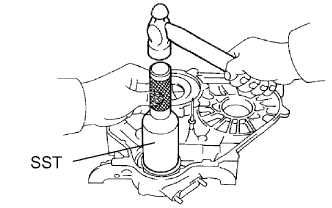
Using SST and a hammer, tap in a new oil seal until its surface is flush with the timing belt case edge.
SST
09214-60010
Apply MP grease to the lip of the oil seal.
2.
INSTALL TIMING BELT CASE SUB-ASSEMBLY
Place a new gasket on the cylinder block.
Install the timing belt case with the 5 bolts.
Torque:
23 N*m{
230 kgf*cm
, 17 ft.*lbf
}
3.
INSTALL OIL STRAINER SUB-ASSEMBLY
Install a new gasket and the oil strainer with the 2 bolts and 2 nuts.
Torque:
for nut:
21 N*m{
210 kgf*cm
, 17 ft.*lbf
}
for bolt:
18 N*m{
184 kgf*cm
, 13 ft.*lbf
}
4.
INSTALL OIL PAN SUB-ASSEMBLY
Remove any old packing (FIPG) material and do not drop any oil on the contact surfaces of the oil pan and cylinder block.
Using a gasket scraper, remove all the old packing (FIPG) material from the installation surface.
Thoroughly clean all components to remove all the loose material.
Using a non-residue solvent, clean both of the sealing surfaces.
NOTICE:
Do not use a solvent which will affect the painted surfaces.
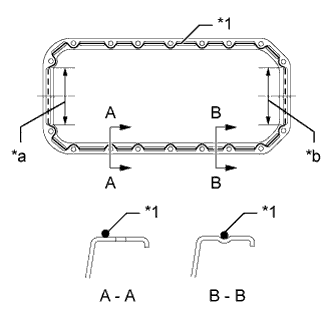
Apply seal packing to the oil pan as shown in the illustration.
Seal packing:
Toyota Genuine Seal Packing Black, Three Bond 1207B or equivalent
Application Specification:
Item
Seal Packing Diameter
Seal Packing Application Length
Dashed line
7.0 mm (0.276 in.)
128 mm (5.04 in.)
Continuous line
5.0 mm (0.197 in.)
-
Text in Illustration
*1
Seal Packing
*a
Timing Belt Case Contact Portion
*b
Rear Oil Seal Retainer Contact Portion
HINT:
Do not apply an excessive amount to the surface, especially near the oil passages.
Parts must be assembled within 5 minutes of application. Otherwise the material must be removed and reapplied.
Install the oil pan with the 16 bolts and 2 nuts. Uniformly tighten the bolts and nuts in several steps.
Torque:
18 N*m{
184 kgf*cm
, 13 ft.*lbf
}
5.
INSTALL CRANKSHAFT TIMING PULLEY
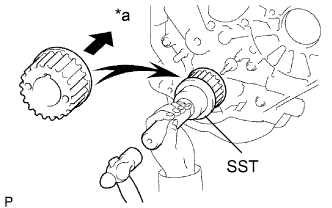
Align the key groove of the timing pulley with the pulley set key.
Using SST and a hammer, tap in the timing pulley with the flange side facing inward.
SST
09223-46011
Text in Illustration
*a
Inside
6.
INSTALL NO. 2 TIMING BELT IDLER SUB-ASSEMBLY
Install the spacer and No. 2 timing belt idler with the bolt.
Torque:
33 N*m{
337 kgf*cm
, 24 ft.*lbf
}
Check that the No. 2 timing belt idler moves smoothly.
7.
INSTALL NO. 1 TIMING BELT IDLER SUB-ASSEMBLY
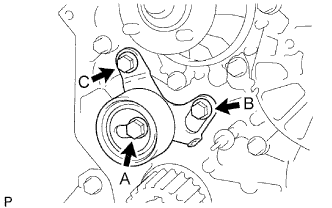
Install the No. 1 belt idler with the 3 bolts.
Torque:
for bolt A:
44 N*m{
449 kgf*cm
, 32 ft.*lbf
}
for bolt B, C:
19 N*m{
195 kgf*cm
, 14 ft.*lbf
}
HINT:
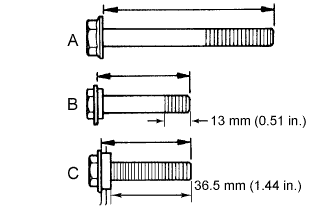
The bolt lengths for bolt A, B and C as follows.
Bolt C is combined with the No. 1 timing belt idler.
Standard Bolt:
Item
Length
A
76.5 mm (3.01 in.)
B
42.9 mm (1.69 in.)
C
41.3 mm (1.63 in.)
8.
INSTALL WATER PUMP ASSEMBLY
Install a new gasket, the water pump and tension spring bracket with the 6 bolts.
Torque:
23 N*m{
236 kgf*cm
, 17 ft.*lbf
}
9.
INSTALL NO. 2 TIMING BELT COVER
Install the timing belt cover with the 4 bolts.
Torque:
18 N*m{
184 kgf*cm
, 13 ft.*lbf
}
10.
INSTALL CAMSHAFT TIMING PULLEY
Install the woodruff key to the key groove of the camshaft.
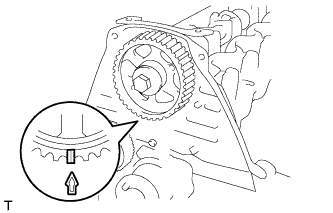
Align the timing mark on the camshaft timing pulley with the timing mark on the No. 2 timing belt cover and temporarily install the pulley with the bolt.
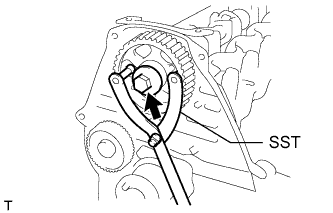
Using SST, tighten the bolt.
SST
09960-10010
(09962-01000, 09963-01000)
Torque:
98 N*m{
999 kgf*cm
, 72 ft.*lbf
}
11.
INSTALL NO. 1 GENERATOR BRACKET
Install the generator bracket with the 3 bolts.
Torque:
49 N*m{
500 kgf*cm
, 36 ft.*lbf
}
12.
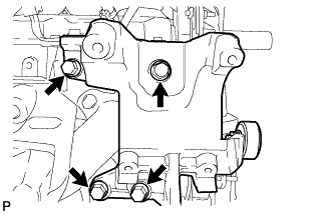
INSTALL NO. 1 FRONT ENGINE MOUNTING BRACKET RH
Install the engine mounting bracket with the 4 bolts.
Torque:
49 N*m{
500 kgf*cm
, 36 ft.*lbf
}
13.
INSTALL NO. 1 FRONT ENGINE MOUNTING BRACKET LH
Install the engine mounting bracket with the 4 bolts.
Torque:
49 N*m{
500 kgf*cm
, 36 ft.*lbf
}
14.
INSTALL PUMP BRACKET
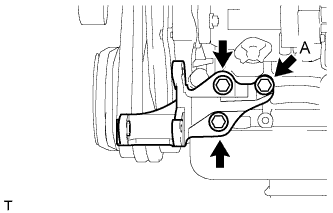
Install the pump bracket with the 3 bolts.
Torque:
for bolt A:
57 N*m{
581 kgf*cm
, 42 ft.*lbf
}
except bolt A:
78 N*m{
795 kgf*cm
, 58 ft.*lbf
}
15.
INSTALL WATER BY-PASS HOSE UNION
Clean the threads of the water by-pass hose union and apply adhesive to them.
Adhesive:
Toyota Genuine Adhesive 1324, Three Bond 1324 or equivalent