REASSEMBLY
Removal / installation · Vehicles built from Aug 2013
| 1. INSTALL FRONT DRIVE SHAFT DUST COVER |

Using SST and a press, install a new dust cover.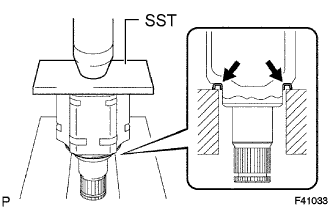

- SST
- 09527-10011
| 2. INSTALL SHAFT SNAP RING |
Install a new snap ring.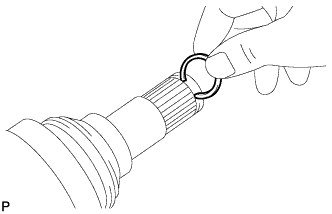
| 3. INSTALL OUTBOARD JOINT BOOT |
- HINT:
-
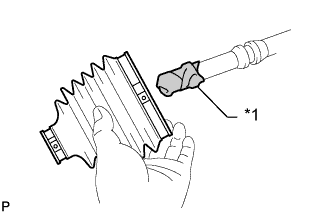
- Before installing the boot, wrap vinyl tape around the spline of the shaft to prevent damage to the boot.
| *1 |
Vinyl Tape |
Temporarily install a new outboard joint boot with 2 new clamps to the outboard joint shaft.
Pack the outboard joint and boot with grease from the boot kit.
- Standard grease capacity:
- 266 to 276 g (9.4 to 9.7 oz.)
| 4. INSTALL FRONT NO. 2 AXLE OUTBOARD JOINT BOOT CLAMP |
Hold the drive shaft lightly in a vise between aluminum plates.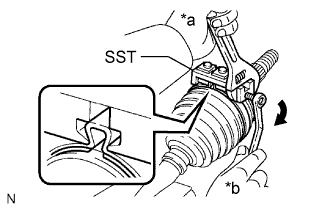
- NOTICE:
- Do not overtighten the vise.
Place SST onto the front No. 2 axle outboard joint boot clamp.
- SST
- 09521-24010
Text in Illustration *a
Hold
*b
Turn
Tighten SST so that the No. 2 front axle outboard joint boot clamp is pinched.
- NOTICE:
- Do not overtighten SST.
Using SST, measure the clearance of the No. 2 front axle out board joint boot clamp.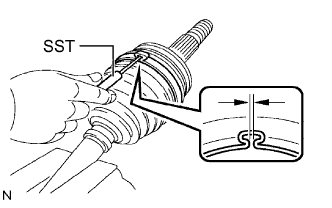
- SST
- 09240-00020
- Standard clearance:
- 2.1 mm (0.0827 in.) or less
- NOTICE:
- If the measured value is more than the specified value, retighten the clamp.
| 5. INSTALL FRONT NO. 1 AXLE OUTBOARD JOINT BOOT CLAMP |
Hold the drive shaft lightly in a vise between aluminum plates.
- NOTICE:
- Do not overtighten the vise.
Secure the outboard joint boot clamp to the boot.
Place SST onto the outboard joint boot clamp.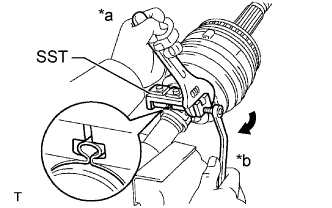
- SST
- 09521-24010
Text in Illustration *a
Hold
*b
Turn
Tighten SST so that the front axle outboard joint boot clamp is pinched.
- NOTICE:
- Do not overtighten SST.
Using SST, measure the clearance of the front axle outboard joint boot clamp.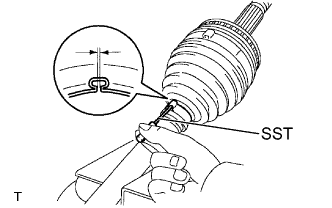
- SST
- 09240-00020
- Standard clearance:
- 1.3 mm (0.0512 in.) or less
- NOTICE:
- If the measured value is more than the specified value, retighten the clamp.
| 6. INSTALL INBOARD JOINT BOOT |
Temporarily install a new inboard joint boot to the outboard joint shaft.
| 7. INSTALL FRONT AXLE INBOARD JOINT ASSEMBLY |
Install new parts to the outboard joint shaft in the following order.
1.
Front axle inboard joint boot clamp
2.
Front axle inboard joint boot
3.
Front No. 2 axle inboard joint boot clamp
Secure the outboard joint shaft in a vise between aluminum plates.
- NOTICE:
- Do not overtighten the vise.
Align the matchmarks and install the tripod joint to the outboard joint shaft.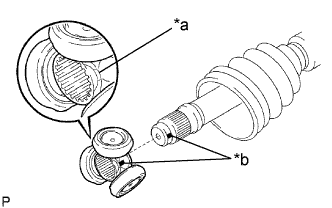
- NOTICE:
- Position tripod so that the beveled side of the tripod faces toward the inboard joint.
Text in Illustration *a
Beveled
*b
Matchmark
Align the matchmarks and install the tripod to the inboard joint.
Using a brass bar and hammer, tap the tripod onto the drive shaft.
- NOTICE:
- Do not hit the roller portion.
- Keep the tripod joint free of foreign matter.
- Do not hit the roller portion.
Using a snap ring expander, install a new snap ring.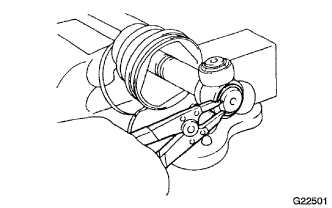
Pack the inboard joint assembly and boot with grease from the boot kit.
- Standard grease capacity:
- 239 to 249 g (8.4 to 8.7 oz.)
Align the matchmarks and install the inboard joint onto the outboard joint shaft.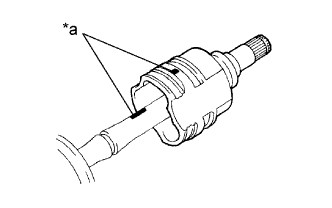
Text in Illustration *a
Matchmark
| 8. INSTALL FRONT NO. 1 AXLE INBOARD JOINT BOOT CLAMP |
Hold the drive shaft lightly in a vise between aluminum plates.
- NOTICE:
- Do not overtighten the vise.
Secure the inboard joint boot clamp to the boot.
Place SST onto the inboard joint boot clamp.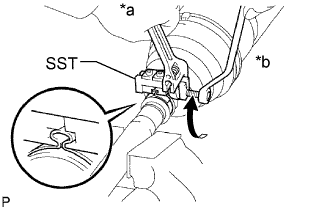
- SST
- 09521-24010
Text in Illustration *a
Hold
*b
Turn
Tighten SST so that the front axle inboard joint boot clamp is pinched.
- NOTICE:
- Do not overtighten SST.
Using SST, measure the clearance of the front axle inboard joint boot clamp.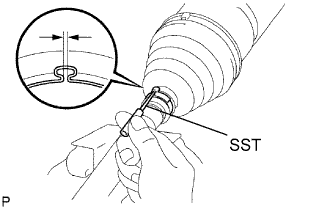
- SST
- 09240-00020
- Standard clearance:
- 1.3 mm (0.0512 in.) or less
- NOTICE:
- If the measured value is greater than the specified value, retighten the clamp.
| 9. INSTALL FRONT NO. 2 AXLE INBOARD JOINT BOOT CLAMP |
Hold the inboard joint shaft assembly in a vise between aluminum plates.
- NOTICE:
- Do not overtighten the vise.
Place SST onto the No. 2 front axle inboard joint boot clamp.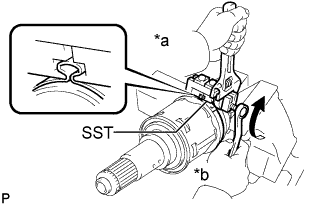
- SST
- 09521-24010
Text in Illustration *a
Hold
*b
Turn
Tighten SST so that the No. 2 front axle inboard joint boot clamp is pinched.
- NOTICE:
- Do not overtighten SST.
Using SST, measure the clearance of the No. 2 front axle inboard joint boot clamp.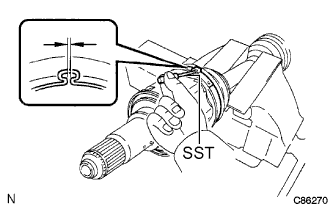
- SST
- 09240-00020
- Standard clearance:
- 2.1 mm (0.0827 in.) or less
- NOTICE:
- If the measured value is greater than the specified value, retighten the clamp.