INSPECTION
Inspection · Vehicles built from Aug 2013
| INSPECT OUTER MIRROR SWITCH ASSEMBLY (w/o Retract Mirror) |

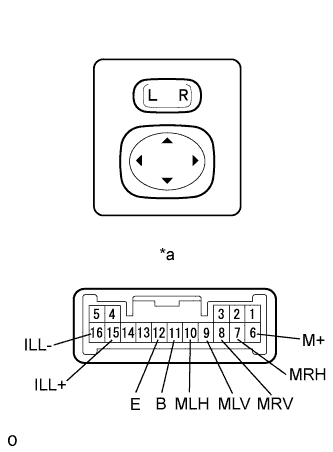  |
Inspect the outer mirror switch.
Select "L" on the left/right adjustment switch.
Measure the resistance according to the value(s) in the table below.
- Standard Resistance:
Tester Connection
Switch Condition
Specified Condition
9 (MLV) - 11 (B)
6 (M+) - 12 (E)
UP
Pressed
Below 1 Ω
Not pressed
10 kΩ or higher
9 (MLV) - 12 (E)
6 (M+) - 11 (B)
DOWN
Pressed
Below 1 Ω
Not pressed
10 kΩ or higher
10 (MLH) - 11 (B)
6 (M+) - 12 (E)
LEFT
Pressed
Below 1 Ω
Not pressed
10 kΩ or higher
10 (MLH) - 12 (E)
6 (M+) - 11 (B)
RIGHT
Pressed
Below 1 Ω
Not pressed
10 kΩ or higher
Select "R" on the left/right adjustment switch.
Measure the resistance according to the value(s) in the table below.
- Standard Resistance:
Tester Connection
Switch Condition
Specified Condition
8 (MRV) - 11 (B)
6 (M+) - 12 (E)
UP
Pressed
Below 1 Ω
Not pressed
10 kΩ or higher
8 (MRV) - 12 (E)
6 (M+) - 11 (B)
DOWN
Pressed
Below 1 Ω
Not pressed
10 kΩ or higher
7 (MRH) - 11 (B)
6 (M+) - 12 (E)
LEFT
Pressed
Below 1 Ω
Not pressed
10 kΩ or higher
7 (MRH) - 12 (E)
6 (M+) - 11 (B)
RIGHT
Pressed
Below 1 Ω
Not pressed
10 kΩ or higher
Inspect the switch illumination.
Apply battery voltage between the terminals of the light, and check the operation of the light.- OK:
Measurement Condition
Specified Condition
Battery positive (+) → Terminal 15 (ILL+)
Battery negative (-) → Terminal 16 (ILL-)
Light comes on
Text in Illustration *a
Component without harness connected
(Outer Mirror Switch Assembly)
| INSPECT OUTER MIRROR SWITCH ASSEMBLY (w/ Retract Mirror) |
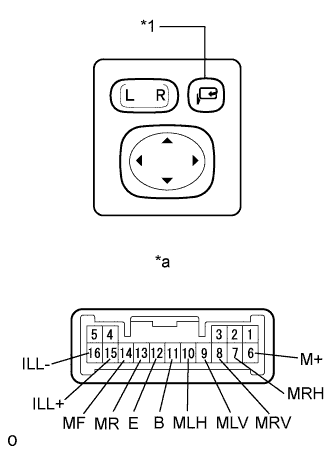 |
Inspect the outer mirror switch.
Select "L" on the left/right adjustment switch.
Measure the resistance according to the value(s) in the table below.
- Standard Resistance:
Tester Connection
Switch Condition
Specified Condition
9 (MLV) - 11 (B)
6 (M+) - 12 (E)
UP
Pressed
Below 1 Ω
Not pressed
10 kΩ or higher
9 (MLV) - 12 (E)
6 (M+) - 11 (B)
DOWN
Pressed
Below 1 Ω
Not pressed
10 kΩ or higher
10 (MLH) - 11 (B)
6 (M+) - 12 (E)
LEFT
Pressed
Below 1 Ω
Not pressed
10 kΩ or higher
10 (MLH) - 12 (E)
6 (M+) - 11 (B)
RIGHT
Pressed
Below 1 Ω
Not pressed
10 kΩ or higher
Select "R" on the left/right adjustment switch.
Measure the resistance according to the value(s) in the table below.
- Standard Resistance:
Tester Connection
Switch Condition
Specified Condition
8 (MRV) - 11 (B)
6 (M+) - 12 (E)
UP
Pressed
Below 1 Ω
Not pressed
10 kΩ or higher
8 (MRV) - 12 (E)
6 (M+) - 11 (B)
DOWN
Pressed
Below 1 Ω
Not pressed
10 kΩ or higher
7 (MRH) - 11 (B)
6 (M+) - 12 (E)
LEFT
Pressed
Below 1 Ω
Not pressed
10 kΩ or higher
7 (MRH) - 12 (E)
6 (M+) - 11 (B)
RIGHT
Pressed
Below 1 Ω
Not pressed
10 kΩ or higher
Inspect the retract switch.
Measure the resistance according to the value(s) in the table below.
- Standard Resistance:
Tester Connection
Switch Condition
Specified Condition
12 (E) - 14 (MF)
11 (B) - 13 (MR)
Pushed in
Below 1 Ω
12 (E) - 13 (MR)
11 (B) - 14 (MF)
Not pushed in
Below 1 Ω
Inspect the switch illumination.
Apply battery voltage between the terminals of the light, and check the operation of the light.- OK:
Measurement Condition
Specified Condition
Battery positive (+) → Terminal 15 (ILL+)
Battery negative (-) → Terminal 16 (ILL-)
Light comes on
Text in Illustration *1
Retract Switch
*a
Component without harness connected
(Outer Mirror Switch Assembly)