INSTALLATION
Removal / installation · Vehicles built from Aug 2013
| 1. INSTALL SPEED SENSOR SP2 |

Coat a new O-ring with ATF and install it to the sensor.
Install the sensor with the bolt.
- Torque:
- 5.4 N*m{ 55 kgf*cm , 48 in.*lbf }
Connect the sensor connector.
| 2. INSTALL SPEED SENSOR NT |
Coat a new O-ring with ATF and install it to the sensor.
Install the sensor with the bolt.
- Torque:
- 5.4 N*m{ 55 kgf*cm , 48 in.*lbf }
Connect the sensor connector.
| 3. INSTALL FRONT EXHAUST PIPE ASSEMBLY (w/ DPF) |
Install a new gasket and the front exhaust pipe to the No. 2 turbine outlet elbow with 3 new nuts.
- Torque:
- 54 N*m{ 554 kgf*cm , 40 ft.*lbf }
Connect the front exhaust pipe to the 2 exhaust pipe supports.
- HINT:
- Install the exhaust pipe supports after installing the No. 3 frame crossmember.
Connect the No. 7 exhaust pipe air hose to the front exhaust pipe with a new clip.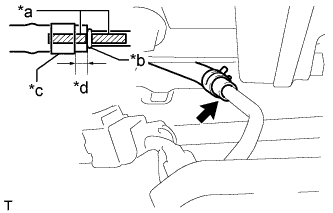

Text in Illustration *a
Paint Mark
*b
Stopper
*c
Clip
*d
4 to 10 mm (0.157 to 0.394 in.)
- NOTICE:
- Align the paint marks of the front exhaust pipe and No. 7 exhaust pipe air hose and insert the No. 7 exhaust pipe air hose until it contacts the stopper.
- Make sure the clip is 4 to 10 mm (0.157 to 0.394 in.) from the end of the No. 7 exhaust pipe air hose when installing the clip.
- Make sure that there is no slack in the No. 7 exhaust pipe air hose, and that it is not twisted or bent.
- Take care not to damage the inner or outer surface of the No. 7 exhaust pipe air hose when installing it. If the No. 7 exhaust pipe air hose is damaged, replace it with a new one.
- Align the paint marks of the front exhaust pipe and No. 7 exhaust pipe air hose and insert the No. 7 exhaust pipe air hose until it contacts the stopper.
Connect the No. 6 exhaust pipe air hose to the front exhaust pipe with a new clip.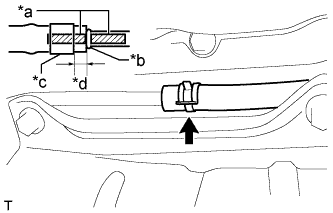
Text in Illustration *a
Paint Mark
*b
Stopper
*c
Clip
*d
4 to 10 mm (0.157 to 0.394 in.)
- NOTICE:
- Align the paint marks of the front exhaust pipe and No. 6 exhaust pipe air hose and insert the No. 6 exhaust pipe air hose until it contacts the stopper.
- Make sure the clip is 4 to 10 mm (0.157 to 0.394 in.) from the end of the exhaust pipe air hose when installing the clip.
- Make sure that there is no slack in the No. 6 exhaust pipe air hose, and that it is not twisted or bent.
- Take care not to damage the inner or outer surface of the No. 6 exhaust pipe air hose when installing it. If the No. 6 exhaust pipe air hose is damaged, replace it with a new one.
- Align the paint marks of the front exhaust pipe and No. 6 exhaust pipe air hose and insert the No. 6 exhaust pipe air hose until it contacts the stopper.
Connect the No. 3 exhaust gas temperature sensor connector.
Connect the No. 2 exhaust gas temperature sensor connector.
Connect the exhaust gas temperature sensor connector.
| 4. CONNECT CENTER EXHAUST PIPE ASSEMBLY (w/ DPF) |
Using a vernier caliper, measure the free length of the compression spring.
- Minimum free length:
- 43 mm (1.693 in.)
Using a plastic-faced hammer and wooden block, tap in a new gasket until its surface is flush with the front exhaust pipe.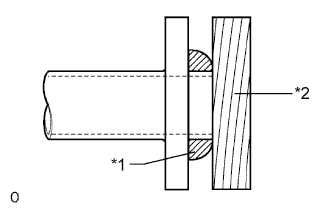
Text in Illustration *1
Gasket
*2
Wooden Block
- NOTICE:
- Be sure to install the gasket so that it faces the correct direction.
- Do not reuse the gasket.
- Do not damage the gasket.
- When connecting the exhaust pipe, do not push in the gasket with the exhaust pipe.
- Be sure to install the gasket so that it faces the correct direction.
Connect the center exhaust pipe assembly and install the 2 compression springs with the 2 bolts.
| 5. CONNECT AIR FUEL RATIO SENSOR (w/ DPF) |
Connect the air fuel ratio sensor connector and attach the clamp.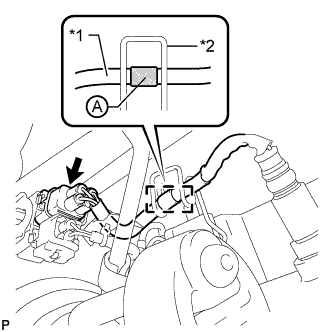
Text in Illustration *1
Wire Harness
*2
Clamp
- HINT:
- Make sure that the part of the wire harness labeled A is as shown in the illustration.
| 6. INSTALL NO. 3 FRAME CROSSMEMBER SUB-ASSEMBLY (w/ DPF) |
Install the frame crossmember to the rear engine mounting insulator with the 4 bolts.
- Torque:
- 30 N*m{ 306 kgf*cm , 22 ft.*lbf }
Install the frame crossmember with the 4 bolts and 4 nuts.
- Torque:
- 72 N*m{ 734 kgf*cm , 53 ft.*lbf }
| 7. INSTALL FRONT SUSPENSION MEMBER BRACKET LH AND RH (w/ DPF) |
Install the front suspension member bracket LH and front suspension member bracket RH with the 8 bolts.
- Torque:
- 33 N*m{ 337 kgf*cm , 24 ft.*lbf }
| 8. INSPECT FOR EXHAUST GAS LEAK (w/ DPF) |
- If gas is leaking, tighten the areas necessary to stop the leak. Replace damaged parts as necessary.