INSTALLATION
Removal / installation · Vehicles built from Aug 2013
- HINT:
- A bolt without a torque specification is shown in the standard bolt chart (Click here).
| 1. INSTALL ELECTRICAL KEY ANTENNA (w/ Entry and Start System) |

Install the electrical key antenna with the bolt.
- Torque:
- 8.0 N*m{ 82 kgf*cm , 71 in.*lbf }
| 2. INSTALL REAR BUMPER SIDE MOUNTING BRACKET LH |
Connect the connector.
Install the rear bumper side mounting bracket with the bolts.
- Torque:
- 8.0 N*m{ 82 kgf*cm , 71 in.*lbf }
| 3. INSTALL REAR BUMPER SIDE MOUNTING BRACKET RH |
- HINT:
- Use the same procedure described for the LH side.
| 4. INSTALL NO. 2 REAR BUMPER SIDE SUPPORT LH |
Install the No. 2 rear bumper side support with the bolts.
- Torque:
- 8.0 N*m{ 82 kgf*cm , 71 in.*lbf }
| 5. INSTALL REAR BUMPER BAR REINFORCEMENT LH |
Install the rear bumper bar reinforcement with the 3 bolts.
- Torque:
- 25 N*m{ 255 kgf*cm , 18 ft.*lbf }
| 6. INSTALL REAR BUMPER BAR REINFORCEMENT RH |
- HINT:
- Use the same procedure described for the LH side.
| 7. INSTALL REAR BUMPER END RETAINER LH (w/ Rear Bumper End Retainer) |
Install the rear bumper end retainer with the screw.
- Torque:
- 3.0 N*m{ 31 kgf*cm , 27 in.*lbf }
| 8. INSTALL REAR BUMPER END RETAINER RH (w/ Rear Bumper End Retainer) |
- HINT:
- Use the same procedure described for the LH side.
| 9. INSTALL REAR BUMPER SIDE SUPPORT LH |
Attach the 4 claws to install the rear bumper side support.
Install the 3 screws.
| 10. INSTALL REAR BUMPER SIDE SUPPORT RH |
- HINT:
- Use the same procedure described for the LH side.
| 11. INSTALL NO. 3 REAR BUMPER SIDE SUPPORT |
Install the No. 3 rear bumper side support with the screw.
- Torque:
- 3.0 N*m{ 31 kgf*cm , 27 ft.*lbf }
| 12. INSTALL REAR BUMPER COVER (for 5 Door) |
w/ TOYOTA Parking Assist-sensor System, w/ Fog Light:
Connect the 4 connectors.
w/ TOYOTA Parking Assist-sensor System, w/o Fog Light:
Connect the 2 connectors.
w/o TOYOTA Parking Assist-sensor System, w/ Fog Light:
Connect the 2 connectors.
Attach the 14 claws to install the rear bumper cover.
Install the 6 bolts and 2 clips.
- Torque:
- 8.0 N*m{ 82 kgf*cm , 71 in.*lbf }
| 13. INSTALL REAR BUMPER COVER (for 3 Door) |
w/ TOYOTA Parking Assist-sensor System, w/ Fog Light:
Connect the 4 connectors.
w/ TOYOTA Parking Assist-sensor System, w/o Fog Light:
Connect the 2 connectors.
w/o TOYOTA Parking Assist-sensor System, w/ Fog Light:
Connect the 2 connectors.
Attach the 10 claws to install the rear bumper cover.
Install the 7 bolts and 2 clips.
- Torque:
- 8.0 N*m{ 82 kgf*cm , 71 in.*lbf }
| 14. INSTALL REAR QUARTER PANEL MUDGUARD LH |
Install the rear quarter panel mudguard with the 5 screws and 2 clips.
| 15. INSTALL REAR QUARTER PANEL MUDGUARD RH |
- HINT:
- Use the same procedure described for the LH side.
| 16. INSTALL NO. 1 REAR BUMPER PLATE |
Attach the 10 claws and 10 guides to install the No. 1 rear bumper plate.
| 17. INSTALL BACK DOOR CHECK |
Bumper side:
Install the back door check with back door lower damper stay bracket with the 2 bolts labeled A.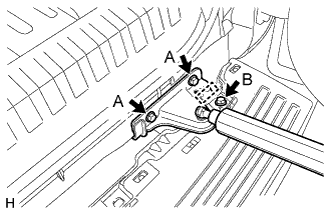

- Torque:
- 30 N*m{ 306 kgf*cm , 22 ft.*lbf }
Install the bolt labeled B.
- Torque:
- 8.0 N*m{ 82 kgf*cm , 71 in.*lbf }
Attach the wire harness.
Back door side:
Attach the clip to install the back door check with back door lower damper stay bracket.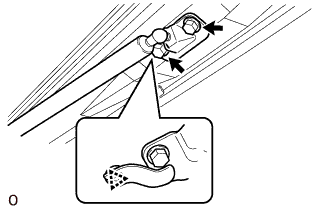
Install the 2 bolts.
- Torque:
- 30 N*m{ 306 kgf*cm , 22 ft.*lbf }
| 18. INSTALL REAR BUMPER BAR PLATE |
Attach the 14 claws to install the rear bumper bar plate.
| 19. INSTALL JACK BOX HOLE COVER |
Attach the 2 claws to install the jack box hole cover.
| 20. INSTALL PINTLE HOOK ASSEMBLY (w/ Pintle Hook) |
Install the pintle hook with the 4 bolts and 4 nuts.
- Torque:
- 81 N*m{ 826 kgf*cm , 60 ft.*lbf }
For vehicles with a spare tire installed to the underbody, install the spare tire.