REPLACEMENT
Removal / installation · Vehicles built from Aug 2013
| 1.
REMOVE REAR WIPER BLADE |
 |
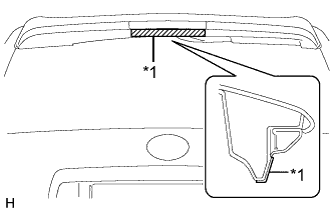
- Apply protective tape to the areas shown in the illustration.
Text in Illustration
*1
|
Protective Tape
|
Turn the ignition switch to ON.
Turn the rear wiper switch on.
- HINT:
- The wiper motor does not operate if the back door and back door glass are not closed.
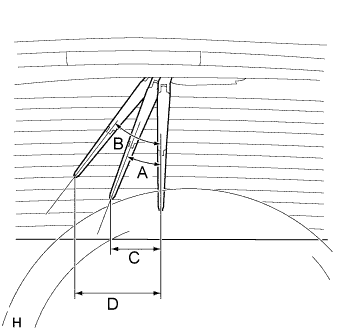
w/ Back Door Tire Carrier:
- Turn the ignition switch off when the wiper arm stops at the position shown in the illustration.
- Standard Clearance:
Area
|
Specified Condition
|
A - B
|
Approximately
27° to 39°
|
C - D
|
Approximately
200 to 273 mm (7.87 to 10.8 in.)
|
- HINT:
- It is easier to stop the wiper blade at the position indicated in the illustration while the wiper blade is returning to the original position.
- Make sure that the end of the wiper blade stops between the third and the fifth defogger wire as counted from the bottom.
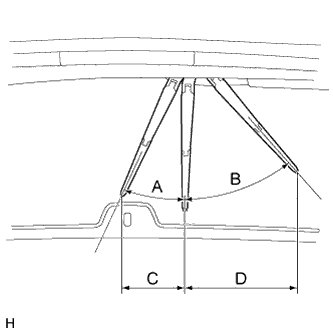
w/o Back Door Tire Carrier:
- Turn the ignition switch off when the wiper arm stops at the position shown in the illustration.
- Standard Clearance:
Area
|
Measurement
|
A - B
|
Approximately
23° to 43°
|
C - D
|
approximately
170.4 to 304.9 mm (6.71 to 12.0 in.)
|
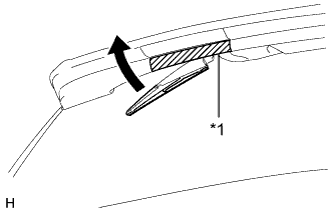
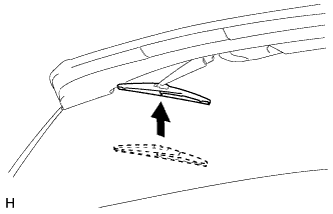
- Raise the rear wiper arm.
Text in Illustration
*1
|
Protective Tape
|
- NOTICE:
- Make sure that the wiper arm does not interfere with the rear spoiler.
- If the wiper arm does interfere with the rear spoiler, operate the engine switch again to stop the wiper arm in a near-vertical position.
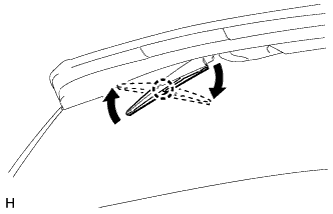
- Raise the wiper blade to the position where the claw detaches with a click sound as shown in the illustration.
- NOTICE:
- Be careful not to damage the claw.
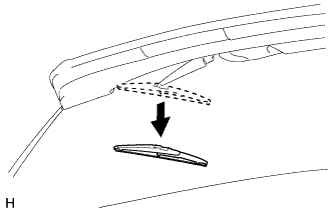
- Pull the wiper blade straight toward the left side of the vehicle to remove it from the wiper arm.
- NOTICE:
- Do not lower the wiper arm with the wiper blade removed. The arm tip may damage the back door glass surface.
| 2.
REMOVE REAR WIPER RUBBER |
|
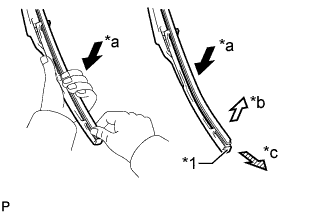
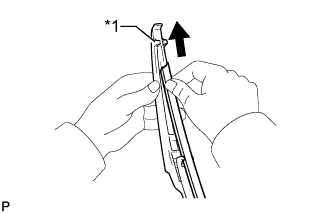
- Lift and pull the end of the wiper rubber protrusion from the blade stopper as shown in the illustration.
Text in Illustration
*1
|
Stopper
(Rear End of Blade)
|
*a
|
Lightly Push
(Grip)
|
*b
|
Lift
|
*c
|
Pull
|
- NOTICE:
- Do not forcibly pull out the wiper rubber. The backing plates will be deformed or the blade claws will be damaged.
- HINT:
- Lightly pushing the rubber in the middle will allow it to be removed more easily.
Remove the rear wiper rubber backing plates.
| 3.
INSTALL REAR WIPER RUBBER |
|
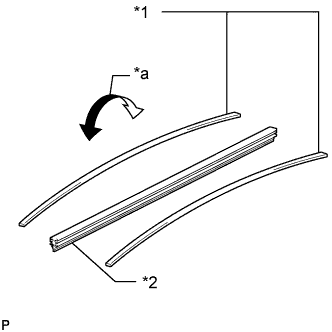
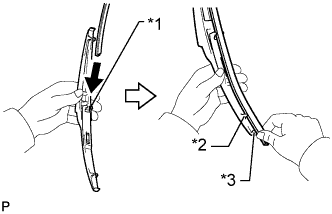
- Install the rear wiper rubber backing plates as shown in the illustration.
Text in Illustration
*1
|
Rear Wiper Rubber Backing Plate
|
*2
|
Rear Wiper Rubber
|
*a
|
Curve
|
- NOTICE:
- Install the backing plates facing the correct direction.
Insert the wiper rubber from the front end of the wiper blade to the rear end through the second claw.
- After pushing the wiper rubber through the rear end claw, allow it to stick out from the rear end stopper.
Text in Illustration
*1
|
Second Claw
|
*2
|
Rear End Claw
|
*3
|
Rear End Stopper
|
- Slide the wiper rubber through the front end claw.
Text in Illustration
*1
|
Front End Claw
|
| 4.
INSTALL REAR WIPER BLADE |
|
- Push the wiper blade straight toward the right side of the vehicle to install it to the wiper arm.
- NOTICE:
- Make sure that the wiper arm does not interfere with the rear spoiler.
- attach the claw to install the rear wiper blade as shown in the illustration.
- NOTICE:
- Be careful not to damage the claw.