REMOVAL
Removal / installation · Vehicles built from Aug 2013
| 1. REMOVE GENERATOR ASSEMBLY |

Remove the 2 bolts and generator.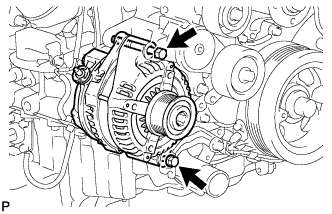

| 2. REMOVE GENERATOR BRACKET |
Remove the bolt and generator bracket.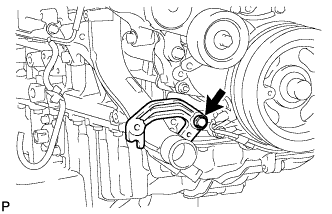
| 3. REMOVE NO. 1 COMPRESSOR MOUNTING BRACKET |
Remove the 5 bolts and No. 1 compressor mounting bracket.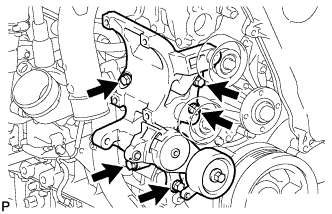
| 4. REMOVE VENTILATION PIPE |
Type A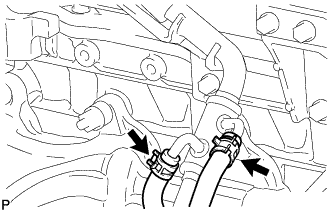
Slide the 2 clamps and disconnect the No. 3 turbo water hose and No. 4 turbo water hose from the ventilation pipe.
Remove the bolt and disconnect the 2 ventilation hoses and ventilation pipe from the cylinder head sub-assembly.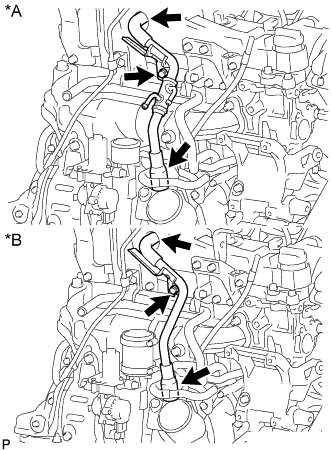
Text in Illustration *A
Type A
*B
Type B
| 5. REMOVE ENGINE OIL LEVEL DIPSTICK GUIDE |
Remove the engine oil level dipstick.
Remove the 2 bolts and engine oil level dipstick guide from the cylinder block sub-assembly.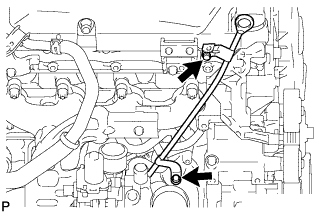
Remove the O-ring from the engine oil level dipstick guide.
| 6. REMOVE COMPRESSOR INLET ELBOW |
Detach the 3 wire harness clamps.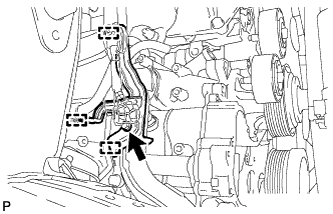
Remove the bolt and wire harness bracket from the water inlet.
Disconnect the 2 connectors and detach the wire harness clamp.
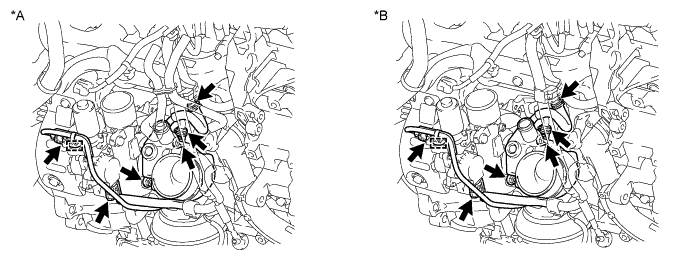
Text in Illustration *A
Type A
*B
Type B
Slide the clamp and disconnect the No. 2 turbo water hose from the No. 1 turbo water hose sub-assembly.
Slide the clamp and disconnect the No. 3 turbo water hose from the No. 2 water by-pass pipe.
Remove the 2 nuts, compressor inlet elbow and gasket from the turbocharger sub-assembly.
| 7. REMOVE NO. 1 TURBO INSULATOR |
Remove the 2 bolts and No. 1 turbo insulator from the turbocharger sub-assembly.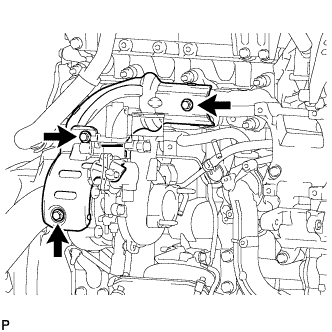
| 8. REMOVE NO. 1 EXHAUST MANIFOLD HEAT INSULATOR |
Remove the bolt and No. 1 exhaust manifold heat insulator from the exhaust manifold.
| 9. DISCONNECT NO. 1 TURBO WATER HOSE |
Disconnect the No. 1 turbo water hose from the No. 1 turbo water pipe sub-assembly.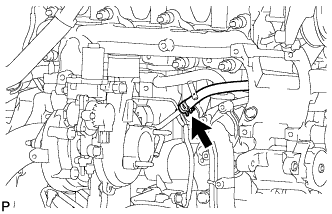
| 10. REMOVE TURBINE OUTLET ELBOW |
Remove the 3 nuts, turbine outlet elbow and gasket from the turbocharger sub-assembly.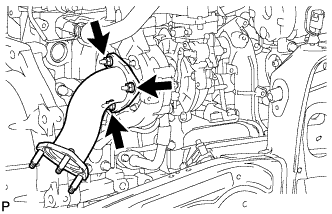
| 11. REMOVE TURBOCHARGER STAY |
Remove the 2 bolts, nut and turbocharger stay from the turbocharger sub-assembly and cylinder block sub-assembly.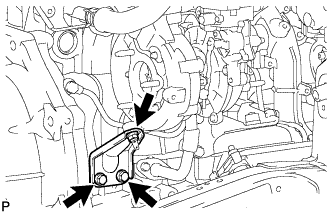
| 12. REMOVE TURBO OIL INLET PIPE SUB-ASSEMBLY |
Remove the 2 bolts, 2 nuts, union bolt, turbo oil inlet pipe sub-assembly and 3 gaskets from the turbocharger sub-assembly and cylinder block sub-assembly.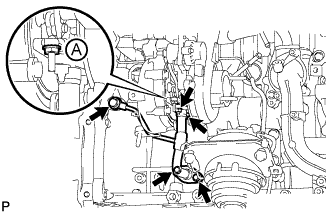
- NOTICE:
- Do not loosen the nut labeled A in the illustration.
| 13. REMOVE EXHAUST MANIFOLD WITH TURBOCHARGER |
Remove the 8 nuts, 8 plate washers and 8 collars from the exhaust manifold with turbocharger sub-assembly.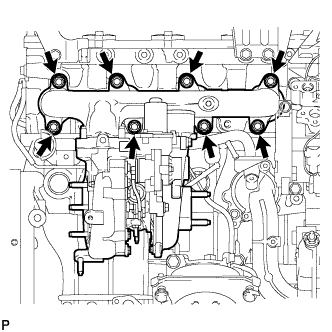
Remove the exhaust manifold with turbocharger and gasket.
| 14. REMOVE NO. 2 CYLINDER HEAD COVER SUB-ASSEMBLY |
Remove the 4 bolts and No. 2 cylinder head cover.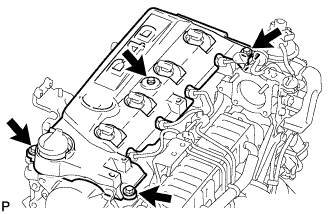
| 15. REMOVE COMPRESSOR ELBOW STAY |
Remove the 2 bolts and compressor elbow stay.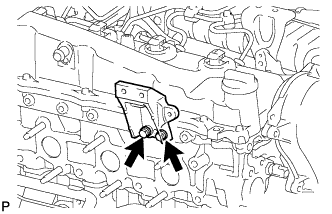
| 16. REMOVE WATER INLET |
Remove the 3 bolts and water inlet.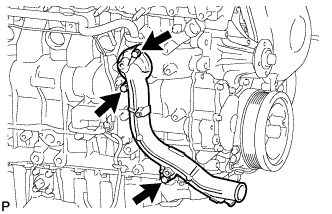
| 17. REMOVE THERMOSTAT |
Remove the thermostat.
Remove the gasket from the thermostat.
| 18. REMOVE NO. 2 WATER BY-PASS PIPE SUB-ASSEMBLY |
Disconnect the 2 hoses.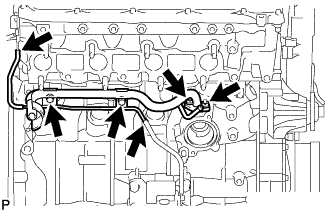
Remove the 2 bolts, 2 nuts and No. 2 water by-pass pipe.
| 19. REMOVE ENGINE OIL LEVEL SENSOR |
Remove the 4 bolts and engine oil level sensor.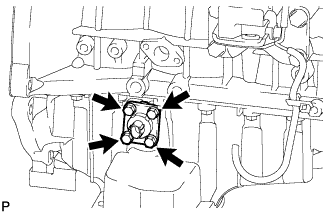
Cut away part of the gasket and remove the gasket from the engine oil level sensor.
- HINT:
- Remove only the outer part of the gasket.
| 20. REMOVE TIMING GEAR COVER INSULATOR |
Remove the bolt and gear cover insulator.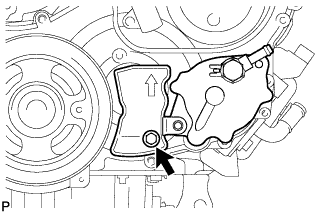
| 21. REMOVE VACUUM PUMP ASSEMBLY |
Remove the 2 nuts, vacuum pump and 2 O-rings.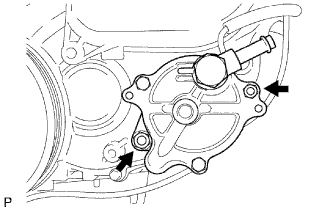
| 22. REMOVE VANE PUMP ASSEMBLY |
Remove the 2 nuts, vane pump and O-ring.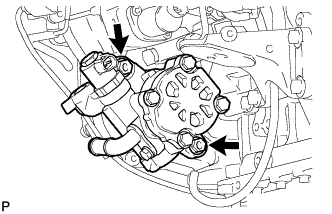
| 23. REMOVE ENGINE COOLANT TEMPERATURE SENSOR |
Disconnect the engine coolant temperature sensor connector.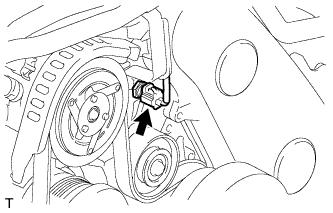
Remove the engine coolant temperature sensor.
Remove the gasket from the engine coolant temperature sensor.
| 24. REMOVE CAMSHAFT POSITION SENSOR |
Remove the bolt and camshaft position sensor.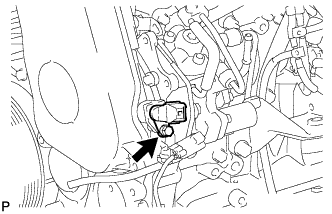
| 25. REMOVE CRANKSHAFT POSITION SENSOR |
Detach the clamp and remove the bolt and crankshaft position sensor.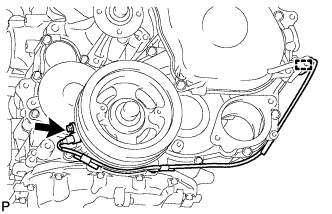
| 26. REMOVE NO. 1 TIMING BELT COVER |
Remove the 6 bolts, 6 washers and timing belt cover.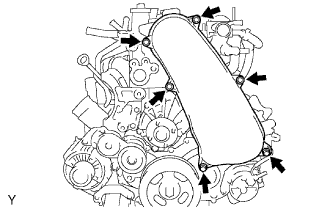
| 27. REMOVE TIMING BELT |
Turn the crankshaft clockwise and align the timing marks as shown in the illustration.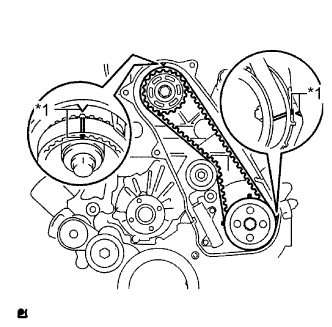
Text in Illustration *1
Timing Mark
- HINT:
- If reusing the timing belt, place matchmarks on the timing belt so that it can be installed exactly as before.
Uniformly loosen and remove the 2 bolts and No. 1 timing belt tensioner.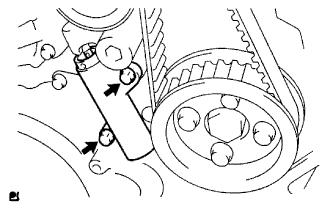
Remove the timing belt.
- HINT:
-
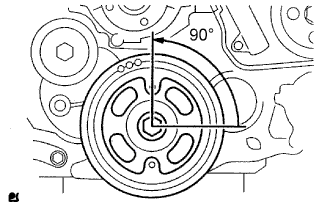
- If turning the camshaft while the timing belt is removed, turn the crankshaft 90° counterclockwise as shown in the illustration.
- When installing the timing belt, turn the camshaft to align the timing marks and then turn the crankshaft clockwise to align the timing marks.
- If turning the camshaft while the timing belt is removed, turn the crankshaft 90° counterclockwise as shown in the illustration.
| 28. REMOVE NO. 1 TIMING BELT IDLER SUB-ASSEMBLY |
- NOTICE:
- When inspecting the No. 1 timing belt idler, do not remove it unless absolutely necessary.
Using a 10 mm hexagon wrench, remove the bolt, No. 1 timing belt idler and washer.
| 29. REMOVE CRANKSHAFT PULLEY |
Using SST, hold the crankshaft pulley and loosen the pulley bolt.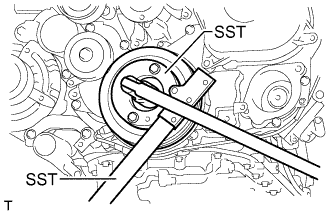
- SST
- 09213-58014
09330-00021
Using SST, remove the pulley bolt and crankshaft pulley.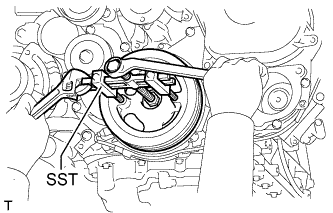
- SST
- 09950-50013
(09951-05010, 09952-05010, 09953-05020, 09954-05021)
| 30. DISCONNECT NO. 3 WATER BY-PASS HOSE (w/ EGR System with EGR Cooler) |
Remove the clamp.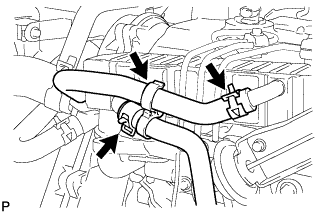
Disconnect the No. 3 water by-pass hose from the EGR cooler.
| 31. DISCONNECT NO. 4 WATER BY-PASS HOSE (w/ EGR System with EGR Cooler) |
Disconnect the No. 4 water by-pass hose from the EGR cooler.
| 32. REMOVE INJECTION PIPE (w/ EGR System) |
- NOTICE:
- After removing the fuel pipe, cover the outlets on the common rail with tape to keep out foreign matter.
- After removing the fuel pipe, put it in a plastic bag to prevent foreign matter from contaminating the injector inlet.
- After removing the fuel pipe, cover the outlets on the common rail with tape to keep out foreign matter.
Remove the 2 nuts and No. 3 injection pipe clamp.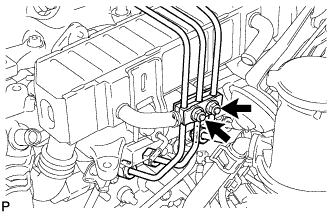
Remove the 2 bolts and 2 No. 2 injection pipe clamps.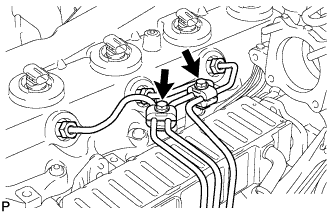
Using a 17 mm union nut wrench, loosen the union nuts and remove the No. 1, No. 2 and No. 3 injection pipes.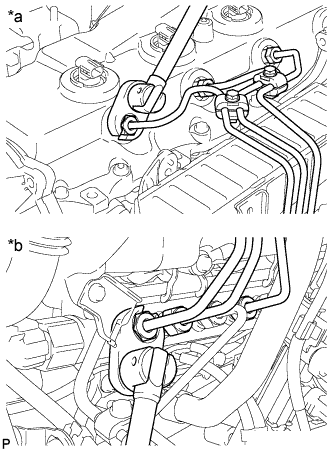
Text in Illustration *a
for Injector Side
*b
for Common Rail Side
| 33. REMOVE AIR CONNECTOR STAY (w/ EGR System) |
Remove the 3 bolts and air connector stay.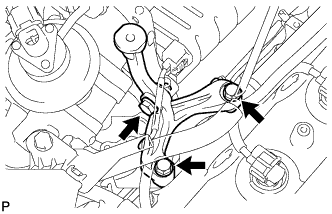
| 34. REMOVE EGR VALVE BRACKET (w/ EGR System) |
Remove the 2 nuts and EGR valve bracket.
| 35. REMOVE ELECTRIC VACUUM REGULATING VALVE ASSEMBLY (w/ EGR System) |
Disconnect the 2 connectors from the electric EGR control valve and E-VRV.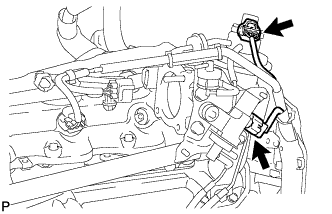
Detach the wire harness clamp.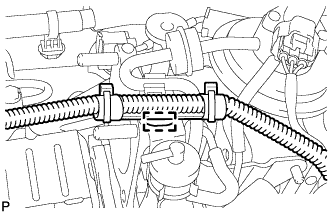
Disconnect the 5 vacuum hoses.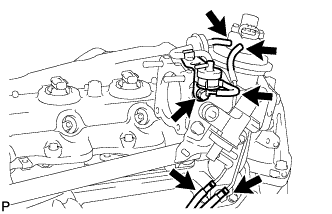
Remove the bolt and gas filter together with the gas filter bracket.
Remove the 2 bolts and E-VRV bracket together with the EGR vacuum damper.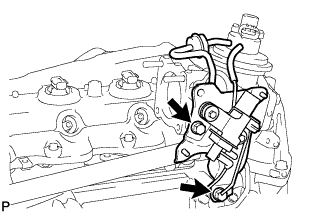
| 36. REMOVE NO. 2 INTAKE AIR CONNECTOR (w/ EGR System) |
Remove the 3 nuts, No. 2 intake air connector and gasket.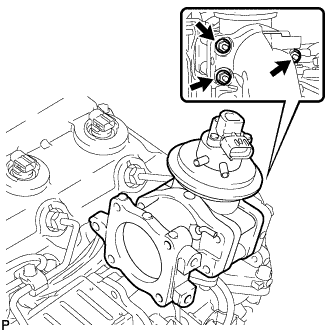
| 37. REMOVE INTAKE AIR CONNECTOR (w/ EGR System) |
Remove the 3 bolts, intake air connector and 2 gaskets.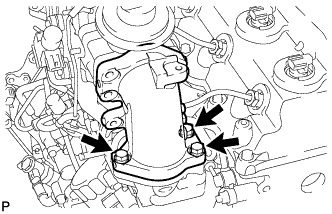
| 38. REMOVE ELECTRIC EGR CONTROL VALVE ASSEMBLY WITH NO. 2 EGR VALVE AND EGR COOLER (w/ EGR System with EGR Cooler) |
Disconnect the No. 3 vacuum transmitting hose from the No. 2 EGR valve.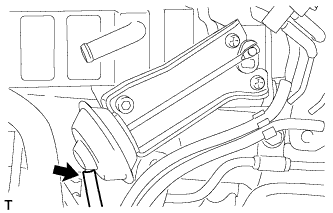
Remove the bolt, 2 nuts, electric EGR control valve together with the No. 2 EGR valve and EGR cooler.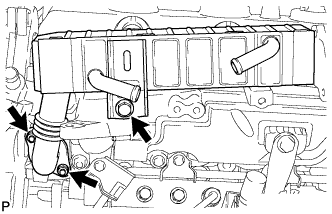
Remove the gasket from the cylinder block.
| 39. REMOVE ELECTRIC EGR CONTROL VALVE ASSEMBLY WITH NO. 1 EGR PIPE SUB-ASSEMBLY (w/ EGR System without EGR Cooler) |
Remove the 2 nuts and electric EGR control valve together with the No. 1 EGR pipe and gasket.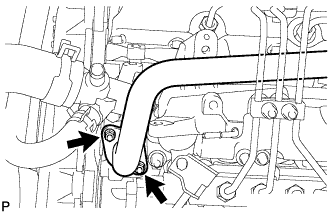
| 40. REMOVE ELECTRIC EGR CONTROL VALVE ASSEMBLY (w/ EGR System) |
Remove the 2 bolts, electric EGR control valve and gasket.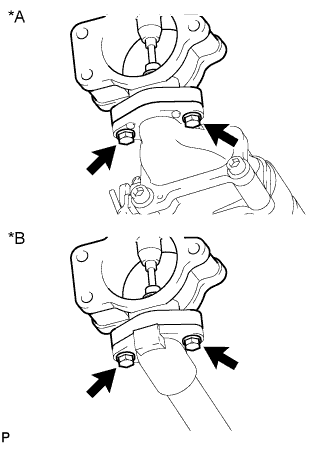
Text in Illustration *A
w/ EGR Cooler
*B
w/o EGR Cooler
| 41. REMOVE EGR VALVE ADAPTER (w/ EGR System with EGR Cooler) |
Using a 6 mm hexagon wrench, remove the 3 hexagon bolts, 3 plate washers, EGR valve adapter and gasket.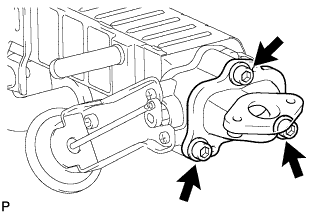
| 42. REMOVE NO. 2 EGR VALVE ASSEMBLY (w/ EGR System with EGR Cooler) |
Using a 5 mm hexagon wrench, remove the hexagon bolt, No. 2 EGR valve and gasket.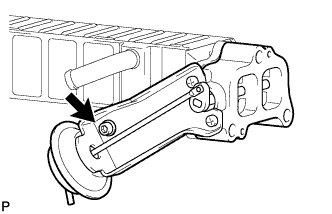
| 43. REMOVE THROTTLE BODY BRACKET (w/o EGR System) |
Disconnect the vacuum hose.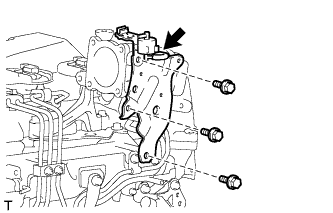
Remove the bolt and gas filter with gas filter bracket.
Remove the 2 bolts and throttle body bracket.
| 44. REMOVE INJECTION PIPE (w/o EGR System) |
- NOTICE:
- After removing the fuel pipe, cover the outlets on the common rail with tape to keep out foreign matter.
- After removing the fuel pipe, put it in a plastic bag to prevent foreign matter from contaminating the injector inlet.
- After removing the fuel pipe, cover the outlets on the common rail with tape to keep out foreign matter.
Remove the 2 nuts and No. 3 injection pipe clamp.
Remove the 2 bolts and 2 No. 2 injection pipe clamps.
Using a 17 mm union nut wrench, loosen the union nuts and remove the No. 1, No. 2 and No. 3 injection pipes.
Text in Illustration *a
for Injector Side
*b
for Common Rail Side
| 45. REMOVE AIR CONNECTOR STAY (w/o EGR System) |
Remove the 3 bolts and air connector stay.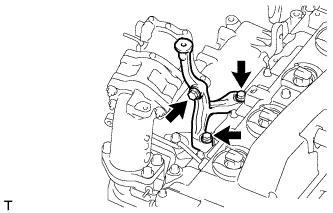
| 46. REMOVE NO. 2 INTAKE AIR CONNECTOR (w/o EGR System) |
Remove the 3 nuts.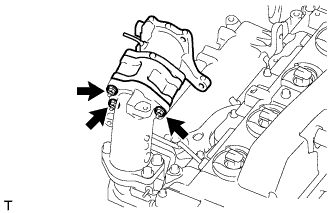
Remove the No. 2 intake air connector, No. 1 intake air connector and 2 gaskets.
| 47. REMOVE INTAKE AIR CONNECTOR (w/o EGR System) |
Remove the 3 bolts, intake air connector and gasket.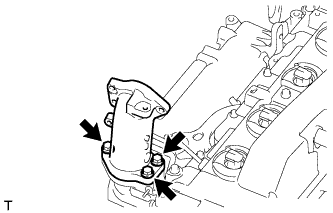
| 48. REMOVE NO. 2 EGR HOLE COVER PLATE (w/o EGR System) |
Remove the 2 nut, gasket and No. 2 EGR hole cover plate.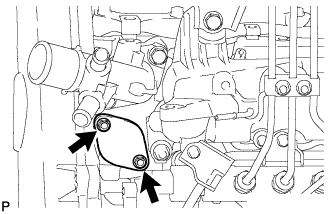
| 49. REMOVE WATER OUTLET |
Remove the 2 bolts, gasket and water outlet.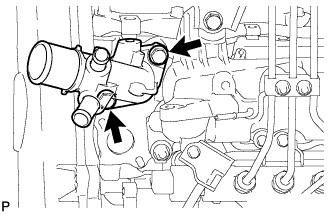
| 50. REMOVE NO. 1 GLOW PLUG CONNECTOR |
Remove the 4 screw grommets, 4 nuts and No. 1 glow plug connector.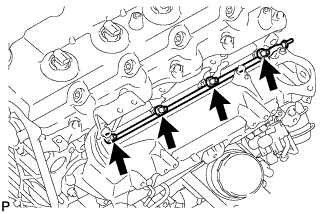
| 51. REMOVE NO. 1 INTAKE MANIFOLD INSULATOR |
Remove the No. 1 intake manifold insulator.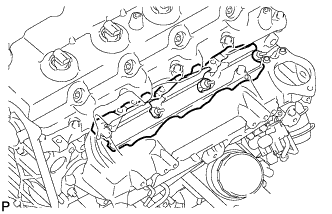
| 52. REMOVE GLOW PLUG ASSEMBLY |
Using a 12 mm deep socket wrench, remove the 4 glow plugs.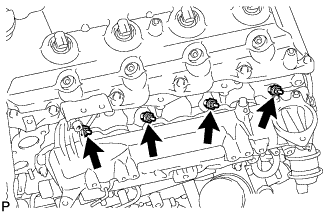
| 53. REMOVE MANIFOLD STAY WITH VACUUM SWITCHING VALVE |
Disconnect the No. 1 vacuum transmitting hose.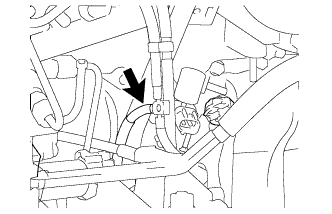
w/ EGR System: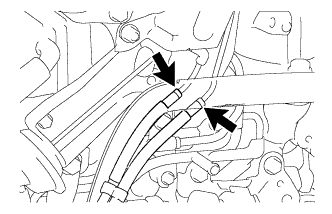
Disconnect the No. 2 vacuum transmitting hose and No. 3 vacuum transmitting hose assembly.
w/ EGR Cooler: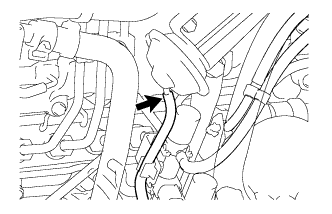
Disconnect the No. 3 vacuum transmitting hose.
Disconnect the No. 3 vacuum transmitting hose assembly and No. 4 vacuum transmitting hose assembly.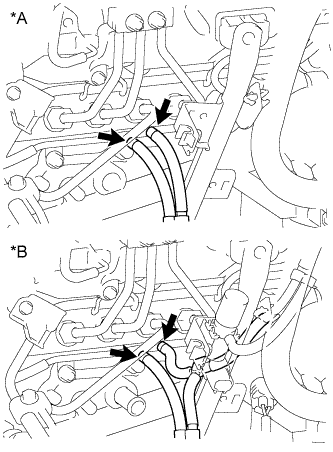
Text in Illustration *A
w/o EGR System
*B
w/ EGR System
Remove the 2 bolts and manifold stay with vacuum switching valve.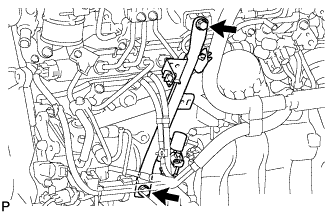
| 54. REMOVE INTAKE PIPE STAY |
Remove the bolt and intake pipe stay.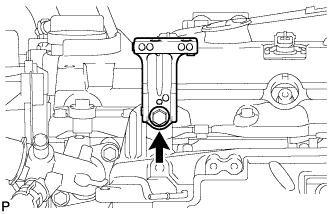
| 55. REMOVE VACUUM CONTROL VALVE SET |
Disconnect the 2 VSV connectors and 3 vacuum hoses.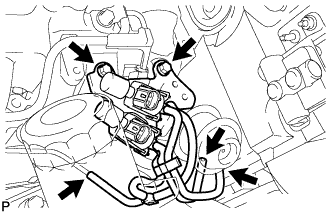
Remove the 2 bolts and vacuum control valve set.
| 56. REMOVE NO. 4 INJECTION PIPE SUB-ASSEMBLY |
Remove the bolt and detach the injection pipe clamp.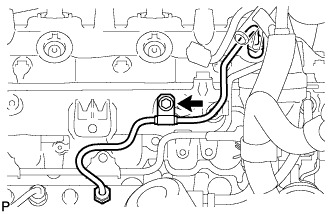
- NOTICE:
- If an injection pipe clamp is removed from the No. 4 injection pipe, replace the injection clamp with a new one.
Using a 17 mm union nut wrench, loosen the union nuts and remove the No. 4 injection pipe.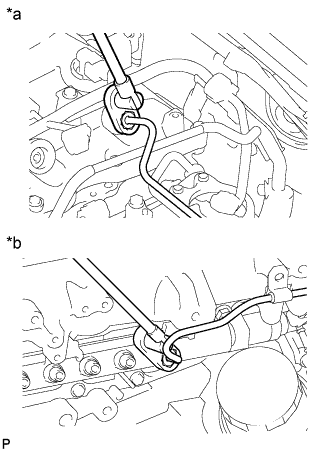
Text in Illustration *a
Injector Side
*b
Common Rail Side
| 57. REMOVE NO. 2 NOZZLE LEAKAGE PIPE ASSEMBLY |
Disconnect the 3 fuel hoses.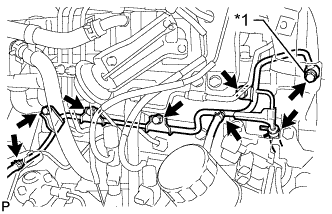
Remove the union bolt, 4 bolts, No. 2 nozzle leakage pipe and gasket.
Text in Illustration *1
Union Bolt
| 58. REMOVE INTAKE MANIFOLD INSULATOR |
Remove the 2 bolts and intake manifold insulator.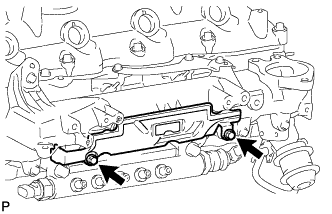
| 59. REMOVE INTAKE MANIFOLD |
Detach the sensor wire connector clamp from the intake manifold.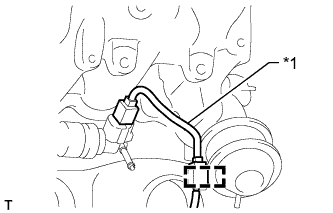
Text in Illustration *1
Sensor Wire
Disconnect the vacuum hose from the intake manifold.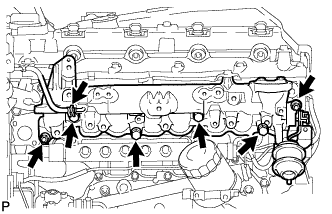
Remove the 2 nuts, 4 bolts, intake manifold and gasket.
| 60. REMOVE NO. 2 INTAKE MANIFOLD INSULATOR |
Remove the No. 2 intake manifold insulator.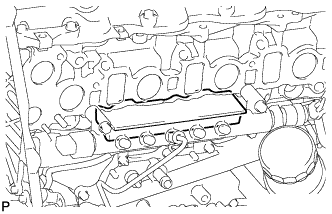
| 61. REMOVE FUEL INLET PIPE SUB-ASSEMBLY |
Loosen the union nuts and remove the fuel inlet pipe.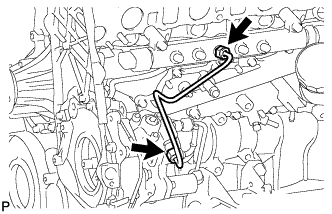
| 62. REMOVE COMMON RAIL ASSEMBLY |
Remove the 2 bolts and common rail.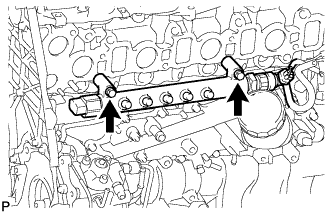
- NOTICE:
- Do not remove the pressure discharge valve or fuel pressure sensor.
| 63. REMOVE SUPPLY PUMP ASSEMBLY |
Remove the 4 bolts indicated by the arrows in the illustration.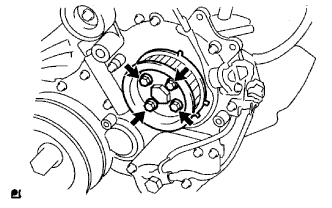
Remove the No. 2 camshaft timing pulley flange and pump drive shaft pulley.
Remove the set nut and O-ring while holding the crankshaft pulley using SST.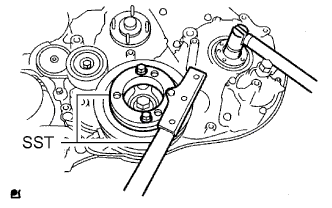
- SST
- 09213-58014
09330-00021
Loosen the 2 nuts.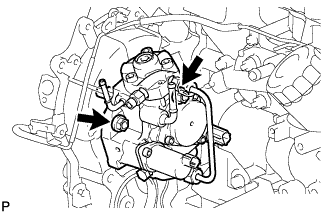
Using SST, disconnect the supply pump from the injection gear.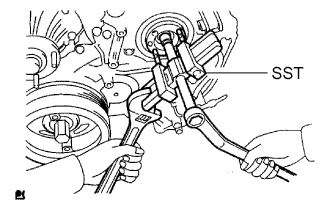
- SST
- 09950-50013
(09951-05010, 09952-05010, 09953-05020, 09954-05021)
- NOTICE:
- Apply lubricant to the threads and tip of SST (center bolt) before using it.
Remove the 2 nuts and supply pump.
- NOTICE:
- Do not hold or carry the fuel supply pump by holding the pipe.
- The fuel supply pump must be kept horizontal.
- Do not hold or carry the fuel supply pump by holding the pipe.
Remove the O-ring.
| 64. REMOVE NO. 1 INJECTION PUMP PROTECTOR |
Remove the 2 bolts and No. 1 injection pump protector.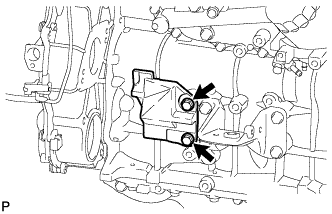
| 65. REMOVE OIL FILTER SUB-ASSEMBLY |
Using SST, remove the oil filter.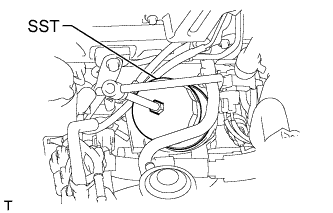
- SST
- 09228-07501
| 66. REMOVE NO. 3 VACUUM TRANSMITTING PIPE SUB-ASSEMBLY |
Disconnect the vacuum hose.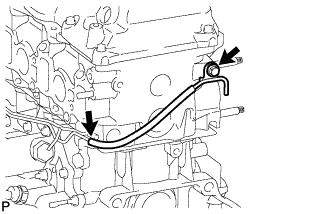
Remove the bolt and No. 3 vacuum transmitting pipe.
| 67. REMOVE NO. 2 VACUUM TRANSMITTING PIPE SUB-ASSEMBLY |
Disconnect the vacuum hose.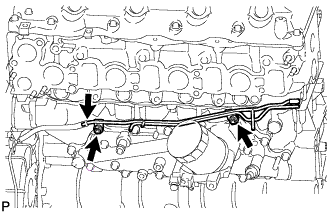
Remove the 2 nuts and No. 2 vacuum transmitting pipe.
| 68. REMOVE OIL COOLER COVER SUB-ASSEMBLY |
Remove the 13 bolts and oil cooler cover.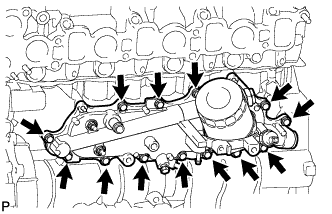
| 69. REMOVE NO. 1 VACUUM TRANSMITTING PIPE SUB-ASSEMBLY |
Remove the bolt, nut and No. 1 vacuum transmitting pipe.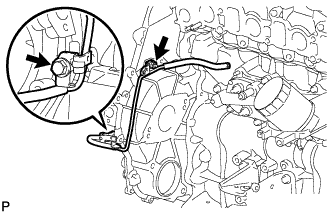
| 70. REMOVE NO. 1 OIL PAN COVER SUB-ASSEMBLY |
Remove the 4 bolts and No. 1 oil pan cover.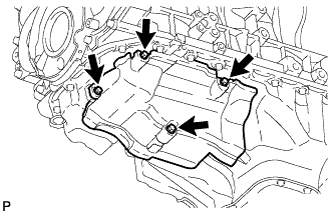
| 71. REMOVE NO. 1 VACUUM PIPE |
Remove the bolt and No. 1 vacuum pipe.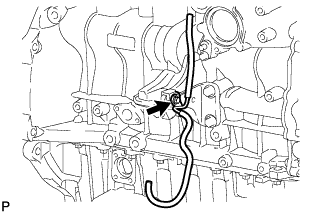
| 72. REMOVE NO. 2 CYLINDER BLOCK INSULATOR |
Remove the No. 2 cylinder block insulator.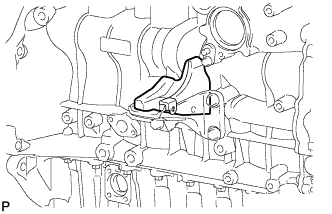
| 73. REMOVE FRONT NO. 1 ENGINE MOUNTING BRACKET RH |
Remove the 8 bolts and 2 engine mounting brackets.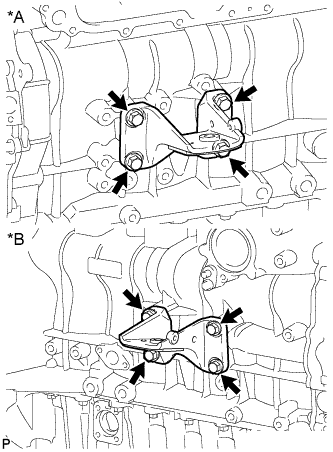
Text in Illustration *A
for LH Side
*B
for RH Side