INSTALLATION
Removal / installation · Vehicles built from Aug 2013
| 1. INSTALL ENGINE OIL PRESSURE SWITCH ASSEMBLY |

Clean the threads of the oil pressure switch and apply adhesive to them.
- Adhesive:
- Toyota Genuine Adhesive 1344, Three Bond 1344 or equivalent
- NOTICE:
- Do not apply adhesive to the oil inlet port of the oil pressure switch.
Using a 24 mm deep socket wrench, install the oil pressure switch.
- Torque:
- 15 N*m{ 150 kgf*cm , 11 ft.*lbf }
- NOTICE:
- Do not start the engine within 1 hour of installation.
| 2. INSTALL VACUUM PUMP OIL INLET HOSE |
Connect the vacuum pump oil inlet hose with a new gasket and the union bolt.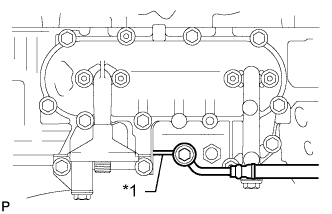

- Torque:
- 14 N*m{ 140 kgf*cm , 10 ft.*lbf }
- HINT:
- When tightening the inlet hose, hang the stopper-bar of the inlet hose on the filter bracket to prevent the inlet hose from rotating.
Text in Illustration *1
Stopper-bar
| 3. INSTALL ENGINE OIL LEVEL DIPSTICK GUIDE |
Apply a light coat of engine oil to a new O-ring.
Install the O-ring to the dipstick guide.
Install the dipstick guide with the 2 bolts.
- Torque:
- 18 N*m{ 184 kgf*cm , 13 ft.*lbf }
Install the dipstick.
| 4. INSTALL RESONATOR WITH AIR CLEANER CAP SUB-ASSEMBLY |
Disconnect the sensor connector.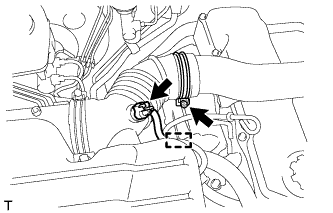
Detach the wire harness clamp.
Loosen the hose clamp and remove the resonator with air cleaner cap.
Detach the 4 hook clamps, and then remove the air cleaner cap and resonator with air cleaner cap.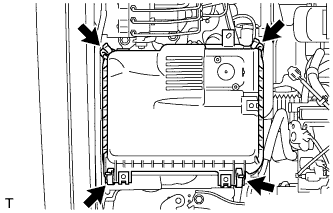
| 5. INSPECT FOR ENGINE OIL LEAK |
Start the engine. Make sure that there are no oil leaks from the areas that were worked on.