REASSEMBLY
Removal / installation · Vehicles built from Aug 2013
| 1. INSTALL OUTPUT SHAFT ASSEMBLY |

Install the output shaft to the intermediate plate by pushing on the output shaft and tapping on the intermediate plate with a plastic-faced hammer.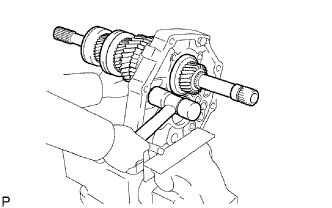

Using a snap ring expander, install the snap ring to the center bearing.
- HINT:
- Make sure the shaft snap ring is flush with the intermediate plate surface.
| 2. INSTALL INPUT SHAFT ASSEMBLY |
Coat the input shaft and No. 2 synchronizer ring with gear oil, and install them to the output shaft.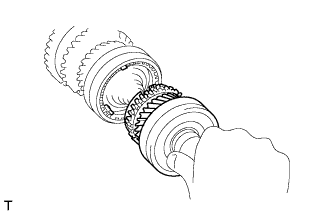
| 3. INSTALL COUNTER GEAR ASSEMBLY |
Coat the input shaft and No. 2 synchronizer ring with gear oil.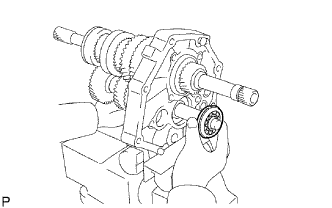
Temporarily install the counter gear, input shaft and a new center bearing to the intermediate plate.
- NOTICE:
- Install the bearing (with snap ring) to the rear side of the counter gear.
Using a plastic-faced hammer, install the center bearing to the intermediate plate by tapping the outer race to the counter gear center bearing.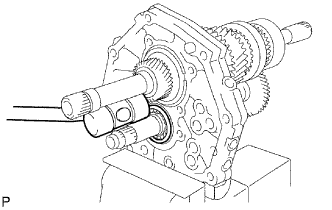
- HINT:
- Hold the front side of the counter gear by hand.
Using a snap ring expander, install the counter shaft center bearing snap ring to the counter shaft center bearing.
| 4. INSTALL OUTPUT SHAFT REAR BEARING RETAINER |
Using a T40 "TORX" socket, install the output shaft rear bearing retainer to the intermediate plate with the 4 bolts.
- Torque:
- 19 N*m{ 189 kgf*cm , 14 ft.*lbf }
| 5. INSTALL REVERSE IDLER GEAR SUB-ASSEMBLY |
Install the reverse idler gear shaft and reverse idler gear to the intermediate plate.
Install the reverse idler gear shaft stopper to the intermediate plate with the bolt.
- Torque:
- 18 N*m{ 178 kgf*cm , 13 ft.*lbf }
| 6. INSTALL REVERSE SHIFT ARM BRACKET |
Install the reverse shift arm bracket to the intermediate plate with the 2 bolts.
- Torque:
- 19 N*m{ 189 kgf*cm , 14 ft.*lbf }
| 7. INSTALL 5TH GEAR BEARING INNER RACE LOCK BALL |
Install the lock ball.
| 8. INSTALL 5TH GEAR THRUST WASHER |
Install the 5th gear thrust washer.
| 9. INSTALL NO. 3 TRANSMISSION HUB SLEEVE |
Coat the counter shaft 5th gear with gear oil.
Install the counter 5th gear, counter shaft 5th gear bearing, 3 synchromesh shifting keys, 2 synchromesh shifting key springs and No. 3 transmission hub sleeve.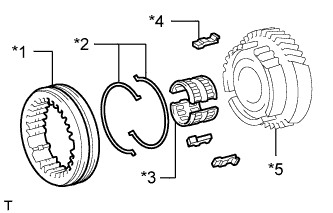
Text in Illustration *1
No. 3 Transmission Hub Sleeve
*2
No. 3 Synchromesh Shifting Key Spring
*3
Counter Shaft 5th Gear Bearing
*4
No. 3 Synchromesh Shifting Key
*5
Counter Shaft 5th Gear
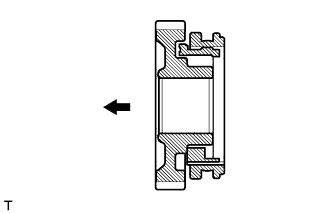
- HINT:
- Be sure to set the No. 3 transmission hub sleeve and 3 synchromesh shifting keys to the counter shaft 5th gear incorrect direction.
Text in Illustration 
Front
| 10. INSTALL COUNTER SHAFT 5TH GEAR |
Install the counter 5th gear bearing to the 5th gear.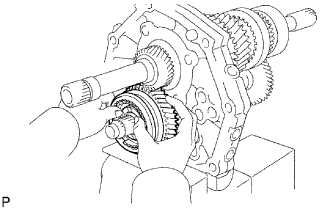
Install the counter shaft 5th gear to the counter gear.
Temporarily install the No. 1 synchronizer ring on the No. 5 gear spline piece.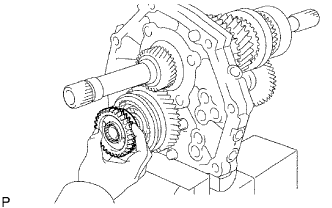
Remove the intermediate plate from the vise.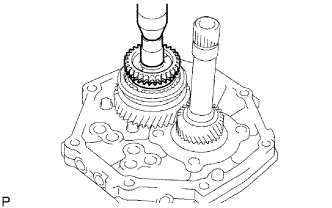
Stand the transmission as shown in the illustration.
Using a press and 22 mm socket wrench, install the No. 5 gear spline piece with the No. 1 synchronizer ring slots aligned with the shifting keys.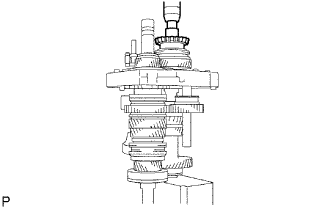
Fix the intermediate plate in a vise between aluminum plates.
Select a snap ring that will allow minimal axial play.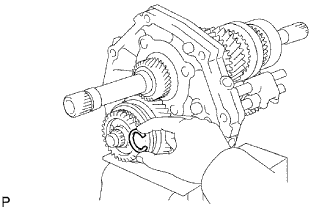
- Standard clearance:
- 0.10 mm (0.00394 in.) or less
- Standard Counter Gear Rear Shaft Snap Ring:
Mark
Thickness
A
2.80 to 2.85 mm (0.110 to 0.112 in.)
B
2.85 to 2.90 mm (0.112 to 0.114 in.)
C
2.90 to 2.95 mm (0.114 to 0.116 in.)
D
2.95 to 3.00 mm (0.116 to 0.118 in.)
E
3.00 to 3.05 mm (0.118 to 0.120 in.)
F
3.05 to 3.10 mm (0.120 to 0.122 in.)
G
3.10 to 3.15 mm (0.122 to 0.124 in.)
Using a brass bar and hammer, tap the snap ring to the counter gear.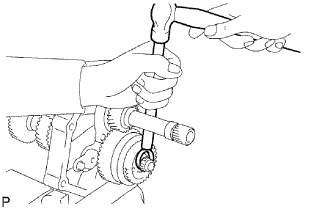
| 11. INSPECT COUNTER SHAFT 5TH GEAR THRUST CLEARANCE |
Using a feeler gauge, measure the counter shaft 5th gear thrust clearance.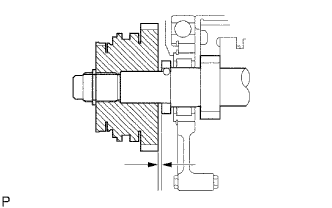
- Standard clearance:
- 0.10 to 0.30 mm (0.00394 to 0.0118 in.)
- If the result is not as specified, replace the counter shaft 5th gear.
| 12. INSTALL NO. 2 GEAR SHIFT FORK SHAFT |
Install the No. 2 gear shift fork and No. 1 gear shift fork.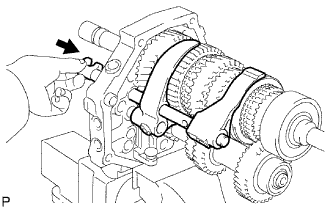
Pass the No. 2 gear shift fork shaft through the intermediate plate, No. 2 gear shift fork and No. 1 gear shift fork to install it.
Using a brass bar and hammer, tap the shaft snap ring onto the No. 2 gear shift fork shaft.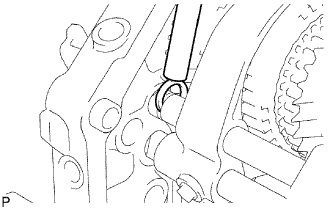
Install the bolt to the No. 2 gear shift fork.
- Torque:
- 20 N*m{ 204 kgf*cm , 15 ft.*lbf }
| 13. INSTALL NO. 2 SHIFT INTERLOCK PIN |
Coat the No. 2 shift interlock pin with MP grease and install it to the No. 1 gear shift fork shaft.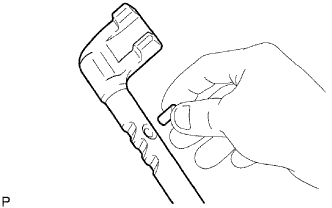
| 14. INSTALL NO. 1 GEAR SHIFT FORK SHAFT |
Coat the No. 1 shift interlock pin with MP grease.
Using a magnet hand, install the No. 1 shift interlock pin to the intermediate plate.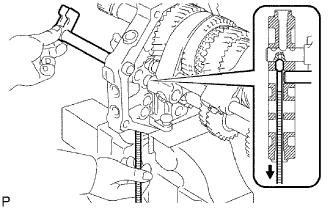
Pass the No. 1 gear shift fork shaft through the intermediate plate and No. 2 gear shift fork to install it.
Install the bolt to the No. 1 shift fork.
- Torque:
- 20 N*m{ 204 kgf*cm , 15 ft.*lbf }
Using pliers, install the shaft snap ring to the No. 1 gear shift fork shaft.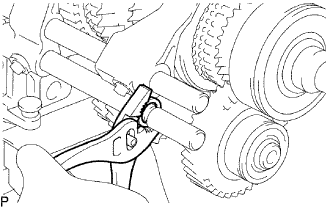
| 15. INSTALL REVERSE SHIFT ARM |
Install the shift arm shoe E-ring and the shift arm shoe to the reverse shift arm.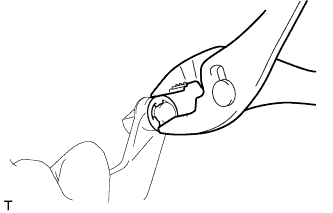
Install the reverse shift arm E-ring and reverse shift fork to the reverse shift arm.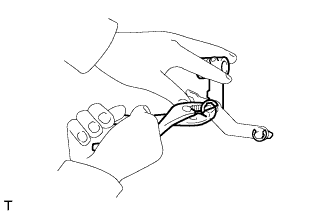
Install the reverse shift arm to the reverse shift arm bracket.
| 16. INSTALL NO. 2 SHIFT INTERLOCK PIN |
Coat the No. 2 shift interlock pin with MP grease, and install it to the No. 3 gear shift fork shaft.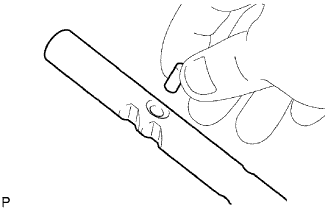
| 17. INSTALL NO. 3 SHIFT INTERLOCK PIN |
Coat the No. 3 shift interlock pin with MP grease.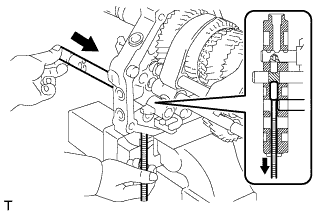
Using a magnet hand, install the No. 3 shift interlock pin to the intermediate plate.
| 18. INSTALL NO. 3 GEAR SHIFT FORK SHAFT |
Install the No. 3 gear shift fork shaft through the reverse shift fork and intermediate plate.
Install the reverse shift head ring to the reverse shift fork shaft.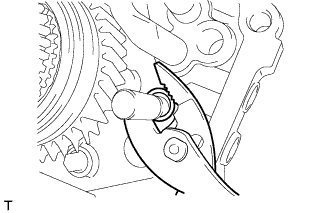
Using a 5 mm pin punch and a hammer, tap in the slotted spring pin to the No. 3 shift fork shaft.
| 19. INSTALL NO. 5 GEAR SHIFT FORK SHAFT |
Install the No. 5 gear shift fork shaft and reverse shift head.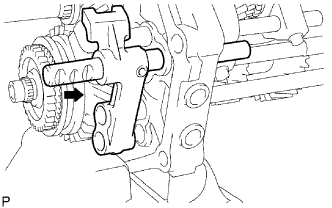
Using a 5 mm pin punch and hammer, tap in the slotted spring pin to the No. 3 shift fork shaft.
| 20. INSTALL NO. 4 GEAR SHIFT FORK SHAFT |
Coat the 2 shift detent balls with MP grease.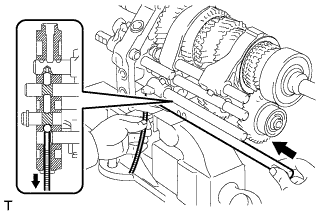
Using a magnet hand, install the 2 shift detent balls to the intermediate plate.
Pass the No. 4 gear shift fork shaft through the reverse shift fork, intermediate plate and reverse shift head to install it.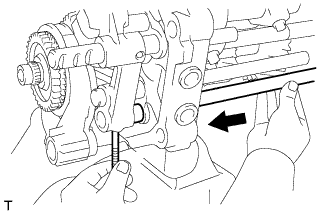
Install a new No. 3 gear shift fork with the bolt.
- Torque:
- 20 N*m{ 204 kgf*cm , 15 ft.*lbf }
| 21. INSTALL NO. 2 SHIFT DETENT BALL |
Coat the No. 2 detent ball with MP grease.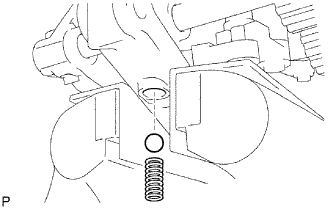
Install the No. 2 detent ball and compression spring to the intermediate plate.
Coat the spring seat with adhesive.
- Adhesive:
- Toyota Genuine Adhesive 1344, Three Bond 1344 or equivalent
Using a T40 "TORX" socket, install the spring seat to the intermediate plate.
- Torque:
- 19 N*m{ 194 kgf*cm , 14 ft.*lbf }
| 22. INSTALL SHIFT DETENT BALL |
Coat the 3 shift detent balls with MP grease, and then install them and the 3 compression springs to the intermediate plate.
Coat the spring seat and 2 ball plugs with adhesive.
- Adhesive:
- Toyota Genuine Adhesive 1344, Three Bond 1344 or equivalent
Using a T40 "TORX" socket, install the spring seat and 2 ball plugs to the intermediate plate.
- Torque:
- 19 N*m{ 194 kgf*cm , 14 ft.*lbf }
| 23. INSTALL MANUAL TRANSMISSION CASE |
Apply seal packing to the transmission case as shown in the illustration.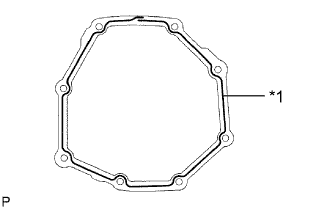
- Seal packing:
- Toyota Genuine Seal Packing 1281, Three Bond 1281 or equivalent
Text in Illustration *1
Seal Packing
Stand the intermediate plate as shown in the illustration.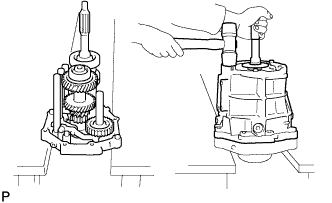
Using a plastic-faced hammer, install the transmission case to the intermediate plate as shown in the illustration.
| 24. INSTALL NO. 1 COUNTER GEAR FRONT BEARING SNAP RING |
Using a snap ring expander, install the snap ring to the counter gear front bearing.
| 25. INSTALL FRONT BEARING SHAFT SNAP RING |
Using a snap ring expander, install the snap ring to the input shaft front bearing.
| 26. INSTALL TRANSMISSION FRONT BEARING RETAINER OIL SEAL |
Using SST, press in a new oil seal to the front bearing retainer.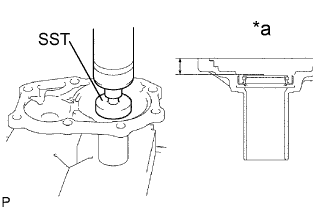
- SST
- 09950-60010
(09951-00440, 09952-06010)
- Standard depth:
- 12.2 to 13.2 m (0.480 to 0.519 in.)
Text in Illustration *a
Oil Seal Depth
- NOTICE:
- Do not damage the oil seal lip.
Apply a light coat of MP grease to the lip of the oil seal.
| 27. INSTALL FRONT BEARING RETAINER |
Install a new gasket and the front bearing retainer to the transmission case.
Install the 8 bolts.
- Torque:
- 17 N*m{ 173 kgf*cm , 13 ft.*lbf }
| 28. INSTALL TRANSFER ADAPTER OIL SEAL |
Using SST, tap in a new oil seal to the transfer adaptor.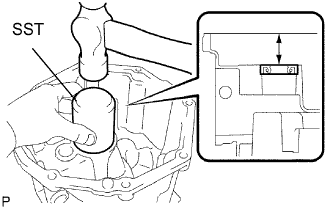
- SST
- 09223-00010
- Standard depth:
- 45 to 46 mm (1.78 to 1.81 in.)
- NOTICE:
- Be careful not to damage the lip of the oil seal.
Apply a light coat of MP grease to the lip of the oil seal.
| 29. INSTALL NO. 1 REVERSE RESTRICT PIN ASSEMBLY |
Install the restrict pin to the transfer adaptor.
Using a 5 mm pin punch and hammer, tap in the slotted spring pin to the transfer adaptor.
Using a T40 "TORX" socket, install the plug to the transfer adaptor.
- Torque:
- 19 N*m{ 194 kgf*cm , 14 ft.*lbf }
| 30. INSTALL SHIFT AND SELECT LEVER |
Install the shift and select lever and shift lever housing to the transfer adaptor.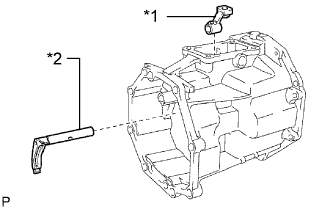
Text in Illustration *1
Shift Lever Housing
*2
Shift and Select Lever
| 31. INSTALL TRANSFER OIL RECEIVER PIPE |
Install the oil receiver pipe to the transfer adaptor.
| 32. INSTALL TRANSMISSION MAGNET |
Install the magnet to the transfer adaptor.
| 33. INSTALL TRANSFER ADAPTER |
Apply seal packing to the transfer adaptor as shown in the illustration.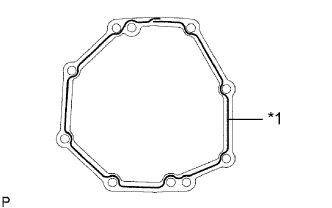
- Seal packing:
- Toyota Genuine Seal Packing 1281, Three Bond 1281 or equivalent
Text in Illustration *1
Seal Packing
Install the transfer adaptor to the manual transmission case with the 8 bolts.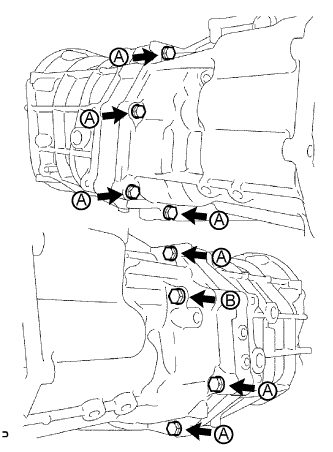
- Torque:
- 37 N*m{ 377 kgf*cm , 27 ft.*lbf }
- HINT:
- Each bolt length is indicated below.
- 80 mm (3.15 in.) for bolt A
- 130 mm (5.12 in.) for bolt B
Install the bolt to the shift lever housing.
- Torque:
- 33 N*m{ 340 kgf*cm , 25 ft.*lbf }
| 34. INSTALL SHIFT DETENT BALL |
Coat the shift detent ball with MP grease, and then install it and the compression spring to the transfer adapter.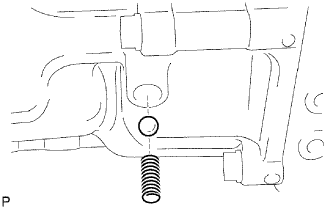
Using a T40 "TORX" socket, install the spring seat to the transfer adapter.
- Torque:
- 19 N*m{ 194 kgf*cm , 14 ft.*lbf }
| 35. INSTALL FLOOR SHIFT CONTROL SHIFT LEVER RETAINER SUB-ASSEMBLY |
Install a new gasket to the transfer adapter.
Install the shift lever retainer with the 4 bolts.
- Torque:
- 18 N*m{ 184 kgf*cm , 13 ft.*lbf }
| 36. INSTALL RESTRICT PIN |
Install the 2 restrict pins to the transfer adaptor.
- Torque:
- 28 N*m{ 286 kgf*cm , 21 ft.*lbf }
| 37. INSTALL FRONT TRANSMISSION CASE |
Install the front transmission case.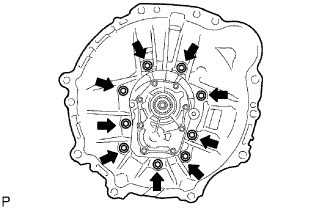
Apply adhesive to the bolt threads.
- Adhesive:
- Toyota Genuine Adhesive 1344, Three Bond 1344 or equivalent
Install the 9 bolts.
- Torque:
- 37 N*m{ 377 kgf*cm , 27 ft.*lbf }
| 38. INSTALL BACK-UP LIGHT SWITCH ASSEMBLY |
Using SST, install a new gasket and the back-up light switch to the manual transmission case.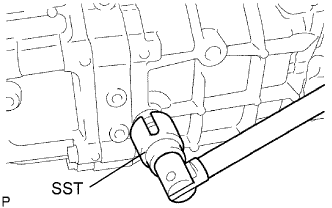
- SST
- 09817-16011
- Torque:
- 37 N*m{ 377 kgf*cm , 27 ft.*lbf }
| 39. INSTALL CLUTCH RELEASE FORK BOOT |
Install the release fork boot to the front transmission case.
| 40. INSTALL RELEASE FORK SUPPORT |
Install the release fork support to the front transmission case.
- Torque:
- 39 N*m{ 400 kgf*cm , 29 ft.*lbf }
| 41. INSTALL CLUTCH RELEASE BEARING ASSEMBLY |
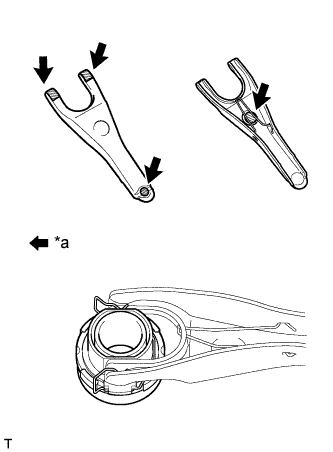 |
Apply release hub grease to the clutch release bearing, and then install it to the clutch release fork with the clip.
- Grease:
- Toyota Genuine Release Hub Grease or equivalent
Text in Illustration *a
Release hub grease
| 42. INSTALL CLUTCH RELEASE FORK SUB-ASSEMBLY |
Install the clutch release fork.
- NOTICE:
- After the installation, move the fork forward and backward to check that the release bearing slides smoothly.
Apply clutch spline grease to the spline of the input shaft.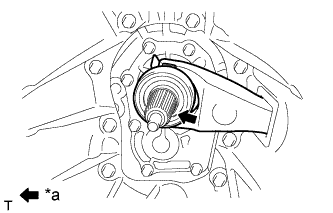
- Grease:
- Toyota Genuine Clutch Spline Grease or equivalent
Text in Illustration *a
Clutch spline grease
| 43. INSTALL DRAIN PLUG SUB-ASSEMBLY |
Install a new gasket and the drain plug to the transmission case.
- Torque:
- 37 N*m{ 377 kgf*cm , 27 ft.*lbf }
| 44. INSTALL MANUAL TRANSMISSION FILLER PLUG |
Install a new gasket and the filler plug to the transmission case.
- Torque:
- 37 N*m{ 377 kgf*cm , 27 ft.*lbf }