BODY PANEL FIT STANDARD / ADJUSTMENT METHOD ADJUSTMENT
INSPECT HOOD SUB-ASSEMBLY
Check that the clearance measurements of areas A through F are within each standard range.
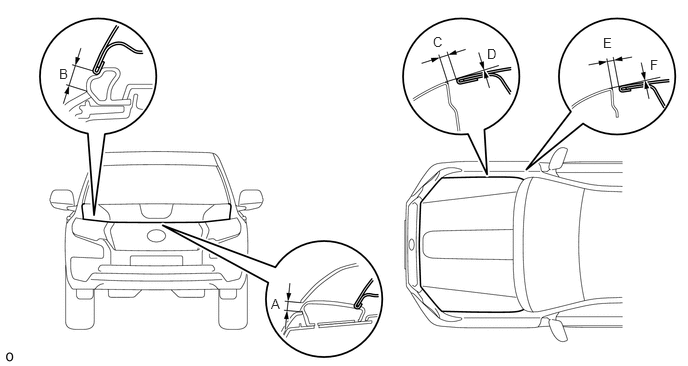
- Standard:
Area Measurement Area Measurement A 5.45 to 8.45 mm (0.215 to 0.333 in.) B 6.55 to 9.55 mm (0.258 to 0.376 in.) C 2.0 to 5.0 mm (0.079 to 0.197 in.) D -1.5 to 1.5 mm (-0.0591 to 0.0591 in.) E 2.0 to 5.0 mm (0.079 to 0.197 in.) F -1.5 to 1.5 mm (-0.0591 to 0.0591 in.)
- HINT:
- ·
Use the same procedure for RHD and LHD vehicles.
·The procedure listed below is for LHD vehicles.
·Centering bolts are used to mount the hood hinge and hood lock. The hood and hood lock cannot be adjusted with the centering bolts installed. Substitute the centering bolts with standard bolts when making adjustments.
·Centering bolts are used to mount the hood hinge and hood lock. The hood and hood lock cannot be adjusted with the centering bolts installed. Substitute the centering bolts with standard bolts when making adjustments.
ADJUST HOOD SUB-ASSEMBLY
Adjust the hood position.
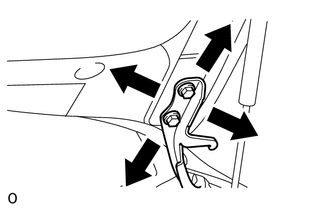
Loosen the 4 hinge bolts on the hood.
Move the hood and adjust the clearance between the hood and front fender.
Tighten the 4 hinge bolts on the hood.
- Torque:
- 13 N*m (133 kgf*cm, 10 ft.*lbf)
Adjust the height of the front end of the hood using the cushion rubbers.
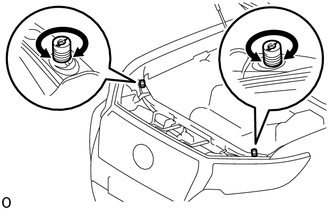
Adjust the 2 cushion rubbers so that the heights of the hood and fender are aligned.
- HINT:
-
Raise or lower the front end of the hood by turning the 2 cushion rubbers.
Adjust the hood lock assembly.
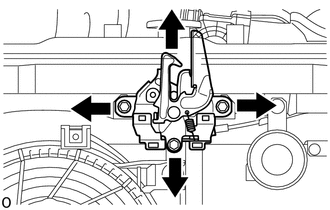
Loosen the 3 bolts.
Adjust the hood lock assembly and tighten the 3 bolts.
- Torque:
- 7.5 N*m (76 kgf*cm, 66 in.*lbf)
Check that the striker can smoothly engage with the hood lock assembly.
INSPECT FRONT DOOR
for 5 Door:
Check that the clearance measurements of areas A through P are within the standard range.
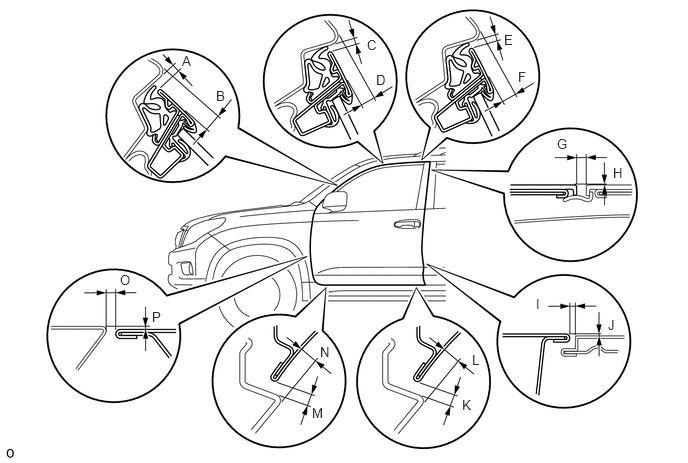
- Standard:
Area Measurement Area Measurement A 3.60 to 6.60 mm (0.142 to 0.260 in.) B 6.50 to 9.50 mm (0.256 to 0.374 in.) C 3.70 to 6.70 mm (0.146 to 0.264 in.) D 3.70 to 6.70 mm (0.146 to 0.264 in.) E 3.70 to 6.70 mm (0.146 to 0.264 in.) F 4.60 to 7.60 mm (0.181 to 0.299 in.) G 2.5 to 6.5 mm (0.0984 to 0.256 in.) H -2.0 to 2.0 mm (-0.0787 to 0.0787 in.) I 3.0 to 6.0 mm (0.118 to 0.236 in.) J -1.5 to 1.5 mm (-0.0591 to 0.0591 in.) K 4.05 to 7.05 mm (0.159 to 0.278 in.) L 4.45 to 7.45 mm (0.175 to 0.293 in.) M 4.05 to 7.05 mm (0.159 to 0.278 in.) N 4.35 to 7.35 mm (0.171 to 0.289 in.) O 2.7 to 5.7 mm (0.106 to 0.224 in.) P -1.5 to 1.5 mm (-0.0591 to 0.0591 in.)
for 3 Door:
Check that the clearance measurements of areas A through P are within the standard range.
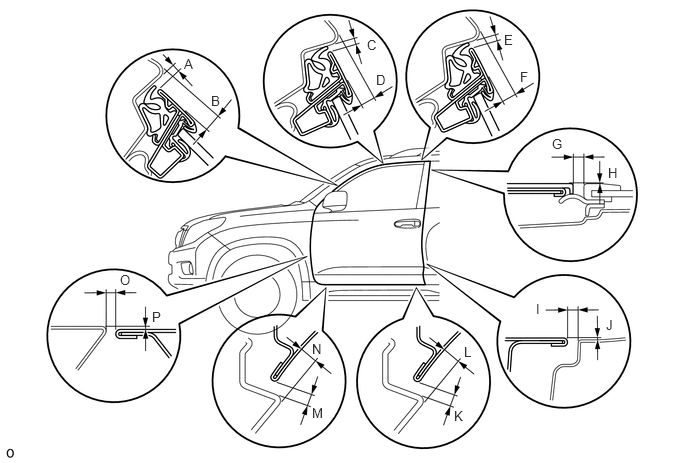
- Standard:
Area Measurement Area Measurement A 3.60 to 6.60 mm (0.142 to 0.260 in.) B 6.50 to 9.50 mm (0.256 to 0.374 in.) C 3.70 to 6.70 mm (0.146 to 0.264 in.) D 3.70 to 6.70 mm (0.146 to 0.264 in.) E 3.70 to 6.70 mm (0.146 to 0.264 in.) F 4.60 to 7.60 mm (0.181 to 0.299 in.) G 3.5 to 6.5 mm (0.138 to 0.256 in.) H -1.5 to 1.5 mm (-0.0591 to 0.0591 in.) I 2.7 to 5.7 mm (0.106 to 0.224 in.) J -1.5 to 1.5 mm (-0.0591 to 0.0591 in.) K 4.05 to 7.05 mm (0.159 to 0.278 in.) L 4.45 to 7.45 mm (0.175 to 0.293 in.) M 4.05 to 7.05 mm (0.159 to 0.278 in.) N 4.35 to 7.35 mm (0.171 to 0.289 in.) O 2.7 to 5.7 mm (0.106 to 0.224 in.) P -1.5 to 1.5 mm (-0.0591 to 0.0591 in.)
- HINT:
- ·
Use the same procedure for the RH and LH sides.
·The procedure listed below is for the LH side.
·Centering bolts are used to mount the door hinge to the vehicle body and door. The door cannot be adjusted with the centering bolts installed on it. Substitute the centering bolts with standard bolts when making adjustments.
ADJUST FRONT DOOR
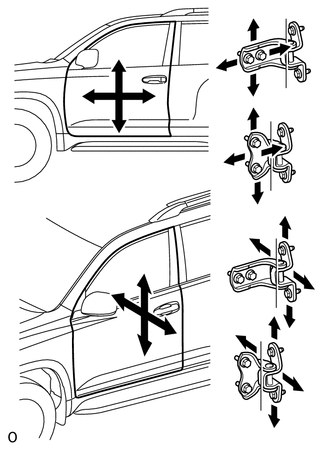
Using SST, loosen the hinge bolts on the vehicle body and adjust the door position.
- SST
- 09812-00010
Tighten the hinge bolts on the vehicle body.
- Torque:
- 26 N*m (265 kgf*cm, 19 ft.*lbf)
Loosen the hinge bolts on the door and adjust the door position.
Tighten the hinge bolts on the door.
- Torque:
- 21 N*m (214 kgf*cm, 15 ft.*lbf)
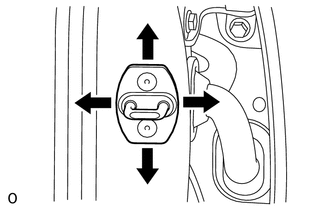
Using a T40 "TORX" socket wrench, slightly loosen the striker mounting screws.
Using a brass bar and hammer, hit the striker to adjust its position.
Using a T40 "TORX" socket wrench, tighten the striker mounting screws.
- Torque:
- 23 N*m (235 kgf*cm, 17 ft.*lbf)
INSPECT REAR DOOR
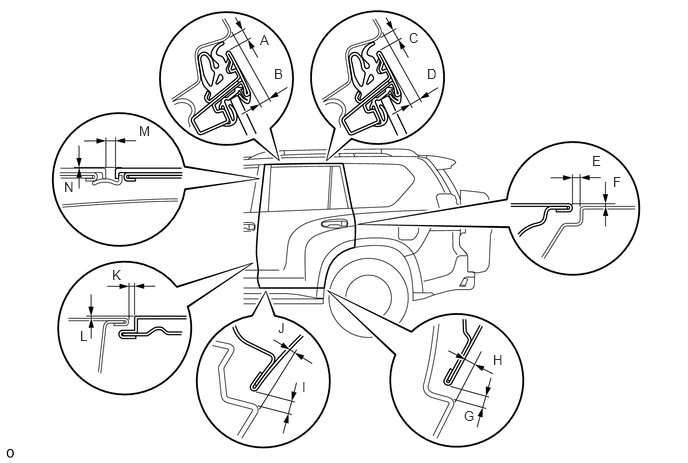
Check that the clearance measurements of areas A through N are within the standard range.
- Standard:
Area Measurement Area Measurement A 3.7 to 6.7 mm (0.146 to 0.264 in.) B 4.2 to 7.2 mm (0.165 to 0.284 in.) C 3.6 to 6.6 mm (0.142 to 0.260 in.) D 4.9 to 7.9 mm (0.193 to 0.311 in.) E 2.7 to 5.7 mm (0.106 to 0.224 in.) F -1.5 to 1.5 mm (-0.0591 to 0.0591 in.) G 4.05 to 7.05 mm (0.159 to 0.278 in.) H 4.45 to 7.45 mm (0.1752 to 0.2933 in.) I 4.05 to 7.05 mm (0.159 to 0.278 in.) J 4.45 to 7.45 mm (0.1752 to 0.2933 in.) K 3.0 to 6.0 mm (0.118 to 0.236 in.) L -1.5 to 1.5 mm (-0.0591 to 0.0591 in.) M 2.5 to 6.5 mm (0.0984 to 0.256 in.) N -2.0 to 2.0 mm (-0.0787 to 0.0787 in.)
- HINT:
- ·
Use the same procedure for the RH and LH sides.
·The procedure listed below is for the LH side.
·Centering bolts are used to mount the door hinge to the vehicle body and door. The door cannot be adjusted with the centering bolts installed. Substitute the centering bolts with standard bolts when making adjustments.
ADJUST REAR DOOR
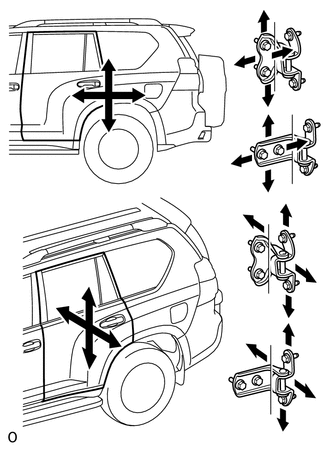
Using SST, loosen the hinge bolts on the vehicle body and adjust the door position.
- SST
- 09812-00010
Tighten the hinge bolts on the vehicle body.
- Torque:
- 26 N*m (265 kgf*cm, 19 ft.*lbf)
Loosen the hinge bolts on the door and adjust the door position.
Tighten the hinge bolts on the door.
- Torque:
- 21 N*m (214 kgf*cm, 15 ft.*lbf)
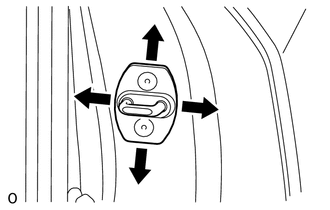
Using a T40 "TORX" socket wrench, slightly loosen the striker mounting screws.
Using a brass bar and hammer, hit the striker to adjust its position.
Using a T40 "TORX" socket wrench, tighten the striker mounting screws.
- Torque:
- 23 N*m (235 kgf*cm, 17 ft.*lbf)
INSPECT BACK DOOR
w/ Back Door Tire Carrier:
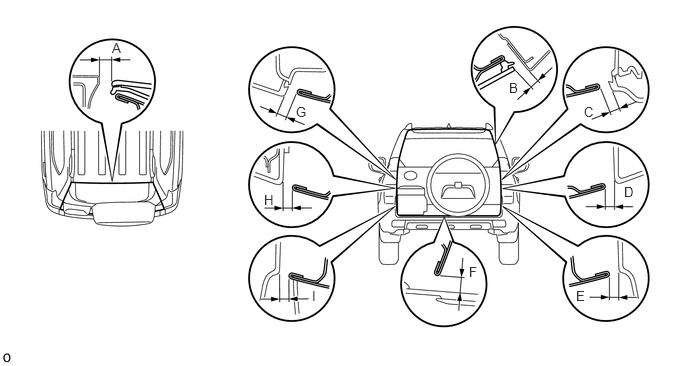
Check that the clearance measurements of areas A through I are within the standard range.
- Standard:
Area Measurement Area Measurement A 8.35 to 11.35 mm (0.329 to 0.447 in.) B 4.65 to 7.65 mm (0.183 to 0.301 in.) C 5.05 to 8.05 mm (0.199 to 0.317 in.) D 5.25 to 8.25 mm (0.207 to 0.325 in.) E 5.25 to 8.25 mm (0.207 to 0.325 in.) F 8.85 to 11.85 mm (0.348 to 0.467 in.) G 4.85 to 7.85 mm (0.191 to 0.309 in.) H 5.25 to 8.25 mm (0.207 to 0.325 in.) I 5.25 to 8.25 mm (0.207 to 0.325 in.) - -
w/o Back Door Tire Carrier:
Check that the clearance measurements of areas A through I are within the standard range.
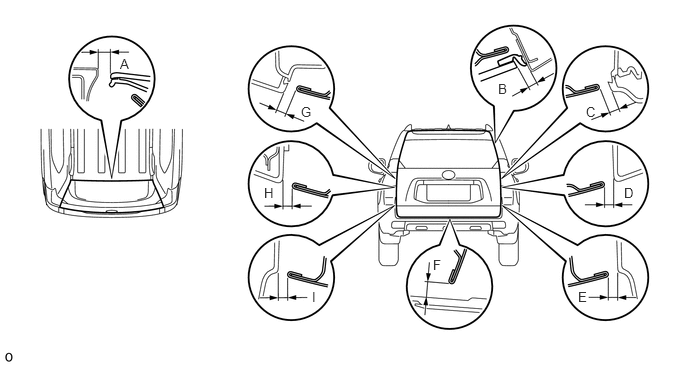
- Standard:
Area Measurement Area Measurement A 8.35 to 11.35 mm (0.329 to 0.447 in.) B 5.05 to 8.05 mm (0.199 to 0.317 in.) C 4.65 to 7.65 mm (0.183 to 0.301 in.) D 4.95 to 7.95 mm (0.195 to 0.313 in.) E 4.95 to 7.95 mm (0.195 to 0.313 in.) F 8.85 to 11.85 mm (0.348 to 0.467 in.) G 4.65 to 7.65 mm (0.183 to 0.301 in.) H 4.95 to 7.95 mm (0.195 to 0.313 in.) I 5.05 to 8.05 mm (0.199 to 0.317 in.) - -
- HINT:
-
Centering bolts are used to mount the door hinge to the vehicle body and door. The door cannot be adjusted with the centering bolts installed. Substitute the centering bolts with standard bolts (with washers) when making adjustments.
ADJUST BACK DOOR
w/ Back Door Tire Carrier:
Remove the spare wheel cover pad.
Remove the spare wheel cover.
Remove the spare tire.
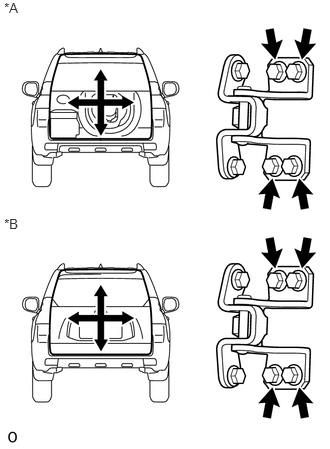
Loosen the hinge bolts on the body and adjust the position of the door.
| *A | w/ Back Door Tire Carrier |
| *B | w/o Back Door Tire Carrier |
Tighten the hinge bolts on the body.
- Torque:
- 26 N*m (265 kgf*cm, 19 ft.*lbf)
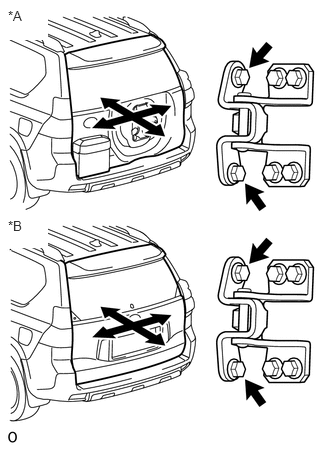
Loosen the hinge bolts on the door and adjust the position of the door.
| *A | w/ Back Door Tire Carrier |
| *B | w/o Back Door Tire Carrier |
Tighten the hinge bolts on the door.
- Torque:
- 36 N*m (367 kgf*cm, 27 ft.*lbf)
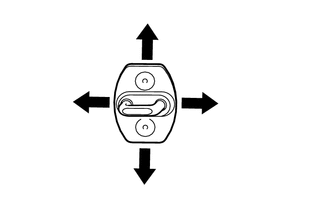
Using a T40 "TORX" socket, adjust the striker position by slightly loosening the striker mounting screws and then hitting the striker with a plastic-faced hammer.
Using a T40 "TORX" socket, tighten the striker mounting screws.
- Torque:
- 23 N*m (235 kgf*cm, 17 ft.*lbf)
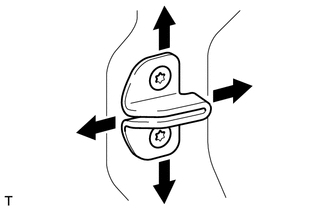
Using a T30 "TORX" socket, adjust the back door side male stopper position by slightly loosening the stopper mounting screws and then hitting the stopper with a plastic-faced hammer.
Using a T30 "TORX" socket, tighten the male stopper mounting screws.
- Torque:
- 7.0 N*m (71 kgf*cm, 62 in.*lbf)
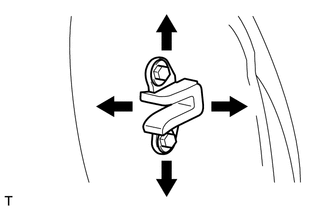
Loosen the back door side female stopper bolts and adjust the stopper position.
Tighten the female stopper bolts.
- Torque:
- 7.0 N*m (71 kgf*cm, 62 in.*lbf)
w/ Back Door Tire Carrier:
Install the spare tire.
Install the spare wheel cover.
Install the spare wheel cover pad.