1GD-FTV ENGINE CONTROL DIESEL THROTTLE BODY INSTALLATION
PROCEDURE

 26100G
1.INSTALL DIESEL THROTTLE BODY ASSEMBLY
Connect the connector to install the emission control valve wire to the diesel throttle body assembly.
for Cold Area Specification Vehicles:
Connect the No. 11 water by-pass hose and No. 14 water by-pass hose to the diesel throttle body assembly, and slide the 2 clips to secure the hose.
Attach the clamp, and then connect the emission control valve wire to the wire harness clamp bracket.
Connect the connector.
Install a new gasket and the diesel throttle body assembly with the 2 bolts and 2 nuts.
- HINT:
-
If installing the diesel throttle body assembly is difficult, using an E6 "TORX" socket wrench to remove the 2 stud bolts, install the diesel throttle body assembly.
- Torque:
- Bolt and Nut : 10 N*m (102 kgf*cm, 7 ft.*lbf)
- Stud Bolt : 5.0 N*m (51 kgf*cm, 44 in.*lbf)
17360A
2.INSTALL AIR TUBE ASSEMBLY
Install the air tube assembly to the diesel throttle body assembly and tighten the hose clamp.
- Torque:
- 6.5 N*m (66 kgf*cm, 58 in.*lbf)
Connect the connector to the intake air temperature sensor.
Temporarily install the air tube support bracket with the 3 bolts.
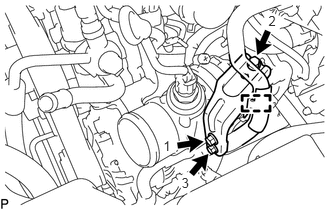
Tighten the 3 bolts in the order shown in the illustration.
- Torque:
- 6.0 N*m (61 kgf*cm, 53 in.*lbf)
Attach the clamp and connect the No. 1 fuel hose to the air tube support bracket.
17342F
3.INSTALL NO. 2 INTERCOOLER AIR HOSE
Install the No. 2 intercooler air hose and tighten the 2 hose clamps.
- Torque:
- 5.0 N*m (51 kgf*cm, 44 in.*lbf)
Connect the oil return hose and slide the 2 clips to secure the hose.
12601B
4.INSTALL NO. 1 ENGINE COVER SUB-ASSEMBLY
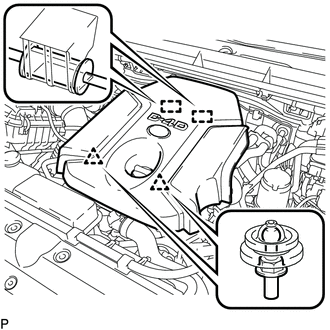
While pushing the No. 1 engine cover sub-assembly towards the rear, attach the 2 rear pins.
Attach the 2 front clips to install the No. 1 engine cover sub-assembly.
5. PERFORM INITIALIZATION
w/o Urea SCR System: (See page Engine / Hybrid System>1GD-FTV (ENGINE CONTROL)>ECD SYSTEM>INITIALIZATION)
w/ Urea SCR System: (See page Engine / Hybrid System>1GD-FTV (ENGINE CONTROL)>ECD SYSTEM (w/ Urea SCR System)>INITIALIZATION)