Home › Engine / Hybrid System › 5L-E (ENGINE MECHANICAL) › CYLINDER HEAD
RM27T0E _51 Engine / Hybrid System _053661 5L-E ENGINE MECHANICAL _0260476 CYLINDER HEAD A

5L-E ENGINE MECHANICAL  CYLINDER HEAD  REASSEMBLY  


PROCEDURE

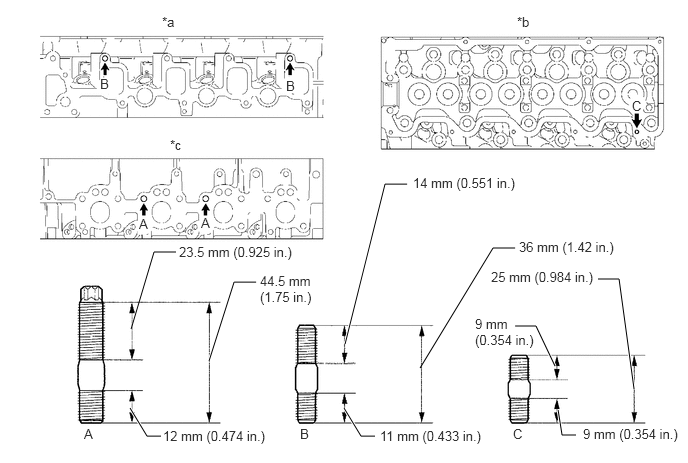
Hide 1.INSTALL STUD BOLT

NOTICE:

If a stud bolt is deformed or the threads are damaged, replace it.

A378635E01
6.604,4.052 6.448,2.906 6.448,2.906 6.229,2.906 true 5.781,3.813 5.583,3.396 5.583,3.396 5.365,3.396 true 4.375,3.833 5.135,2.583 5.135,2.583 5.365,2.583 false 5.813,4.271 5.854,4.531 5.854,4.531 6,4.531 true 3.594,3.583 4.01,1.917 4.01,1.917 4.24,1.917 true 3.583,4.25 3.76,4.542 3.76,4.542 3.906,4.542 true 1.354,4.25 1.531,4.542 1.531,4.542 1.677,4.542 true 1.365,3.427 1.604,2.625 1.604,2.625 1.833,2.625 false 2.177,3.76 2.438,2.938 2.438,2.938 2.667,2.938 true 1.688,0.146 2,0.344 0.313,0.198 10 false *a 5.385,0.146 5.698,0.344 0.313,0.198 10 false *b 1.771,1.427 2.083,1.625 0.313,0.198 10 false *c 0.875,4.438 1.188,4.635 0.313,0.198 10 false A 3.125,4.438 3.438,4.635 0.313,0.198 10 false B 5.344,4.438 5.656,4.635 0.313,0.198 10 false C 1.448,2.25 1.76,2.448 0.313,0.198 10 false A 2.094,2.24 2.406,2.438 0.313,0.198 10 false A 1.042,0.792 1.354,0.99 0.313,0.198 10 false B 6.583,1.021 6.896,1.219 0.313,0.198 10 false C 2.979,0.813 3.292,1.01 0.313,0.198 10 false B 4.302,1.823 5.427,2.021 1.125,0.198 10 false 14 mm (0.551 in.) 5.406,2.49 6.531,2.688 1.125,0.198 10 false 36 mm (1.42 in.) 5.115,2.802 6.24,3 1.125,0.198 10 false 25 mm (0.984 in.) 4.948,3.292 5.646,3.677 0.698,0.385 10 false 9 mm (0.354 in.) 6.073,4.438 7.104,4.656 1.031,0.219 10 false 9 mm (0.354 in.) 3.958,4.458 5.083,4.677 1.125,0.219 10 false 11 mm (0.433 in.) 1.698,4.458 2.823,4.677 1.125,0.219 10 false 12 mm (0.474 in.) 1.865,2.542 3.125,2.75 1.26,0.208 10 false 23.5 mm (0.925 in.) 2.708,2.844 3.365,3.219 0.656,0.375 10 false 44.5 mm (1.75 in.)

Text in Illustration
*a Intake Manifold Side
B
*b Cylinder Head Cover Side
*c Exhaust Manifold Side - -

Torque:
for bolt A : 26 N*m (265 kgf*cm, 19 ft.*lbf)
for bolt B : 12 N*m (120 kgf*cm, 9 ft.*lbf)
for bolt C : 6.0 N*m (60 kgf*cm, 53 in.*lbf)

Hide 11183 2.INSTALL SEMICIRCULAR PLUG

a.

Remove any old packing (FIPG material).

b.
A056910E04
2.979,1.094 2.979,1.354 2.979,1.354 2.74,1.594 false 2.531,1.604 2.708,1.792 0.177,0.188 10 false *1

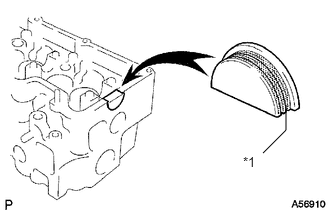
Apply seal packing to the semicircular plug as shown in the illustration.

Seal packing:

Toyota Genuine Seal Packing Black, Three Bond 1207B or equivalent


Text in Illustration
*1 Seal Packing

NOTICE:
·

The semicircular plug must be installed within 3 minute from the completion of applying the seal packing.

·

Prevent FIPG from being stuck to the camshaft thrust groove.


c.

Install the semicircular plug to the cylinder head.


Hide 11106 3.INSTALL COMBUSTION CHAMBER SUB-ASSEMBLY
a.
A378636E01
1.344,1.094 2.094,0.542 2.094,0.542 2.333,0.542 false 0.271,0.625 0.74,0.625 false 1.146,0.625 1.615,0.625 false 0.271,0.125 0.51,0.125 0.51,0.125 0.875,0.583 false 1,0.583 1.281,0.125 1.281,0.125 1.531,0.125 false 0.104,0.542 0.417,0.74 0.313,0.198 10 false *1 1.615,0.542 1.927,0.74 0.313,0.198 10 false *4 0.073,0.063 0.385,0.26 0.313,0.198 10 false *2 1.552,0.031 1.865,0.229 0.313,0.198 10 false *3 2.344,0.458 2.656,0.656 0.313,0.198 10 true *5

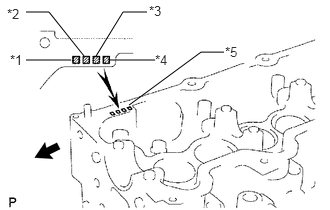
Select the number of shim, according to the table below.

Select a new combustion chamber:
Item Specified Condition
Mark 1 5.91 to 5.94 mm (0.2327 to 0.2338 in.)
Mark 2 5.94 to 5.97 mm (0.2338 to 0.2350 in.)
Mark 3 5.97 to 6.00 mm (0.2350 to 0.2362 in.)


Text in Illustration
*1 No. 1 Combustion Chamber
*2 No. 2 Combustion Chamber
*3 No. 3 Combustion Chamber
*4 No. 4 Combustion Chamber
*5 Mark 1, 2 or 3
V100135

Front


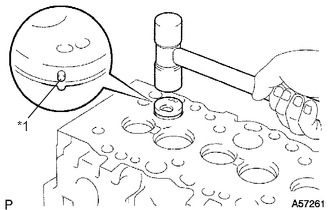
b.
A057261E05
0.635,0.823 0.292,1.229 false 0.177,1.229 0.375,1.438 0.198,0.208 10 false *1

Align the combustion chamber knock pin with the cylinder head notch.

Text in Illustration
*1 Pin


c.

Using a plastic-faced hammer, tap in the combustion chamber.

d.
A057260

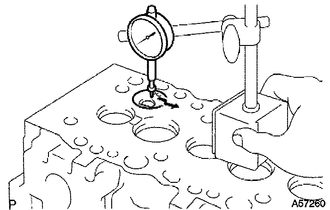
Using a dial indicator, check the combustion chamber protrusion.

Combustion chamber protrusion:

-0.03 to 0.03 mm (- 0.00118 to 0.00118 in.)


If the protrusion is less than the specification, adjust with shims.

If the protrusion is more than the specification, replace the chamber and recheck the protrusion.


Hide 13711E 4.INSTALL VALVE STEM OIL SEAL

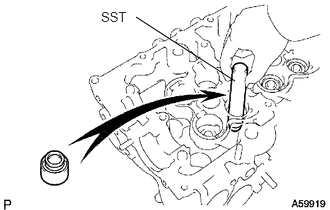
A059919E04
1.417,0.177 2.448,0.844 false 1.052,0.094 1.396,0.25 0.344,0.156 10 false SST

a.

Using SST, push in a new oil seal.

SST
09201-41020  


Hide 13711 5.INSTALL INTAKE VALVE

a.

Install the valve, spring seat plate washer, valve spring and spring retainer.
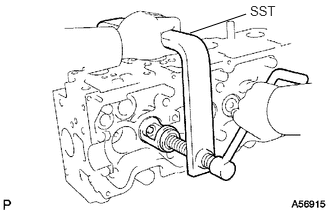

b.
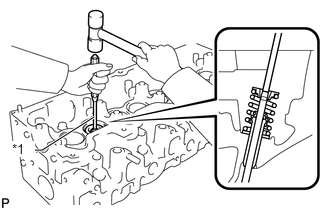
A056915E04
1.979,0.344 2.563,0.146 false 2.604,0.031 3.083,0.271 0.479,0.24 10 false SST

Using SST, compress the valve spring and place the 2 retainer locks around the valve stem.

SST
09202-70020  (09202-00030)


c.
A122913E03
0.302,1.563 0.438,1.563 0.438,1.563 0.979,1.219 true 0.125,1.469 0.365,1.635 0.24,0.167 10 true *1

Using a 5 mm pin punch and plastic-faced hammer, lightly tap the valve stem tip to ensure a proper fit.

Text in Illustration
*1 5 mm Pin Punch

NOTICE:

Be careful not to damage the valve stem tip.


Hide 13715 6.INSTALL EXHAUST VALVE

a.

Install the valve, spring seat, valve spring and spring retainer.
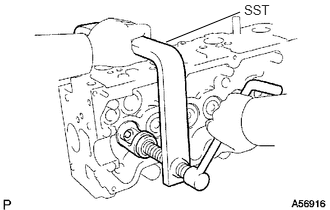

b.
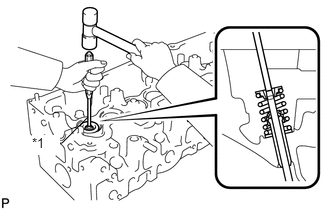
A056916E04
1.729,0.438 2.5,0.125 false 2.542,0.021 3.031,0.313 0.49,0.292 10 false SST

Using SST, compress the valve spring and place the 2 retainer locks around the valve stem.

SST
09202-70020  (09202-00030)


c.
A122914E03
0.542,1.49 0.646,1.49 0.646,1.49 0.917,1.219 false 0.333,1.406 0.625,1.615 0.292,0.208 10 true *1

Using a 5 mm pin punch and plastic-faced hammer, lightly tap the valve stem tip to ensure a proper fit.

Text in Illustration
*1 5 mm Pin Punch

NOTICE:

Be careful not to damage the valve stem tip.


Hide 13751 7.INSTALL VALVE LIFTER

a.

Install the valve lifter and shim.


b.

Check that the valve lifter rotates smoothly by hand.