5L-E ENGINE MECHANICAL CYLINDER BLOCK REASSEMBLY
PROCEDURE

 1.INSTALL STUD BOLT
- NOTICE:
-
If a stud bolt is deformed or the threads are damaged, replace it.
Install the stud bolts as shown in the illustration.
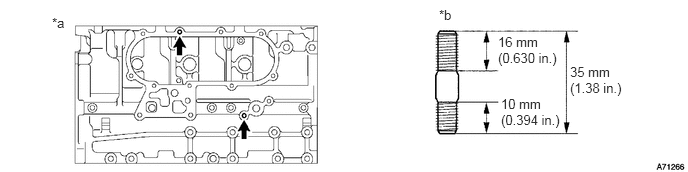
| *a | Right Side | *b | Thread diameter: 8 mm |
- Torque:
- 15 N*m (148 kgf*cm, 11 ft.*lbf)
11432A
2.INSTALL NO. 1 TAPER SCREW PLUG
Apply adhesive to 2 or 3 threads of the screw plug.
- Adhesive:
Toyota Genuine Adhesive 1324, Three Bond 1324 or equivalent
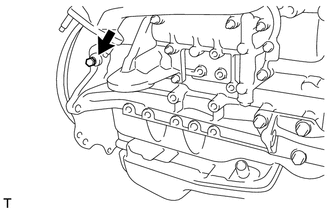
Install the screw plug.
- Torque:
- 20 N*m (199 kgf*cm, 14 ft.*lbf)
11415
3.INSTALL CYLINDER BLOCK WATER DRAIN COCK SUB-ASSEMBLY
Apply adhesive to 2 or 3 threads of the water drain cock.
- Adhesive:
Toyota Genuine Adhesive 1324, Three Bond 1324 or equivalent
| *1 | Adhesive |
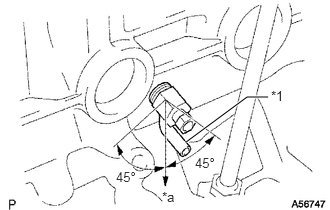
Install the water drain cock.
- Torque:
- 57 N*m (581 kgf*cm, 42 ft.*lbf)
| *1 | Port |
| *a | Downward |
- HINT:
- ·
After tightening the drain cock to the specified torque, rotate the drain union clockwise until its drain port is facing downward.
·The drain port may be set within 45° of either side of the prescribed position.
11448
4.INSTALL CYLINDER BLOCK OIL ORIFICE
Using a 6 mm hexagon socket wrench, install the oil orifice.
- Torque:
- 11 N*m (110 kgf*cm, 8 ft.*lbf)
15708
5.INSTALL NO. 1 OIL NOZZLE SUB-ASSEMBLY
- NOTICE:
-
Use the same procedure for all oil nozzle No. 1 sub-assemblies.
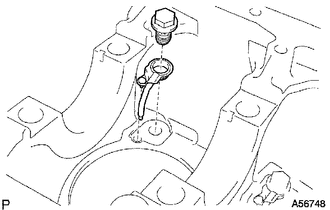
Align the pin of the oil nozzle with the one of the pin holes of the cylinder block.
Install the oil nozzle with the check valve.
- Torque:
- 26 N*m (260 kgf*cm, 19 ft.*lbf)
13101
6.INSTALL PISTON SUB-ASSEMBLY
Assemble the piston and connecting rod.
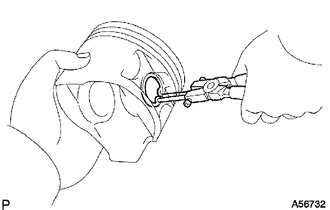
Using snap ring pliers, install a new snap ring on one side of the piston pin hole.
Gradually heat the piston to about 60°C (140°F).
Coat the piston pin with engine oil.
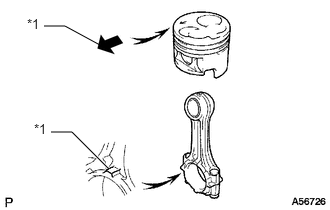
Align the front marks of the piston and connecting rod, connect the connecting rod to the piston, and then push in the piston pin with your thumb.
| *1 | Front Mark |
Check the fitting condition between the piston and piston pin. Try to move the piston back and forth on the piston pin.
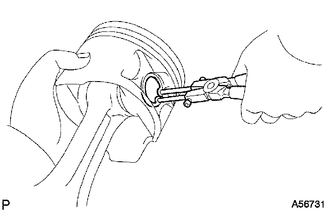
Using snap ring pliers, install a new snap ring on the other side of the piston pin hole.
13011
7.INSTALL PISTON RING SET
Install the piston rings.
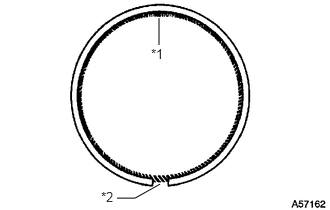
Install the coil and oil ring by hand.
| *1 | Coil Joint |
| *2 | Oil Ring Ends |
- HINT:
-
Make sure the end gap of the oil ring faces the opposite direction of the coil joint.
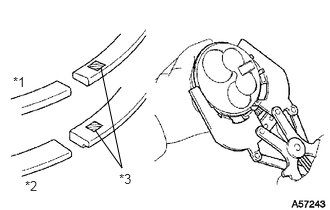
Using a piston ring expander, install the No. 1 and No. 2 piston rings with the code mark facing upward.
- Code Mark:
Item Code Mark No. 1 piston ring 1N No. 2 piston ring 2N
| *1 | No. 1 |
| *2 | No. 2 |
| *3 | Code Mark |
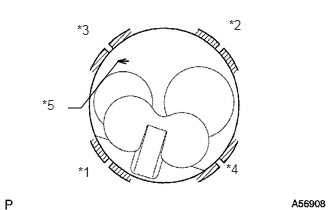
Position the piston rings so that the ring ends are as shown in the illustration.
| *1 | No. 1 Compression Ring |
| *2 | No. 2 Compression Ring |
| *3 | Oil Ring |
| *4 | Coil |
| *5 | Front Mark |
- NOTICE:
-
Do not align the ring ends.
13041
8.INSTALL CONNECTING ROD BEARING
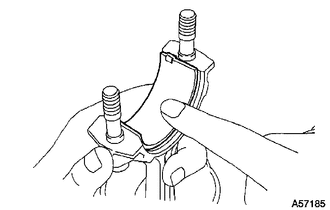
Align the bearing claw with the groove of the connecting rod or connecting rod cap.
Install the bearings to the connecting rod and connecting rod cap.
11711
9.INSTALL CRANKSHAFT BEARING
- HINT:
-
Upper bearings have an oil groove and oil hole; lower bearings do not.
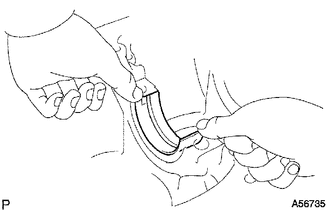
Align the bearing claw with the claw groove of the cylinder block, and push in the 5 upper bearings to install them.
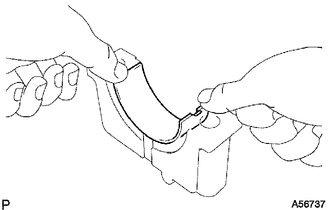
Align the bearing claw with the claw groove of the crankshaft bearing cap, and push in the 5 lower bearings to install them.
11011
10.INSTALL CRANKSHAFT THRUST WASHER SET
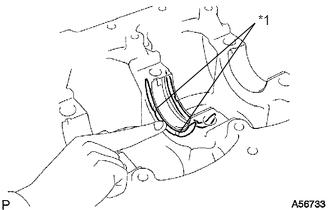
Install the 2 thrust washers to the No. 3 journal position of the cylinder block with the oil grooves facing outward.
| *1 | Oil Groove |
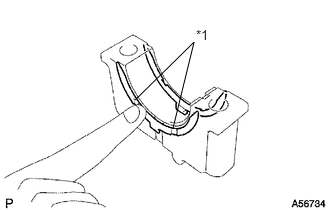
Install the 2 thrust washers to the No. 3 crankshaft bearing cap with the grooves facing outward.
| *1 | Oil Groove |
13411
11.INSTALL CRANKSHAFT
Place the crankshaft on the cylinder block.
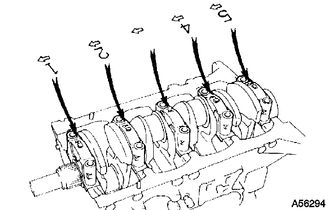
Install the 5 crankshaft bearing caps in their proper locations.
Install the crankshaft bearing cap bolts.
Apply a light coat of the engine oil to the threads and under the bolt heads of the crankshaft bearing caps.
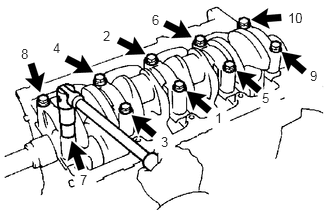
Install and uniformly tighten the 10 bolts of the crankshaft bearing caps, in several steps, in the sequence shown in the illustration.
- Torque:
- 105 N*m (1071 kgf*cm, 77 ft.*lbf)
Check that the crankshaft turns smoothly.
Check the crankshaft thrust clearance (See page Engine / Hybrid System>5L-E (ENGINE MECHANICAL)>CYLINDER BLOCK>DISASSEMBLY).
12.INSTALL PISTON AND CONNECTING ROD
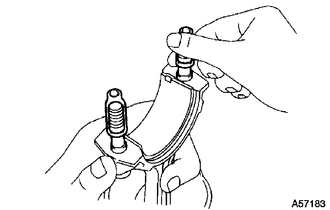
Cover the connecting rod bolts with a short piece of hose to protect the crankshaft and cylinder bore from damage.
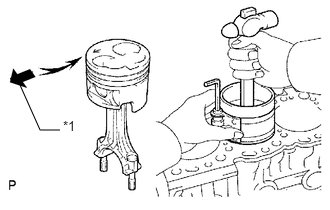
Using a piston ring compressor, push the correctly numbered piston and connecting rod assembly into the cylinder with the front mark of the piston facing forward.
| *1 | Front Mark |
Place the connecting rod cap on the connecting rod.
Match each numbered connecting rod cap with the correct connecting rod.
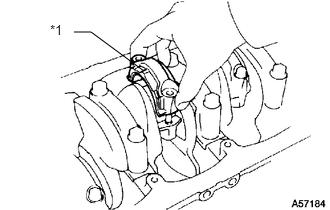
Install the connection rod cap with the front mark facing forward.
| *1 | Front Mark |
Install the connecting rod cap nuts.
- NOTICE:
-
If any connecting rod bolt is broken or deformed, replace it.
- HINT:
-
The connecting rod cap nuts are tightened in 2 progressive steps.
Apply a light of engine oil to the threads and under the heads of the connecting rod cap nuts.
Step 1:
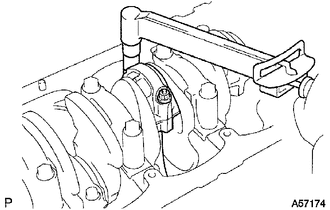
Install and alternately tighten the nuts of the connecting rod cap in several passes.
- Torque:
- 54 N*m (551 kgf*cm, 40 ft.*lbf)
- HINT:
-
If any one of the connecting rod cap nuts does not meet the torque specification, replace them.
Step 2:
Mark the front side of the connecting rod cap nuts with paint.
Tighten the connecting rod cap nuts 90° in the shown step 1.
Check that the painted marks are now at a 90° angle to the front.
Check that the crankshaft turns smoothly.
Check the connecting rod thrust clearance (See page Engine / Hybrid System>5L-E (ENGINE MECHANICAL)>CYLINDER BLOCK>DISASSEMBLY).