1GR-FE ENGINE MECHANICAL CYLINDER HEAD GASKET INSTALLATION
CAUTION / NOTICE / HINT
- HINT:
-
for Automatic Transmission:
-
Perform "Inspection After Repairs" after replacing the cylinder head sub-assembly or cylinder head LH (See page Engine / Hybrid System>1GR-FE (ENGINE CONTROL)>SFI SYSTEM>INITIALIZATION).
PROCEDURE

 11101A
1.INSPECT CYLINDER HEAD SET BOLT
11101
2.INSPECT CYLINDER HEAD SUB-ASSEMBLY
11115
3.INSTALL CYLINDER HEAD GASKET
Remove any old packing (FIPG) material and be careful not to drop any oil on the contact surfaces of the cylinder head or cylinder block.
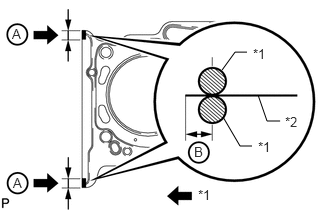
Apply seal packing to a new cylinder head gasket as shown in the illustration.
- Seal packing:
Toyota Genuine Seal Packing Black, Three Bond 1207B or equivalent
- Standard seal diameter:
2.5 to 3.0 mm (0.0984 to 0.118 in.)
| A | 10 to 15 mm (0.394 to 0.591 in.) |
| B | 1.25 to 1.5 mm (0.0492 to 0.0591 in.) |
| *1 | Seal Packing |
| *2 | Gasket |
- NOTICE:
- ·
Remove any oil from the contact surface.
·Install the cylinder head gasket within 3 minutes and tighten the bolts within 15 minutes after applying seal packing.
·Do not add engine oil within 2 hours of installation.
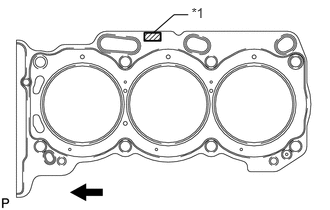
Place the cylinder head gasket on the cylinder block surface with the front face of the Lot No. stamp upward.
- NOTICE:
-
Make sure that the gasket is installed facing the proper direction.
| *1 | Lot No. |

|
Engine Front |
11101
4.INSTALL CYLINDER HEAD SUB-ASSEMBLY
- HINT:
-
for Automatic Transmission:
-
Perform "Inspection After Repairs" after replacing the cylinder head sub-assembly (See page Engine / Hybrid System>1GR-FE (ENGINE CONTROL)>SFI SYSTEM>INITIALIZATION).
Place the cylinder head on the cylinder block.
- NOTICE:
- ·
Gently place the cylinder head in order not to damage the gasket with the bottom part of the head.
·Make sure that no oil is on the mounting surface of the cylinder head.
- HINT:
-
The cylinder head bolts are tightened in 3 progressive steps.
Apply a light coat of engine oil to the threads and under the heads of the cylinder head bolts.
Step 1:
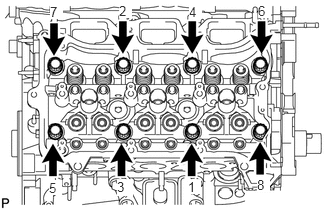
Using a 10 mm bi-hexagon wrench, install and uniformly tighten the 8 cylinder head bolts with the plate washers in several steps in the sequence shown in the illustration.
- Torque:
- 36 N*m (367 kgf*cm, 27 ft.*lbf)
Step 2:
Mark the front side of each cylinder head bolt head with paint.
Tighten the cylinder head bolts another 90°.
Step 3:
Tighten the cylinder head bolts an additional 90°.
Check that the paint mark is now at a 180° angle to the front.
- NOTICE:
-
Thoroughly wipe clean any seal packing.
11116
5.INSTALL NO. 2 CYLINDER HEAD GASKET
Remove any old packing (FIPG) material and be careful not to drop any oil on the contact surfaces of the cylinder head or cylinder block.
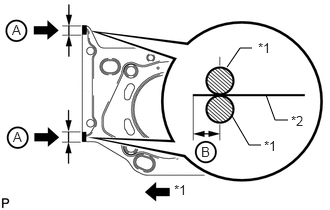
Apply seal packing to a new cylinder head gasket as shown in the illustration.
- Seal packing:
Toyota Genuine Seal Packing Black, Three Bond 1207B or equivalent
- Standard seal diameter:
2.5 to 3.0 mm (0.0984 to 0.118 in.)
| A | 10 to 15 mm (0.394 to 0.591 in.) |
| B | 1.25 to 1.5 mm (0.0492 to 0.0591 in.) |
| *1 | Seal Packing |
| *2 | Gasket |
- NOTICE:
- ·
Remove any oil from the contact surface.
·Install the cylinder head gasket within 3 minutes and tighten the bolts within 15 minutes after applying seal packing.
·Do not add engine oil within 2 hours of installation.
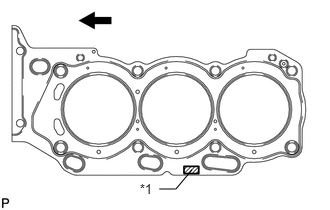
Place the cylinder head gasket on the cylinder block surface with the front face of the Lot No. stamp upward.
- NOTICE:
-
Make sure that the gasket is installed facing the proper direction.
| *1 | Lot No. |
|
|
Engine Front |
11102
6.INSTALL CYLINDER HEAD LH
- HINT:
-
for Automatic Transmission:
-
Perform "Inspection After Repairs" after replacing the cylinder head LH (See page Engine / Hybrid System>1GR-FE (ENGINE CONTROL)>SFI SYSTEM>INITIALIZATION).
Place the cylinder head on the cylinder block.
- NOTICE:
- ·
Gently place the cylinder head in order not to damage the gasket with the bottom part of the head.
·Make sure that no oil is on the mounting surface of the cylinder head.
- HINT:
-
The cylinder head bolts are tightened in 3 progressive steps.
Apply a light coat of engine oil to the threads and under the heads of the cylinder head bolts.
Step 1:
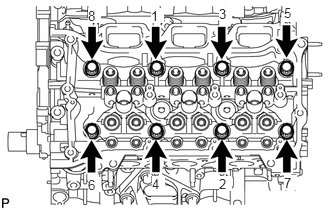
Using a 10 mm bi-hexagon wrench, install and uniformly tighten the 8 cylinder head bolts with the plate washers in several steps in the sequence shown in the illustration.
- Torque:
- 36 N*m (367 kgf*cm, 27 ft.*lbf)
Step 2:
Mark the front side of each cylinder head bolt head with paint.
Tighten the cylinder head bolts another 90°.
Step 3:
Tighten the cylinder head bolts an additional 90°.
Check that the paint mark is now at a 180° angle to the front.
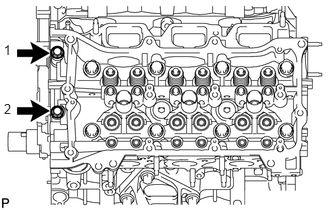
Tighten the 2 bolts in the order shown in the illustration.
- Torque:
- 30 N*m (306 kgf*cm, 22 ft.*lbf)
- NOTICE:
-
Thoroughly wipe clean any seal packing.
16356
7.INSTALL REAR WATER BY-PASS JOINT
13716
8.INSTALL VALVE STEM CAP
13750
9.INSTALL VALVE LASH ADJUSTER ASSEMBLY
13801
10.INSTALL NO. 1 VALVE ROCKER ARM SUB-ASSEMBLY
11.INSTALL CAMSHAFT BEARING CAP (for Bank 2)
12.INSTALL CAMSHAFT HOUSING SUB-ASSEMBLY LH
13.INSTALL CAMSHAFT BEARING CAP (for Bank 1)
14.INSTALL CAMSHAFT HOUSING SUB-ASSEMBLY RH
13560A
15.INSTALL NO. 3 CHAIN TENSIONER ASSEMBLY
16.INSTALL CAMSHAFT TIMING GEARS AND NO. 2 CHAIN (for Bank 2)
13550
17.INSTALL NO. 2 CHAIN TENSIONER ASSEMBLY
18.INSTALL CAMSHAFT TIMING GEARS AND NO. 2 CHAIN (for Bank 1)
13561
19.INSTALL NO. 1 CHAIN VIBRATION DAMPER
13562
20.INSTALL NO. 2 CHAIN VIBRATION DAMPER
13521
21.INSTALL CRANKSHAFT TIMING SPROCKET
13581
22.INSTALL NO. 1 IDLE GEAR SHAFT
13506
23.INSTALL CHAIN SUB-ASSEMBLY
13559
24.INSTALL CHAIN TENSIONER SLIPPER
13540
25.INSTALL NO. 1 CHAIN TENSIONER ASSEMBLY
26.INSPECT VALVE TIMING
11302
27.INSTALL TIMING CHAIN COVER SUB-ASSEMBLY
Install the timing chain cover (See page Engine / Hybrid System>1GR-FE (LUBRICATION)>OIL PUMP>INSTALLATION).