Home › Engine / Hybrid System › 2TR-FE (ENGINE MECHANICAL) › CYLINDER HEAD
RM27T0E _51 Engine / Hybrid System _053663 2TR-FE ENGINE MECHANICAL _0260501 CYLINDER HEAD A

2TR-FE ENGINE MECHANICAL  CYLINDER HEAD  REASSEMBLY  


CAUTION / NOTICE / HINT

HINT:

Perform "Inspection After Repairs" after replacing the cylinder head sub-assembly (See page Engine / Hybrid System>2TR-FE (ENGINE CONTROL)>SFI SYSTEM>INITIALIZATION).


PROCEDURE

Hide 1.INSTALL STUD BOLT

NOTICE:

If a stud bolt is deformed or its threads are damaged, replace it.

A337749E06
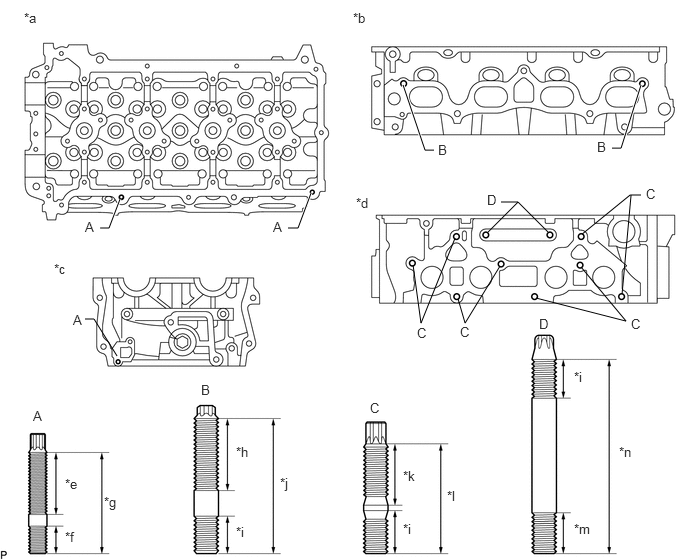
1.25,2.073 1.135,2.375 1.135,2.375 1.042,2.375 true 3.24,2.01 3.104,2.375 3.104,2.375 3,2.375 true 4.198,0.885 4.427,1.563 4.427,1.563 4.521,1.563 true 6.677,0.885 6.469,1.542 6.469,1.542 6.375,1.542 true 1.219,3.708 0.979,3.323 0.979,3.323 0.885,3.323 false 4.302,2.76 4.385,3.365 4.385,3.365 4.74,2.479 false 4.771,3.115 4.844,3.365 4.844,3.365 5.208,2.771 false 5.583,3.104 6.521,3.344 6.521,3.344 6.052,2.781 false 6.063,2.438 6.563,2.031 6.563,2.031 6.677,2.031 false 6.479,3.063 6.573,2.031 false 5.708,2.417 5.396,2.104 5.396,2.104 5.219,2.104 false 5.083,2.417 5.396,2.104 false 0.25,0.104 0.448,0.281 0.198,0.177 10 false *a 0.563,2.719 0.76,2.896 0.198,0.177 10 false *c 3.677,0.104 3.875,0.281 0.198,0.177 10 false *b 0.885,2.281 1.063,2.49 0.177,0.208 10 false A 2.844,2.281 3.01,2.49 0.167,0.208 10 false A 4.563,1.479 4.74,1.677 0.177,0.198 10 false B 6.219,1.448 6.396,1.635 0.177,0.188 10 false B 0.76,3.25 0.896,3.417 0.135,0.167 10 false A 3.708,2.031 3.906,2.208 0.198,0.177 10 false *d 4.344,3.385 4.521,3.615 0.177,0.229 10 false C 4.792,3.375 4.948,3.594 0.156,0.219 10 false C 6.573,3.292 6.75,3.5 0.177,0.208 10 false C 6.729,1.938 6.885,2.146 0.156,0.208 10 false C 0.344,4.25 0.479,4.417 0.135,0.167 10 false A 2.094,3.979 2.229,4.146 0.135,0.167 10 false B 3.854,4.167 3.99,4.333 0.135,0.167 10 false C 0.677,4.958 0.875,5.135 0.198,0.177 10 false *e 0.677,5.51 0.875,5.688 0.198,0.177 10 false *f 1.083,5.146 1.323,5.354 0.24,0.208 10 false *g 2.458,4.625 2.656,4.802 0.198,0.177 10 false *h 2.458,5.458 2.656,5.635 0.198,0.177 10 false *i 2.917,4.948 3.115,5.125 0.198,0.177 10 false *j 4.198,5.427 4.396,5.604 0.198,0.177 10 false *i 4.198,4.875 4.396,5.052 0.198,0.177 10 false *k 4.656,5.083 4.854,5.26 0.198,0.177 10 false *l 5.615,3.292 5.75,3.458 0.135,0.167 10 false D 5.073,2 5.229,2.188 0.156,0.188 10 false D 5.979,5.427 6.26,5.635 0.281,0.208 10 false *m 5.979,3.844 6.208,4.052 0.229,0.208 10 false *i 6.448,4.625 6.698,4.802 0.25,0.177 10 false *n

Text in Illustration
*a Cylinder Head Upper Side *b Intake Side
*c Front Side *d Exhaust Side
*e 21 mm (0.827 in.) *f 9.0 mm (0.354 in.)
*g 34 mm (1.34 in.) *h 24 mm (0.945 in.)
*i 13 mm (0.512 in.) *j 45 mm (1.77 in.)
*k 20 mm (0.787 in.) *l 35 mm (1.38 in.)
*m 14 mm (0.551 in.) *n 63 mm (2.48 in.)

a.

Using E6, E7 and E8 "TORX" socket wrenches, install the stud bolts.

Torque:
for stud bolt A : 3.0 N*m (31 kgf*cm, 27 in.*lbf)
for stud bolt B : 7.5 N*m (76 kgf*cm, 66 in.*lbf)
for stud bolt C : 7.5 N*m (76 kgf*cm, 66 in.*lbf)
for stud bolt D : 7.5 N*m (76 kgf*cm, 66 in.*lbf)


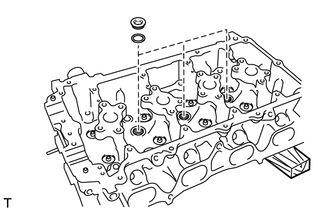
Hide 11117E 2.INSTALL NO. 1 HEAD STRAIGHT SCREW PLUG

NOTICE:
A101373

If coolant leaks from the No. 1 head straight screw plug or the plug is corroded, replace it.


a.

Using a 10 mm hexagon wrench, install 3 new gaskets and the straight screw plugs.

Torque:
44 N*m (449 kgf*cm, 32 ft.*lbf)


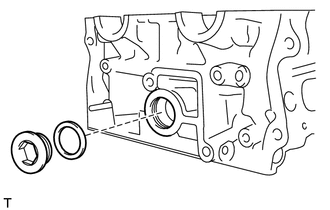
Hide 11117F 3.INSTALL NO. 2 HEAD STRAIGHT SCREW PLUG

NOTICE:
A101374

If coolant leaks from the No. 2 head straight screw plug or the plug is corroded, replace it.


a.

Using a 19 mm hexagon wrench, install a new gasket and the straight screw plug.

Torque:
140 N*m (1428 kgf*cm, 103 ft.*lbf)


Hide 13734 4.INSTALL VALVE SPRING SEAT

a.

Install the 16 valve spring seats to the cylinder head.


Hide 13711A 5.INSTALL VALVE STEM OIL SEAL

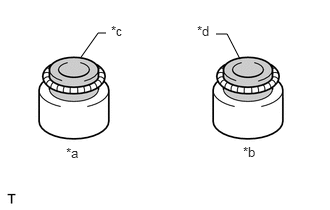
a.
A101414E10
0.844,0.594 1.021,0.344 1.021,0.344 1.104,0.344 false 2.5,0.615 2.365,0.354 2.365,0.354 2.25,0.354 false 2.052,0.24 2.25,0.458 0.198,0.219 10 false *d 1.156,0.24 1.396,0.5 0.24,0.26 10 false *c 0.688,1.51 0.917,1.74 0.229,0.229 10 false *a 2.531,1.5 2.74,1.74 0.208,0.24 10 false *b

Apply a light coat of engine oil to new oil seals.

Text in Illustration
*a Intake Side
*b Exhaust Side
*c Gray
*d Black

NOTICE:

Pay attention when installing the intake and exhaust oil seals. For example, installing an intake oil seal to the exhaust side or installing an exhaust oil seal to the intake side can cause installation problems later.


HINT:

The intake valve oil seals are gray and the exhaust valve oil seals are black.


b.
A101415E02
1.975,0 2.140,0.201 0.165,0.201 10 *1 2.605,0.605 2.333,0.079 2.333,0.079 2.196,0.079 false 2.116,1.749 2.491,1.950 0.375,0.201 10 SST 0.286,1.661 0.662,1.862 0.375,0.201 10 SST 2.992,1.362 2.668,1.861 2.668,1.861 2.523,1.861 false 1.068,1.217 0.467,1.56 0.467,1.56 0.467,1.663 false

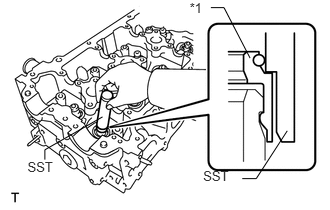
Using SST, push in the 16 oil seals to install them.

SST
09201-41020  

Text in Illustration
*1 Valve Stem Oil Seal

NOTICE:

Failure to use SST will cause the seal to be damaged or improperly seated.


Hide 13711 6.INSTALL INTAKE VALVE

a.
A101416E05
2.652,1.492 2.848,1.687 0.197,0.195 10 *a

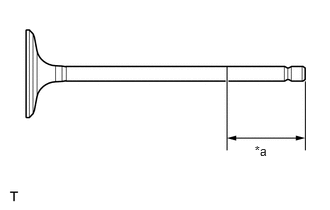
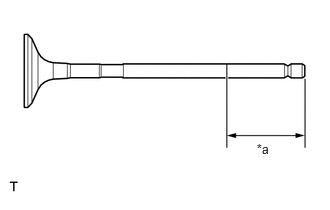
Apply plenty of engine oil to the tip area of the intake valve shown in the illustration.

Text in Illustration
*a 30 mm (1.18 in.) or more


b.
A332526E05
1.094,0.396 1.385,0.219 1.385,0.219 1.469,0.219 false 0.948,1.208 1.323,1.677 1.323,1.677 1.406,1.677 false 1.49,0.125 1.719,0.344 0.229,0.219 10 false *a 1.438,1.583 1.646,1.792 0.208,0.208 10 false *b

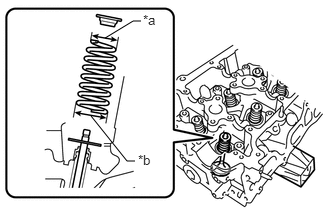
Install the valve, inner compression spring and retainer to the cylinder head.

Text in Illustration
*a Narrow
*b Wide

NOTICE:

Install the same parts in the same combination to the original locations.


c.
A333831E01
1.209,0.051 1.520,0.218 0.311,0.167 10 SST 1.811,0.681 1.691,0.141 1.691,0.141 1.584,0.141 false

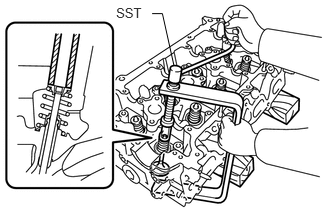
Using SST and wooden blocks, compress the inner compression spring and install the 2 valve spring retainer locks.

SST
09202-70020  
09202-00021  


d.
A333836E03
0.278,1.738 0.444,1.896 0.165,0.158 10 *a 1.056,0.933 0.357,1.586 0.357,1.586 0.357,1.723 false

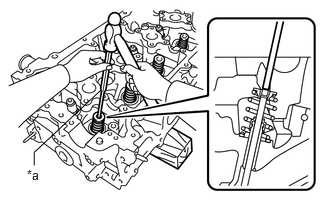
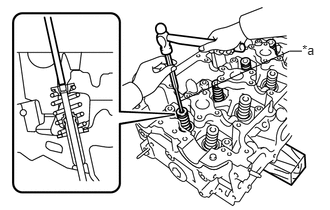
Using a 5 mm pin punch and plastic-faced hammer, lightly tap the valve stem tip to ensure a proper fit.

Text in Illustration
*a 5 mm Pin Punch

NOTICE:

Do not damage the valve stem tip.


Hide 13715 7.INSTALL EXHAUST VALVE

a.
A101419E05
2.673,1.465 2.833,1.656 0.160,0.191 10 *a

Apply plenty of engine oil to the tip area of the exhaust valve shown in the illustration.

Text in Illustration
*a 30 mm (1.18 in.) or more


b.
A332527E05
0.75,0.385 0.5,0.198 0.5,0.198 0.406,0.198 false 0.917,1.198 1.323,1.479 1.323,1.479 1.479,1.479 false 0.188,0.083 0.427,0.313 0.24,0.229 10 false *a 1.51,1.385 1.76,1.604 0.25,0.219 10 false *b

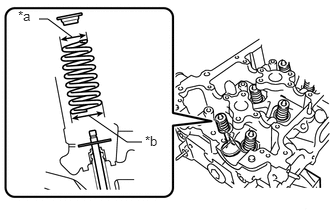
Install the valve, inner compression spring and retainer to the cylinder head.

Text in Illustration
*a Narrow
*b Wide

NOTICE:

Install the same parts in the same combination to the original locations.


c.
A333832E01
1.212,0.023 1.525,0.174 0.313,0.152 10 SST 0.894,0.37 1.079,0.113 1.079,0.113 1.199,0.113 false

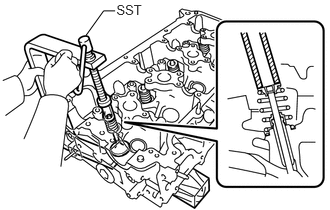
Using SST and wooden blocks, compress the inner compression spring and install the 2 valve spring retainer locks.

SST
09202-70020  
09202-00021  


d.
A333837E05
3.147,0.442 3.315,0.609 0.169,0.167 10 *a 1.88,1.053 3.016,0.532 3.016,0.532 3.144,0.532 false

Using a 5 mm pin punch and plastic-faced hammer, lightly tap the valve stem tip to ensure a proper fit.

Text in Illustration
*a 5 mm Pin Punch

NOTICE:

Do not damage the valve stem tip.