1GR-FE FUEL FUEL SYSTEM PRECAUTION
PRECAUTION
Before starting work on the fuel system, including inspections and repairs, disconnect the cable from the negative (-) battery terminal.
Do not smoke or work near fire when performing work on the fuel system.
Keep gasoline away from rubber or leather parts.
DISCHARGE FUEL SYSTEM PRESSURE
- CAUTION:
- ·
Take precautions to prevent gasoline from spilling out before removing fuel system parts.
·Pressure still remains in the fuel lines even after performing the following procedures. When disconnecting a fuel line, cover it with a piece of cloth to prevent fuel from spraying or coming out.
Remove the circuit opening relay from the engine room relay block.
Start the engine. After the engine stops, turn the engine switch off.
- HINT:
-
DTC P0171 (system to lean) may be stored.
Check that the engine does not start.
Remove the fuel tank cap and let the air out of the fuel tank.
Disconnect the cable from the negative battery (-) terminal.
- NOTICE:
- ·
After turning the engine switch off, waiting time may be required before disconnecting the cable from the battery terminal. Therefore, make sure to read the disconnecting the cable from the battery terminal notice before proceeding with work (See page General>INTRODUCTION>REPAIR INSTRUCTION>PRECAUTION).
·When disconnecting the cable, some systems need to be initialized after the cable is reconnected (See page General>INTRODUCTION>REPAIR INSTRUCTION>INITIALIZATION).
Reinstall the circuit opening relay.
FUEL SYSTEM
When disconnecting a high pressure fuel line, a large amount of gasoline will spill out. Follow these procedures.
Disconnect the fuel pump tube.
Drain any fuel remaining inside the fuel pump tube.
To protect the disconnected fuel pump tube from damage and contamination, cover it with a plastic bag.
Put a container under the connection.
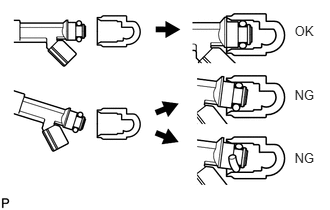
Observe these precautions when removing and installing the injectors.
Never reuse the O-ring.
When installing a new O-ring to the injector, do not damage it.
Coat new O-rings with spindle oil or gasoline before installing. Do not use engine oil, gear oil or brake oil.
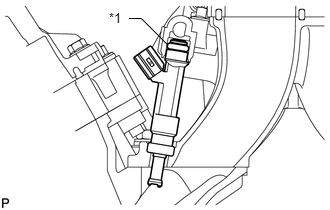
Install the injector to the delivery pipe and lower intake manifold as shown in the illustration.
| *1 | O-Ring |
- NOTICE:
-
Before installing the injector, be sure to apply spindle oil or gasoline to the place where the delivery pipe or cylinder head contacts the O-ring of the injector.
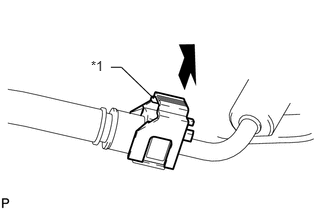
Observe these precautions when disconnecting the fuel tube connector (for quick type A).
Fuel Hose Connector Cover Type:
Detach the lock claw by lifting up the cover as shown in the illustration.
| *1 | Fuel Hose Connector Cover |
Check for dirt or mud on the pipe and around the connector before disconnection. Clean if necessary.
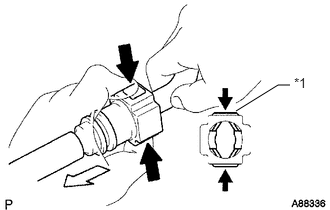
If the connector and the pipe are stuck, pinch the connector, push and pull the pipe to disconnect the pipe and pull it out.
| *1 | Retainer |

|
Pinch |

|
Pull |
- NOTICE:
- ·
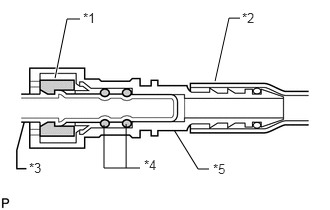 0.833,0.198 0.698,0.198 0.698,0.198 0.573,0.813 true 2.5,0.188 2.385,0.188 2.385,0.188 2.24,0.844 false 1.313,1.292 1.313,1.75 false 1.458,1.75 1.083,1.75 1.083,1.75 1.083,1.302 false 1.813,1.354 2.063,1.76 2.063,1.76 2.177,1.76 false 0.865,0.104 1.052,0.281 0.188,0.177 10 false *1 2.219,1.677 2.427,1.875 0.208,0.198 10 false *5 1.5,1.635 1.719,1.844 0.219,0.208 10 false *4 2.521,0.104 2.75,0.313 0.229,0.208 10 false *2 0.302,1.667 0.49,1.844 0.188,0.177 10 false *3
Check for foreign matter in the pipe and around the connector. Clean if necessary. Foreign matter may damage the O-ring or cause leaks in the seal between the pipe and connector.
·Do not use any tools to separate the pipe and connector.
·Do not forcefully bend or twist the nylon tube.
·Check for foreign matter on the pipe seal surface. Clean if necessary.
·Put the pipe and connector ends in plastic bags to prevent damage and foreign matter contamination.
·If the pipe and connector are stuck together, pinch the connector between your fingers and turn it carefully to disconnect it.
| *1 | Retainer |
| *2 | Nylon Tube |
| *3 | Pipe |
| *4 | O-Ring |
| *5 | Fuel Tube Connector |
Check for dirt or mud on the seal surface of the disconnected pipe. Clean if necessary.
To protect the disconnected pipe and connector from damage and contamination, cover them with a plastic bag.
Observe these precautions when connecting the fuel tube connector (for quick type A).
Check that there is no damage or contamination in the connected part of the pipe.
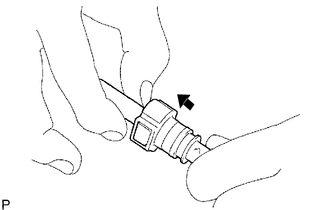
Align the axis of the connector with the axis of the pipe. Push the pipe into the connector until the connector makes a "click" sound. If the connection is tight, apply a small amount of fresh engine oil to the tip of the pipe.
|
|
Push |
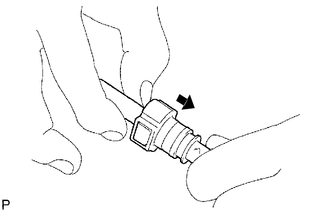
After connecting the pipe and the connector, check that the pipe and connector are securely connected by trying to pull them apart.
|
|
Pull |
Fuel Hose Connector Cover Type:
Attach the lock claws to the connector by pushing down on the cover.
Check for any fuel leaks.
Observe these precautions when disconnecting the fuel tube connector (for quick type B):
Check if there is any dirt or mud on the pipe and around the connector before disconnecting them. Clean if necessary.
Disconnect the parts by hand.
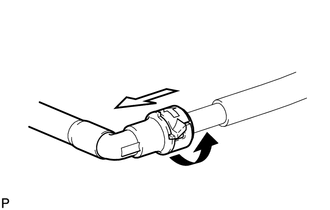
If the connector and pipe are stuck, push and pull the connector to disconnect the pipe and pull it out.
|
|
Turn |
|
|
Pull |
- NOTICE:
- ·
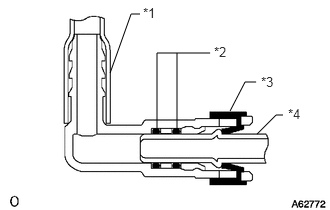 1.458,0.146 1.365,0.146 1.365,0.146 1.146,0.76 false 2.667,0.854 2.552,0.854 2.552,0.854 2.396,1.156 false 2.948,1.198 2.875,1.198 2.875,1.198 2.677,1.396 false 1.844,1.344 1.844,0.552 false 1.635,1.333 1.635,0.552 1.635,0.552 2.188,0.552 false 1.49,0.052 1.719,0.26 0.229,0.208 10 false *1 2.719,0.771 2.917,0.948 0.198,0.177 10 false *3 3,1.104 3.24,1.313 0.24,0.208 10 false *4 2.229,0.458 2.458,0.646 0.229,0.188 10 false *2
Check for foreign matter in the pipe and around the connector. Clean if necessary. Foreign matter may damage the O-ring or cause leaks in the seal between the pipe and connector.
·Do not use any tools to separate the pipe and connector.
·Do not forcefully bend or twist the nylon tube.
·Check for foreign matter on the pipe seal surface. Clean if necessary.
·Put the pipe and connector ends in plastic bags to prevent damage and foreign matter contamination.
·If the pipe and connector are stuck together, pinch the connector between your fingers and turn it carefully to disconnect it.
| *1 | Nylon Tube |
| *2 | O-Ring |
| *3 | Retainer |
| *4 | Pipe |
Check for dirt or mud on the seal surface of the disconnected pipe. Clean if necessary.
To protect the disconnected pipe and connector from damage and contamination, cover them with a plastic bag.
Observe these precautions when connecting the fuel tube connector (for quick type B):
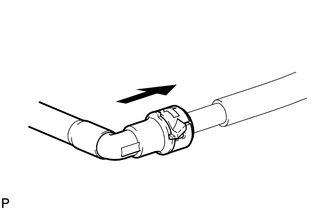
Align the axis of the connector with the axis of the pipe and push in the connector until the connector makes a "click" sound. If the connection is tight, apply a small amount of new engine oil to the tip of the pipe.
|
|
Push |
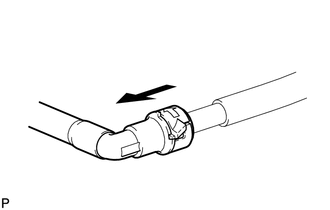
After connecting the pipe and the connector, check that the pipe and connector are securely connected by trying to pull them apart.
|
|
Pull |
Check for fuel leaks.
Observe these precautions when disconnecting the fuel tube connector (for quick type C).
Check that there is no damage or foreign matter on the part of the pipe that contacts the connector.
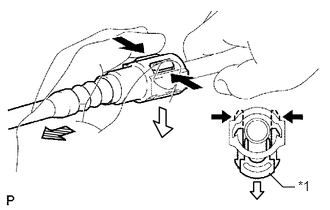
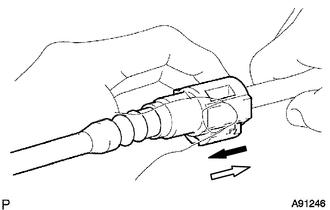
Detach the 2 claws of the connector retainer. Push down on the connector and disconnect it from the pipe.
| *1 | Retainer |
|
|
Push |
|
|
Down |

|
Pull |
- HINT:
-
If the connector and pipe are stuck, pinch the fuel pipe by hand and push and pull the connector to disconnect it.
|
|
Pull |
|
|
Push |
- NOTICE:
- ·
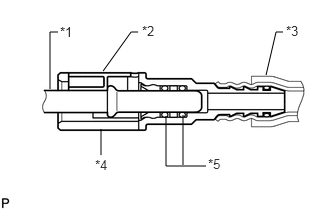 1.052,1.615 1.052,1.344 false 1.906,1.198 1.906,1.719 false 2.146,1.729 1.729,1.729 1.729,1.729 1.729,1.208 false 0.604,0.333 0.521,0.333 false 0.521,0.333 0.521,0.927 false 1.438,0.333 1.365,0.333 1.365,0.333 1.073,0.74 false 2.948,0.333 2.875,0.333 2.875,0.333 2.771,0.781 false 0.99,1.635 1.24,1.844 0.25,0.208 10 false *4 1.479,0.24 1.688,0.427 0.208,0.188 10 false *2 0.625,0.25 0.833,0.438 0.208,0.188 10 false *1 2.979,0.24 3.198,0.448 0.219,0.208 10 false *3 2.167,1.625 2.385,1.823 0.219,0.198 10 false *5
Check for any dirt and foreign matter contamination in the pipe and around the connector. Clean if necessary. Foreign matter may damage the O-ring or cause leaks in the seal between the pipe and connector.
·Do not use any tools to separate the pipe and connector.
·Do not allow any scratches or foreign matter on the parts when disconnecting them, as the fuel tube joint contains the O-rings that seal the plug.
·Check for any dirt and foreign matter on the pipe seal surface. Clean if necessary.
·Do not forcibly bend, twist or turn the nylon tube.
·Protect the disconnected part by covering it with a plastic bag and tape after disconnecting the main tube.
·If the pipe and connector are stuck together, pinch the tube between your fingers and turn it carefully to free it. Then disconnect the main tube.
| *1 | Pipe |
| *2 | Retainer |
| *3 | Nylon Tube |
| *4 | Connector |
| *5 | O-Ring |
Check for foreign matter on the seal surface of the disconnected pipe. Clean it if necessary.
To protect the disconnected pipe and connector from damage and foreign matter, cover them with a plastic bag.
Observe these precautions when connecting the fuel tube connector (for quick type C).
Check for foreign matter on the pipe and around the connector before connecting it. Clean it if necessary.
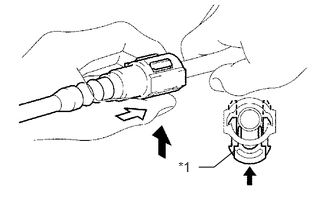
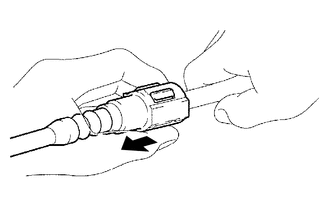
Align the axis of the connector with the axis of the pipe. Push the pipe into the connector, and then push up on the retainer.
| *1 | Retainer |
|
|
Up |
|
|
Push |
- NOTICE:
- ·
Before connecting the tube connectors to the pipes, check if there is any damage or foreign matter in the connectors.
·After connecting the pipe and the connector, check that the pipe and connector are securely connected by trying to pull them apart.
|
|
Pull |
Observe these precautions when handling the nylon tube.
- NOTICE:
- ·
Be careful not to turn the connection part of the nylon tube and the quick connector when connecting them.
·Do not kink the nylon tube.
·Do not remove the EPDM protector on the outside of the nylon tube.
·Do not bend the nylon tube as this may cause blockage.
Observe these precautions when disconnecting the fuel tank breather tube connector:
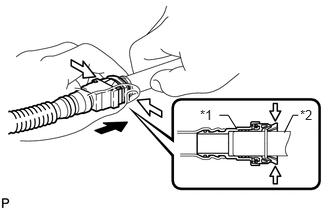
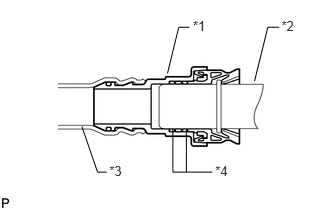
Pinch the retainer and pull out the fuel tank breather tube connector with the fuel tank breather tube connector pushed toward the pipe to disconnect the fuel tank breather tube from the pipe.
| *1 | Fuel Tank Breather Tube Connector |
| *2 | Pipe |
|
|
Push |
|
|
Pinch |
- NOTICE:
- ·
Remove dirt or foreign objects on the fuel tank breather tube connector before performing this procedure.
·Do not allow any scratches or foreign objects on the parts when disconnecting them as the fuel tank breather tube connector has the O-ring that seals the pipe.
·Perform this work by hand. Do not use any tools.
·Do not forcibly bend, kink or twist the nylon tube.
·Protect the connecting part by covering it with a plastic bag after disconnecting the fuel tank breather tube.
·If the fuel tank breather tube connector and pipe are stuck, push and pull them to release them.
| *1 | Fuel Tank Breather Tube Connector |
| *2 | Pipe |
| *3 | Nylon Tube |
| *4 | O-Ring |
Observe these precautions when connecting the fuel tank breather tube connector:
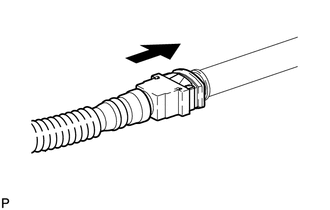
Align the fuel tank breather tube connector with the pipe, and then push in the fuel tank breather tube connector until the retainer makes a "click" sound to connect the fuel tank breather tube to the pipe.
|
|
Push |
- NOTICE:
- ·
Check that there are no scratches or foreign objects on the connected part of the fuel tank breather tube connector and pipe before performing this procedure.
·After connecting the fuel tank breather tube, check that the fuel tank breather tube is securely connected by pulling the fuel tank breather tube connector.
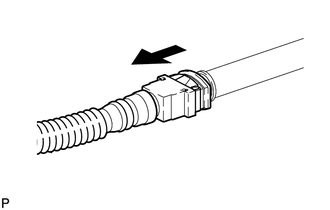
After connecting the pipe and the connector, check that the pipe and connector are securely connected by trying to pull them apart.
|
|
Pull |
Inspect for fuel leaks.
INSPECT FOR FUEL LEAK
Inspect for fuel leaks (See page Engine / Hybrid System>1GR-FE (FUEL)>FUEL INJECTOR>INSTALLATION).