1GD-FTV EMISSION CONTROL UREA PUMP INSTALLATION
PROCEDURE

 77871
1.INSTALL UREA PUMP
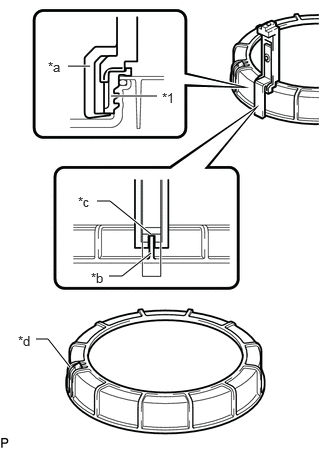
| *1 | Urea Pump Gauge Retainer |
| *a | SST (Claw Set) |
| *b | Rib |
| *c | Cutout |
| *d | SST (Claw Set) Incorrect Installation Point (Rotational Start Point Mark of Urea pump Gauge Retainer) |
Set 4 SST (claw sets) to the urea pump gauge retainer and temporarily install.
- SST
- 09808-14031 (09808-01080, 09808-01090, 09808-01100)
- NOTICE:
- ·
Align the cutout of SST (claw set) to the rib of the urea pump gauge retainer.
·Do not place SST on the rotational start paint mark of the urea pump gauge retainer, otherwise SST (claw set) cannot be set correctly.
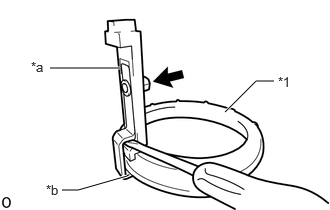
| *1 | Urea Pump Gauge Retainer |
| *a | SST (Claw Set) |
| *b | Hook |

|
Pinch |
Using a screw driver, while firmly pressing SST (claw) into rib of the urea pump gauge retainer, tighten the bolt.
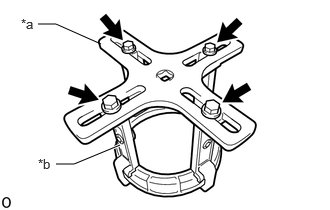
| *a | SST (Plate) |
| *b | SST (Claw Set) |
|
|
SST (Bolt) |
Temporarily install SST (plate) to SST (claw set) with 4 SST (bolts).
- SST
- 09808-14031 (09808-01030, 09808-01090)
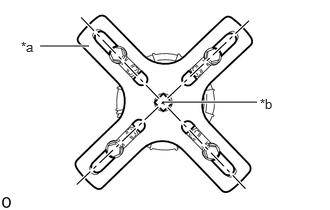
| *a | SST (Plate) |
| *b | Center of Urea Pump Gauge Retainer |
Adjust the position of SST (plate) so that the setting hole of SST (handle) aligns with the center of the urea pump gauge retainer.
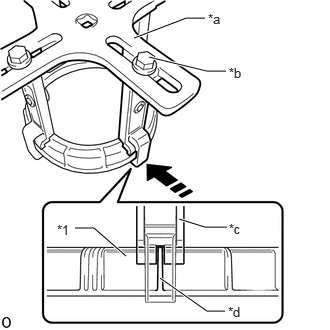
| *1 | Urea Pump Gauge Retainer |
| *a | SST (Plate) |
| *b | SST (Bolt) |
| *c | SST (Claw Set) |
| *d | Rib |

|
Press |
While firmly pressing SST (claw set) into rib of the urea pump gauge retainer, tighten SST (bolt).
- NOTICE:
-
Check that SST (claw set) is securely installed to the urea pump gauge retainer to prevent it from dropping.
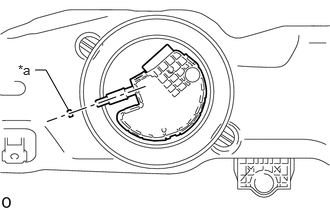
| *a | Matchmark |
Install a new gasket and the urea pump to the urea tank sub-assembly as shown in the illustration.[*]
- NOTICE:
-
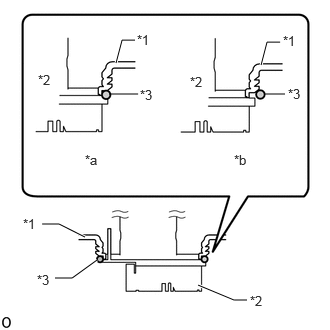 2.063,2.969 2.438,3.125 2.438,3.125 2.573,3.125 true 0.885,2.469 0.615,2.333 0.615,2.333 0.438,2.333 true 1.01,2.708 0.75,2.896 0.75,2.896 0.573,2.896 true 1.135,0.979 1.438,0.979 false 2.75,0.979 2.969,0.979 false 1.208,0.656 1.271,0.417 1.271,0.417 1.406,0.417 true 2.719,0.677 2.781,0.438 2.781,0.438 2.917,0.438 true 0.24,2.25 0.427,2.417 0.188,0.167 10 true *1 2.604,3.052 2.917,3.208 0.313,0.156 10 false *2 0.385,2.833 0.698,2.99 0.313,0.156 10 false *3 1.458,0.906 1.771,1.063 0.313,0.156 10 false *3 3,0.896 3.198,1.063 0.198,0.167 10 false *3 0.885,1.583 1.198,1.74 0.313,0.156 10 true *a 2.438,1.583 2.75,1.74 0.313,0.156 10 true *b 0.396,0.75 0.708,0.906 0.313,0.156 10 false *2 1.979,0.771 2.292,0.927 0.313,0.156 10 false *2 1.427,0.333 1.74,0.49 0.313,0.156 10 true *1 2.948,0.344 3.156,0.521 0.208,0.177 10 true *1
*1 Urea Tank Sub-assembly *2 Urea Pump *3 Gasket *a Correct *b Incorrect
- ·
Check that the urea pump is not tilted and securely inserted, and that the gasket is not jammed or protruding out along the entire circumference of the gasket.
·After checking the gasket, do not move the urea pump or the gasket could become misaligned. If it is moved, align the position [*] of the urea pump again before continuing.
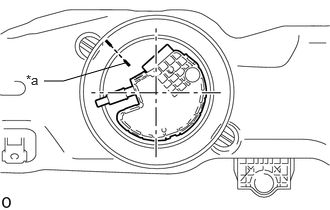
| *a | Co-rotation Prevention Check Mark |
Apply a co-rotation prevention check mark to the urea pump.
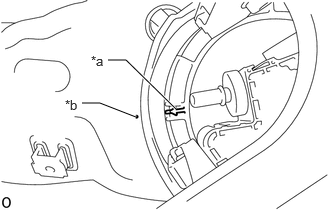
| *a | Rotational Start Point Mark (Urea Pump Gauge Retainer Side) |
| *b | Rotational Start Point Mark (Urea Tank Sub-assembly Side) |
Temporarily install the urea pump gauge retainer by aligning the rotational start point mark of the urea pump gauge retainer with the rotational start point mark of the urea tank sub-assembly.
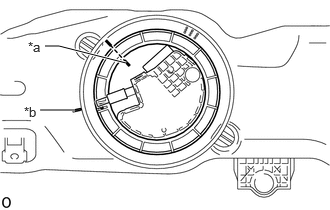
| *a | Co-rotation Prevention Check Mark |
| *b | Tighten Start Position |
While one person presses the urea pump into the urea tank sub-assembly, have another person firmly press the urea pump gauge retainer into the threads of the urea tank assembly and tighten approximately one turn.
- NOTICE:
- ·
Do not any tools other than SST, such as a screwdriver, etc.
·Do not apply excessive force when pressing down on SST, as the urea pump will place excessive force on urea pump gauge retainer and be difficult to remove, and parts may be damaged.
·Do not use an impact wrench or turn SST handle with excessive force, as parts may be damaged.
·Do not rotate the urea pump gauge retainer when the co-rotation prevention check mark is out of place.
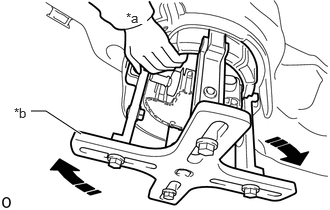
| *a | Person in Charge of Supporting |
| *b | SST (Plate) |
|
|
Tighten |
While one person presses the urea pump into the urea tank sub-assembly, have another person slowly tighten it.
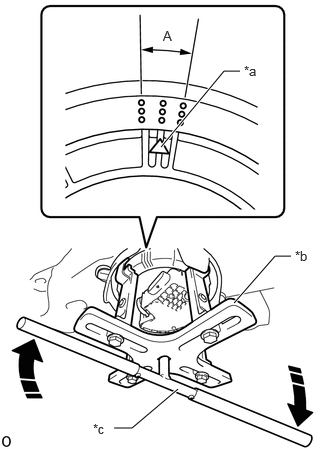
| *a | Rotational Start Point Mark of Urea Pump Gauge Retainer |
| *b | SST (Plate) |
| *c | SST (Handle) |
|
|
Tighten |
Install SST (handle) to SST (plate).
- SST
- 09808-14031 (09808-01010, 09808-01020)
Using SST (handle) and slowly tighten the urea pump gauge retainer is within range A on the urea tank sub-assembly as shown in the illustration.
77840
2.CONNECT UREA TUBE WITH HEATER ASSEMBLY
- NOTICE:
-
Check for dirt or mud on the urea pump and around the urea tube connector before connection. Clean if necessary.
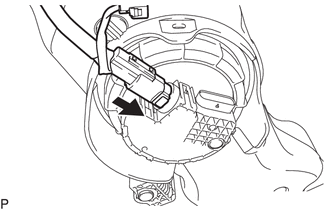
Connect the urea tube with heater assembly to the urea pump.
- HINT:
-
If there is any solidified urea solution (white solids) on the connection areas of the urea tube with heater assembly and urea pump, clean the solids off with water. Otherwise, they may prevent the O-ring from sealing properly.
Wash the connection area of the urea tube connector with water to remove all solidified urea solution (white solids).
Wipe off the connection area of the urea pump with water to remove all solidified urea solution (white solids).
|
|
Push |
Align the axis of the connector with the axis of the urea pump. Push the urea tube connector into the urea pump until the urea tube connector makes a "click" sound.
After connecting the urea pump and the urea tube connector, check that the urea pump and urea tube connector are securely connected by trying to pull them apart.
Attach the 2 clamps and connect the urea tube with heater assembly to the urea tank sub-assembly.
82169
3.CONNECT NO. 3 FRAME WIRE
51226A
4.INSTALL FRONT SUSPENSION MEMBER BRACKET LH
5.ADD UREA SOLUTION (AdBlue)
77830A
6.INSTALL UREA TANK CAP ASSEMBLY