A750F AUTOMATIC TRANSMISSION / TRANSAXLE SHIFT LEVER ON-VEHICLE INSPECTION
PROCEDURE

 1.CHECK SHIFT LOCK OPERATION
Move the shift lever to P.
Turn the ignition switch off.
Check that the shift lever cannot be moved from P.
Turn the ignition switch ON, depress the brake pedal and check that the shift lever can be moved to other positions.
If the operation cannot be done as specified, inspect the shift lever assembly and shift lock control unit.
2.CHECK SHIFT LOCK RELEASE BUTTON OPERATION
When operating the shift lever with the shift lock release button pressed, check that the lever can be moved to any position.
If the operation cannot be performed as specified, check the shift lever assembly.
85903
3.CHECK SHIFT LOCK CONTROL ECU
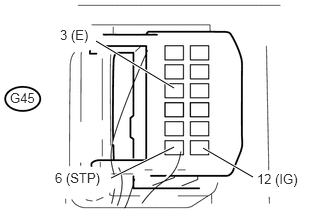
Measure the voltage and resistance according to the value(s) in the table below.
- HINT:
-
Do not disconnect the shift lock control ECU connector.
- Standard Voltage:
Tester Connection Condition Specified Condition G45-12 (IG) - G45-3 (E) Ignition switch ON 11 to 14 V G45-12 (IG) - G45-3 (E) Ignition switch off Below 1 V G45-6 (STP) - G45-3 (E) Brake pedal depressed 11 to 14 V G45-6 (STP) - G45-3 (E) Brake pedal released Below 1 V G45-1 (E) - Body ground Always Below 1 Ω
Disconnect the shift lock solenoid connector from the shift lock control ECU.
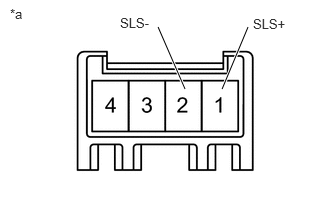
Measure the voltage according to the value(s) in the table below.
- HINT:
-
Do not disconnect the shift lock control ECU connector.
- Standard Voltage:
Tester Connection Condition Specified Condition 1 (SLS+) - 2 (SLS-) Ignition switch off Below 1 V 1 (SLS+) - 2 (SLS-) Ignition switch ON Below 1 V Ignition switch ON and brake pedal depressed 11 to 14 V
| *a | Component without harness connected
(Shift Lock Control ECU) |
85431
4.CHECK SHIFT LOCK SOLENOID
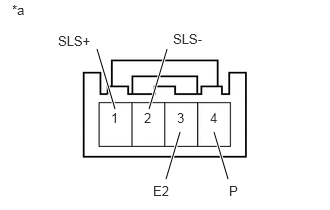
Disconnect the shift lock solenoid connector from the shift lock control ECU.
Measure the resistance according to the values in the table below.
- Standard Resistance:
Tester Connection Condition Specified Condition 1 (SLS+) - 2 (SLS-) Always 101 to 123 Ω 3 (E2) - 4 (P) Shift lever in P 10 kΩ or higher 3 (E2) - 4 (P) Shift lever not in P Below 1 Ω
| *a | Component without harness connected
(Shift Lock Control Solenoid) |
Apply 12 V of battery voltage to the shift lock solenoid and check that the valve moves and makes an operating noise.
- OK:
Measurement Condition Specified Condition ·Battery positive (+) → Terminal 1 (SLS+)
·Battery negative (-) → Terminal 2 (SLS-)
Solenoid moves and makes an operating noise
If the result is not as specified, replace the shift lever assembly.