AXLE AND DIFFERENTIAL REAR DIFFERENTIAL CARRIER ASSEMBLY(w/ Differential Lock) REASSEMBLY
PROCEDURE

 1.INSTALL DIFFERENTIAL CASE ASSEMBLY
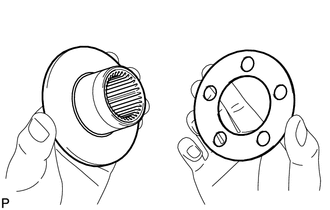
Install the rear differential side gear thrust washer to the rear differential side gear.
Install the rear differential pinion thrust washer and rear differential pinion to the rear differential spider.
Fix the differential case RH in place.
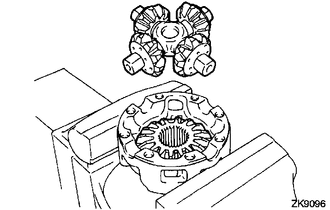
Install the rear differential side gear and rear differential spider to the differential case RH.
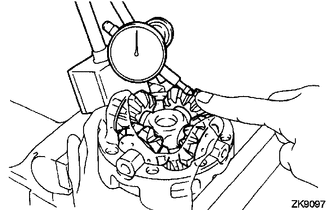
Using a dial indicator, measure the differential case RH side backlash while pushing the pinion toward the case.
- Standard backlash:
0.05 to 0.20 mm (0.00197 to 0.00787 in.)
Remove the rear differential spider from the differential case RH.
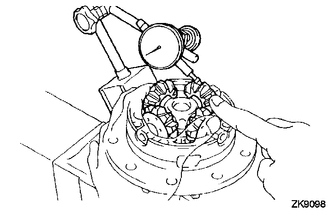
Install the rear differential side gear and rear differential spider to the differential case LH.
Using a dial indicator, measure the differential case LH side backlash while pushing the pinion toward the case.
- Standard Backlash:
0.05 to 0.20 mm (0.00197 to 0.00787 in.)
If the backlash is not within the specification, install 2 side gear thrust washers of a different thickness.
- Standard Thrust Washer:
Thickness Thickness 0.88 to 0.92 mm (0.0346 to 0.0362 in.) 1.18 to 1.22 mm (0.0465 to 0.0480 in.) 0.98 to 1.02 mm (0.0386 to 0.0402 in.) 1.28 to 1.32 mm (0.0504 to 0.0520 in.) 1.08 to 1.12 mm (0.0425 to 0.0441 in.) -
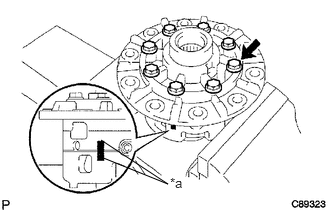
Align the matchmarks and assemble the differential case from the RH and LH cases.
| *a | Matchmark |
Using a plastic-faced hammer, install the differential case.
Install the 8 bolts.
- Torque:
- 47.1 N*m (480 kgf*cm, 35 ft.*lbf)
2.INSTALL DIFFERENTIAL RING GEAR
Clean the contact surfaces of the differential case and ring gear.
Heat the ring gear to approximately 100°C (212°F) in boiling water.
Carefully take the ring gear out of the boiling water.
After the moisture on the ring gear has completely evaporated, quickly install the ring gear to the differential case.
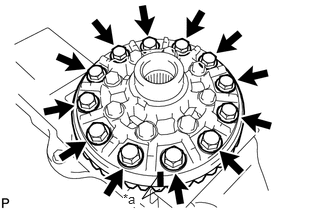
Align the matchmarks on the ring gear and differential case.
| *a | Matchmark |
After the ring gear cools down sufficiently, apply adhesive to the 12 bolts and install them.
- Adhesive:
Toyota Genuine Adhesive 1360K, Three Bond 1360K or equivalent.
- Torque:
- 96.6 N*m (985 kgf*cm, 71 ft.*lbf)
41301A
3.INSTALL REAR DIFFERENTIAL CASE BEARING
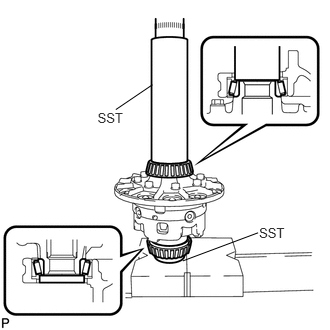
Using SST and a press, install the bearing to the differential case.
- SST
- 09308-14010
09950-60010 (09951-00490)
4.INSPECT DIFFERENTIAL RING GEAR RUNOUT
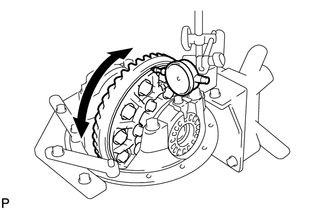
Install the differential case to the carrier, and then install the 2 adjusting nuts so that there is no play in the bearing.
Install the 2 bearing caps with the 4 bolts.
- Torque:
- 102.9 N*m (1049 kgf*cm, 76 ft.*lbf)
Using a dial indicator, measure the runout of the ring gear.
- Maximum runout:
0.07 mm (0.00276 in.)
Remove the 2 bearing caps, 2 adjusting nuts and differential case.
41201B
5.INSTALL REAR DRIVE PINION FRONT TAPERED ROLLER BEARING
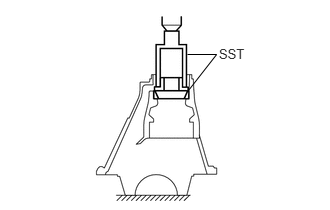
Using SST and a press, install the tapered roller bearing to the carrier.
- SST
- 09308-14010
09309-14040
41201A
6.INSTALL REAR DRIVE PINION REAR TAPERED ROLLER BEARING (OUTER)
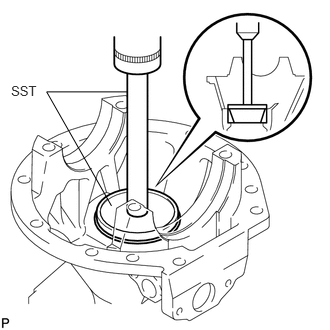
Install the plate washer to the carrier.
- HINT:
-
First, install a washer with the same thickness as the removed washer, and then check the tooth contact pattern. Replace the washer with one of a different thickness if necessary.
Using SST and a press, install the tapered roller bearing to the carrier.
- SST
- 09950-70010 (09951-07200)
09255-10012
41201A
7.INSTALL REAR DRIVE PINION REAR TAPERED ROLLER BEARING (INNER)
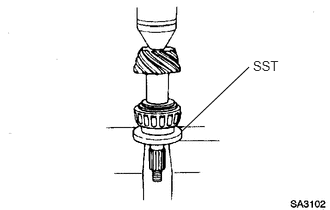
Using SST and a press, install the tapered roller bearing to the drive pinion.
- SST
- 09506-30012
8.ADJUST DIFFERENTIAL DRIVE PINION PRELOAD
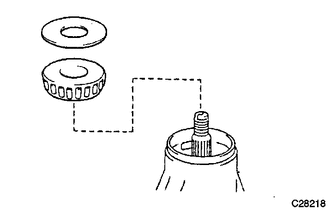
Install the drive pinion, rear drive pinion tapered roller bearing and rear differential drive pinion oil slinger.
- HINT:
-
Install the spacer and oil seal after adjusting the gear contact pattern.
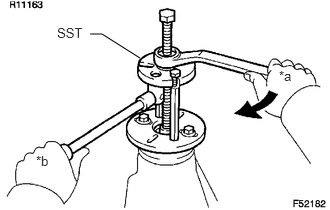
Using SST, install the drive pinion companion flange.
- SST
- 09950-30012 (09951-03010, 09953-03010, 09954-03010, 09955-03030, 09956-03040)
| *a | Turn |
| *b | Hold |
- NOTICE:
-
Before using SST (center bolt), apply hypoid gear oil to its threads and tip.
Coat the threads of the nut with hypoid gear oil LSD.
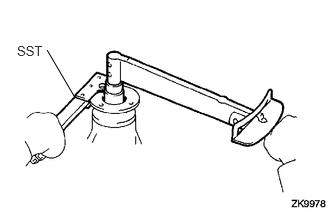
Using SST to hold the companion flange in place, then slowly tighten the nut within the drive pinion preload adjustment range so that it reaches the specified drive pinion preload (at Starting).
- SST
- 09330-00021
- Limit Torque Value:
457 N*m (4660 kgf*cm, 337ft.*lbf) or less
- NOTICE:
- ·
As there is no spacer, tighten the nut a little at a time, being careful not to overtighten it.
·Apply hypoid gear oil LSD to drive pinion thread and seat face.
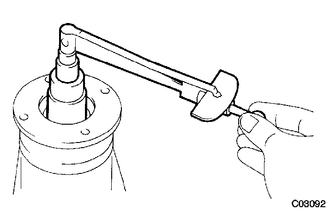
Using a torque wrench, measure the preload.
- Standard Preload (at Starting):
Item Specified Condition New bearing 0.68 to 2.03 N*m (7 to 20 kgf*cm, 7 to 17 in.*lbf) Used bearing 0.73 to 1.83 N*m (8 to 18 kgf*cm, 7 to 16 in.*lbf)
- NOTICE:
-
For a more accurate measurement, rotate the bearing forward and backward several times before measuring.
9.INSTALL DIFFERENTIAL CASE ASSEMBLY
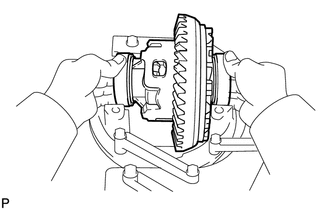
Place the 2 bearing outer races on their respective bearings.
- HINT:
-
Do not interchange the right and left races.
41315
10.INSTALL REAR DIFFERENTIAL BEARING ADJUSTING NUT
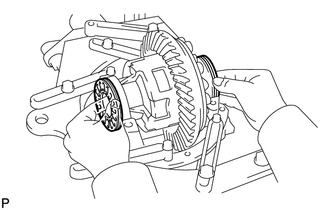
Install the 2 adjusting nuts to the carrier, making sure the nuts are threaded properly.
11.INSPECT AND ADJUST DIFFERENTIAL RING GEAR AND DIFFERENTIAL DRIVE PINION BACKLASH
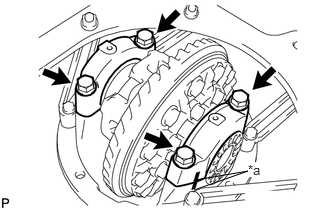
Align the matchmarks on the cap and carrier.
| *a | Matchmark |
Install the right and left bearing caps with the 4 bolts.
- Torque:
- 102.9 N*m (1049 kgf*cm, 76 ft.*lbf)
- HINT:
-
If the bearing cap does not fit tightly onto the carrier, the adjusting nuts are not threaded properly.
-
Reinstall the adjusting nuts if necessary.
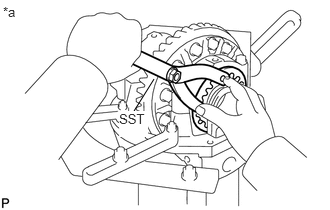
Tighten the 4 bearing cap bolts to the specified torque, and then loosen them to the point where the adjusting nuts can be turned by SST.
- Torque:
- 102.9 N*m (1049 kgf*cm, 76 ft.*lbf)
| *a | for LH Side |
Using SST, tighten the adjusting nut on the ring gear side until the ring gear has a backlash of about 0.2 mm (0.008 in.).
- SST
- 09960-10010 (09962-01000, 09963-00700)
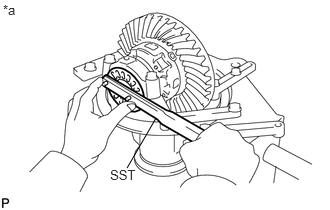
While turning the ring gear, use SST to tighten the adjusting nut on the drive pinion side.
| *a | for RH Side |
- HINT:
-
After the bearings have settled, loosen the adjusting nut on the drive pinion side.
Using SST, tighten the adjusting nut 1 to 1.5 notches from the 0 preload position.
- SST
- 09504-00011
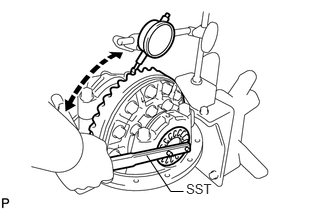
Using a dial indicator, adjust the ring gear backlash until it is within the specification.
- Standard backlash (reference):
0.10 to 0.20 mm (0.00394 to 0.00787 in.)
- HINT:
- ·
The backlash is adjusted by turning the left and right adjusting nuts an equal amount. For example, loosen the nut on the right side one notch and loosen the nut on the left side one notch.
·Perform the measurement at 3 or more positions around the circumference of the ring gear.
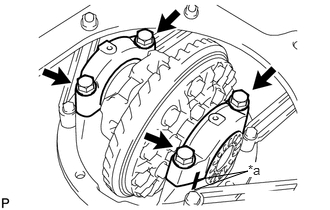
Tighten the bearing cap bolts.
- Torque:
- 102.9 N*m (1049 kgf*cm, 76 ft.*lbf)
| *a | Matchmark |
12.INSPECT TOTAL PRELOAD
Using a torque wrench, measure the preload with the teeth of the drive pinion and ring gear in contact.
- Standard total preload (at starting):
Item Specified Condition New bearing 0.88 to 2.43 N*m (9 to 24 kgf*cm, 8 to 21 in.*lbf) Used bearing 0.93 to 2.23 N*m (10 to 22 kgf*cm, 9 to 19 in.*lbf)
If necessary, disassemble and inspect the differential.
- NOTICE:
-
Record the differential ring gear preload.
13.INSPECT TOOTH CONTACT BETWEEN RING GEAR AND DRIVE PINION
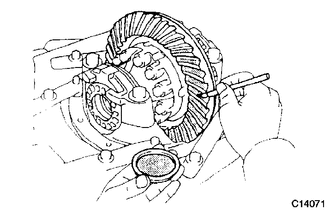
Coat 3 or 4 teeth at 3 different positions on the ring gear with Prussian blue.
Hold the companion flange firmly and rotate the ring gear in both directions.
Inspect the tooth contact pattern.
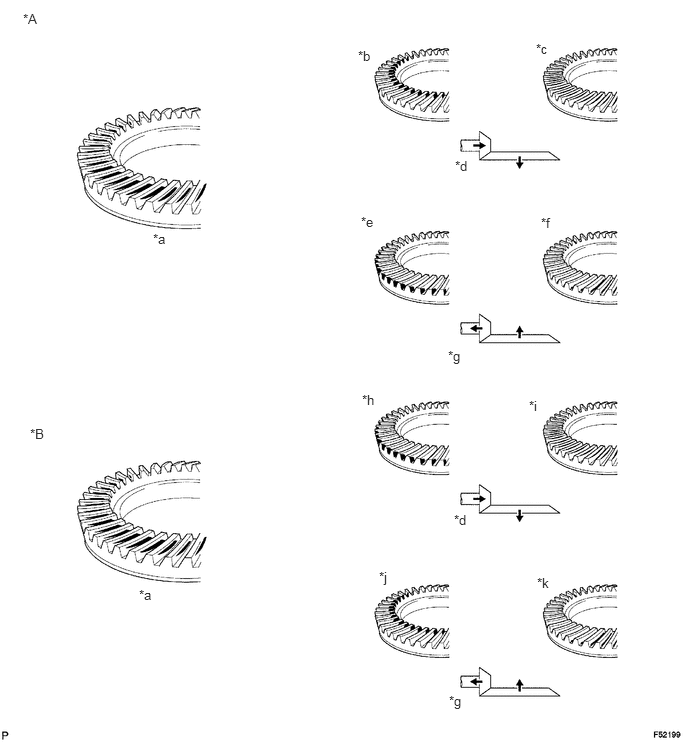
| *A | Drive Side | *B | Coast Side |
| *a | Proper Contact | *b | Toe Contact |
| *c | Face Contact | *d | Select an adjusting washer that will shift the drive pinion closer to the ring gear. |
| *e | Heel Contact | *f | Flank Contact |
| *g | Select an adjusting washer that will shift the drive pinion away from the ring gear. | *h | Heel Contact |
| *i | Flank Contact | *j | Toe Contact |
| *k | Face Contact | - | - |
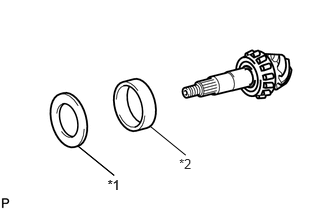
If the teeth are not engaged properly, use the following chart to select an appropriate washer for correction.
| *1 | Plate Washer |
| *2 | Rear Drive Pinion Rear Tapered Roller Bearing (Outer) |
- Standard Plate Washer:
Mark Thickness Mark Thickness 29 1.84 to 1.86 mm (0.0725 to 0.0732 in.) 53 2.08 to 2.10 mm (0.0819 to 0.0826 in.) 31 1.86 to 1.88 mm (0.0733 to 0.0740 in.) 55 2.10 to 2.12 mm (0.0827 to 0.0834 in.) 33 1.88 to 1.90 mm (0.0741 to 0.0748 in.) 57 2.12 to 2.14 mm (0.0835 to 0.0842 in.) 35 1.90 to 1.92 mm (0.0749 to 0.0755 in.) 59 2.14 to 2.16 mm (0.0843 to 0.0850 in.) 37 1.92 to 1.94 mm (0.0756 to 0.0763 in.) 61 2.14 to 2.16 mm (0.0843 to 0.0850 in.) 39 1.94 to 1.96 mm (0.0764 to 0.0771 in.) 63 2.18 to 2.20 mm (0.0859 to 0.0866 in.) 41 1.96 to 1.98 mm (0.0772 to 0.0779 in.) 65 2.20 to 2.22 mm (0.0867 to 0.0874 in.) 43 1.98 to 2.00 mm (0.0780 to 0.0787 in.) 67 2.22 to 2.24 mm (0.0875 to 0.0881 in.) 45 2.00 to 2.02 mm (0.0788 to 0.0795 in.) 69 2.24 to 2.26 mm (0.0882 to 0.0889 in.) 47 2.02 to 2.04 mm (0.0796 to 0.0803 in.) 71 2.26 to 2.28 mm (0.0890 to 0.0897 in.) 49 2.04 to 2.06 mm (0.0804 to 0.0811 in.) 73 2.28 to 2.30 mm (0.0898 to 0.0905 in.) 51 2.06 to 2.08 mm (0.0812 to 0.0818 in.) 75 2.30 to 2.32 mm (0.0906 to 0.0913 in.)
41204B
14.REMOVE REAR DRIVE PINION NUT
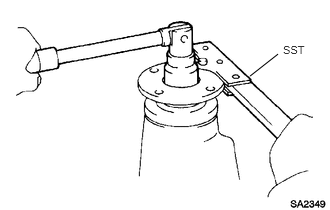
Using SST to hold the drive pinion companion flange, remove the nut.
- SST
- 09330-00021
41204
15.REMOVE REAR DRIVE PINION COMPANION FLANGE SUB-ASSEMBLY
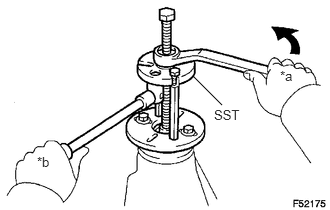
Using SST, remove the drive pinion companion flange.
- SST
- 09950-30012 (09951-03010, 09953-03010, 09954-03010, 09955-03030, 09956-03040)
| *a | Turn |
| *b | Hold |
41214
16.REMOVE REAR DIFFERENTIAL DRIVE PINION OIL SLINGER
41201B
17.REMOVE REAR DRIVE PINION FRONT TAPERED ROLLER BEARING
41231
18.INSTALL REAR DIFFERENTIAL DRIVE PINION BEARING SPACER
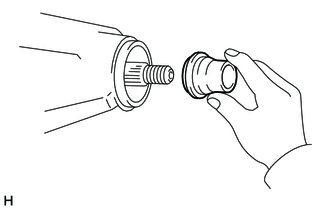
Install a new bearing spacer to the drive pinion.
41115
19.INSTALL DIFFERENTIAL OIL STORAGE RING
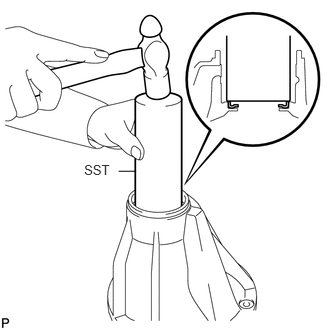
Using SST, tap in a new oil storage ring.
- SST
- 09308-14010
41201B
20.INSTALL REAR DRIVE PINION FRONT TAPERED ROLLER BEARING
41214
21.INSTALL REAR DIFFERENTIAL DRIVE PINION OIL SLINGER
41201C
22.INSTALL REAR DIFFERENTIAL CARRIER OIL SEAL
Apply MP grease to the oil seal lip.
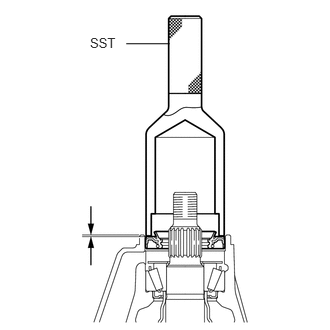
Using SST and a hammer, install a new carrier oil seal.
- SST
- 09214-76011
- Standard oil seal drive in depth:
-0.3 to 0.3 mm (-0.0118 to 0.0118 in.)
41204
23.INSTALL REAR DRIVE PINION COMPANION FLANGE SUB-ASSEMBLY REAR
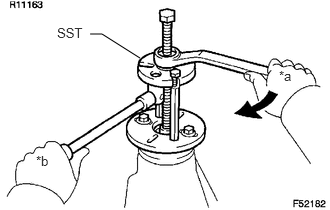
Using SST, install the drive pinion companion flange to the drive pinion.
- SST
- 09950-30012 (09951-03010, 09953-03010, 09954-03010, 09955-03030, 09956-03040)
| *a | Turn |
| *b | Hold |
Coat the threads of a new nut with hypoid gear oil.
Using SST to hold the companion flange in place, then slowly tighten the nut within the drive pinion preload adjustment range so that it reaches the specified drive pinion preload (at Starting).
- SST
- 09330-00021
- Limit Torque Value:
457 N*m (4660 kgf*cm, 337ft.*lbf) or less
24.INSPECT DRIVE PINION PRELOAD
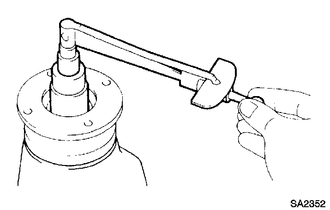
Using a torque wrench, measure the preload of the backlash between the drive pinion and ring gear.
- Standard Preload (at Starting):
Item Specified Condition New bearing 0.83 to 2.18 N*m (9 to 22 kgf*cm, 8 to 19 in.*lbf) Reused bearing 0.88 to 1.98 N*m (9 to 20 kgf*cm, 8 to 17 in.*lbf)
If the result not as specified, replace the bearing spacer.
If the preload is less than the minimum, retighten the nut with 13 N*m (130 kgf*cm, 9 ft.*lbf) of torque at a time until the specified preload is reached.
- Limit Torque Value:
457 N*m (4660 kgf*cm, 337ft.*lbf) or less
If the maximum torque is exceeded while retightening the nut, replace the bearing spacer and repeat the preload adjusting procedure.
- HINT:
-
Do not loosen the pinion nut to reduce the preload.
25.INSPECT TOTAL PRELOAD
Using a torque wrench, measure the preload.
- Standard total preload (at starting):
Item Specified Condition New bearing 1.03 to 2.58 N*m (11 to 26 kgf*cm, 10 to 22 in.*lbf) Reused bearing 1.08 to 2.38 N*m (12 to 24 kgf*cm, 10 to 21 in.*lbf)
If necessary, disassemble and inspect the differential.
26.INSPECT DIFFERENTIAL RING GEAR BACKLASH
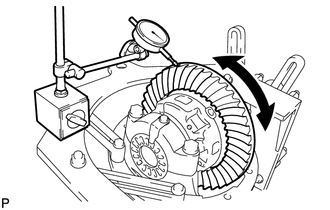
Using a dial indicator, check the backlash of the ring gear.
- Standard Backlash:
0.10 to 0.20 mm (0.00394 to 0.00787 in.)
If the backlash is not within the specification, adjust the side bearing preload or perform repairs as necessary.
- HINT:
-
Perform the measurement at 3 or more positions around the circumference of the ring gear.
41204
27.INSPECT RUNOUT OF REAR DRIVE PINION COMPANION FLANGE SUB-ASSEMBLY REAR
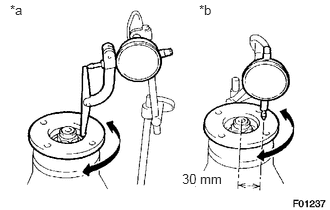
Using a dial indicator, measure the runout of the drive pinion companion flange vertically and laterally.
- Distance from center to runout measurement point:
30 mm (1.18 in.)
- Maximum Runout:
Item Specified Condition Vertical runout 0.10 mm (0.00394 in.) Lateral runout 0.10 mm (0.00394 in.)
| *a | Vertical Runout |
| *b | Lateral Runout |
If the runout is more than the maximum, replace the companion flange.
41204B
28.INSTALL REAR DRIVE PINION NUT
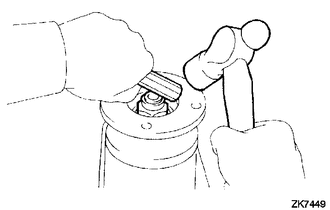
Using a chisel and hammer, stake the drive pinion nut.
41316
29.INSTALL REAR DIFFERENTIAL BEARING ADJUSTING NUT LOCK
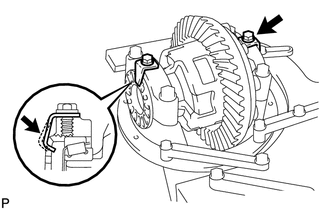
Install 2 new adjusting nut locks to the bearing caps with the 2 bolts.
- Torque:
- 12.7 N*m (130 kgf*cm, 9 ft.*lbf)
After tightening the bolts, bend the nut locks.
41451
30.INSTALL REAR DIFFERENTIAL LOCK SHIFT FORK
Apply MP grease to shaft.
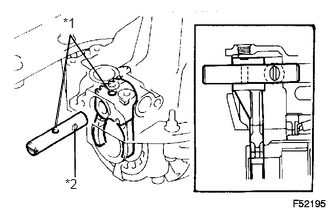
Install the fork shaft so that the hole of the shift fork shaft aligns with that of the shift fork.
| *a | Hole |
| *b | Groove |
Remove any FIPG material and be careful not to drop the oil shaft retainer.
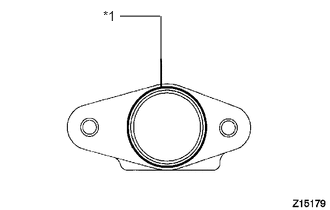
Apply seal packing to the carrier as shown in the illustration.
- Seal packing:
Toyota Genuine Seal Packing 1281, Three Bond 1281 or equivalent
- FIPG Width:
Approx. 1 to 2 mm (0.0394 to 0.0787 in.)
| *1 | Seal Packing |
- HINT:
-
Install the shaft retainer within 10 minutes of applying seal packing.
Clean the threads of the bolts and retainer bolt holes with toluene or trichloroethylene.
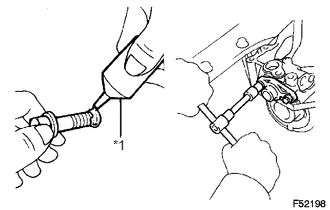
Apply adhesive to 2 or 3 threads at the tip of each mount bolt.
- Adhesive:
Toyota Genuine Adhesive 1344, Three Bond 1344 or equivalent
| *a | Adhesive |
Install the shaft retainer with the 2 bolts.
- Torque:
- 23.2 N*m (237 kgf*cm, 17 ft.*lbf)
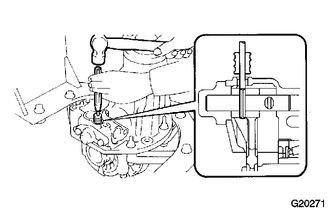
Using a 5 mm pin punch and hammer, install the slotted spring pin to the shift fork.
Using a 6 mm hexagon wrench, install the screw plug.
- Torque:
- 21.6 N*m (220 kgf*cm, 16 ft.*lbf)
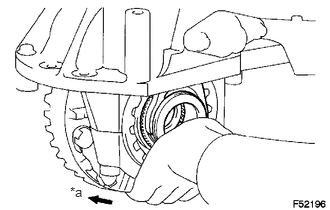
Push the differential lock sleeve in deeply and hold it in position.
| *a | Lock |
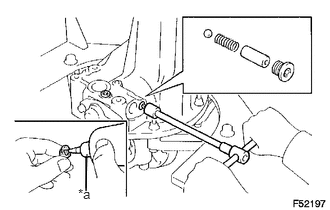
Install the ball, spring and spring seat.
Clean the threads of the 2 plugs and plug holes with toluene or trichloroethylene.
- Adhesive:
Toyota Genuine Adhesive 1344, Three Bond 1344 or equivalent
| *a | Adhesive |
Using a 6 mm hexagon wrench, install the screw plug.
- Torque:
- 23.2 N*m (237 kgf*cm, 17 ft.*lbf)
84222E
31.INSTALL DIFFERENTIAL LOCK INDICATOR SWITCH
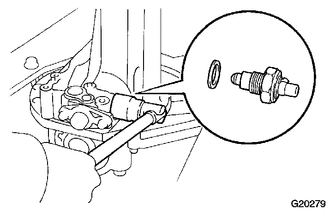
Install the indicator switch together with a new gasket.
- Torque:
- 40.2 N*m (410 kgf*cm, 30 ft.*lbf)
41453
32.INSPECT REAR DIFFERENTIAL LOCK SLEEVE
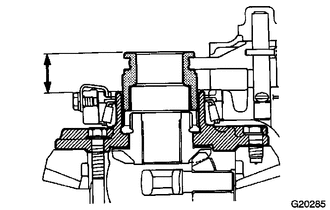
Measure the distance between the sleeve and tip of the differential case when the differential is free, and when it is locked.
- Standard distance:
Locked: 17.45 to 18.85 mm (0.687 to 0.742 in.)
Free: 32.40 to 33.90 mm (1.276 to 1.334 in.)
41450
33.INSTALL DIFFERENTIAL LOCK SHIFT ACTUATOR
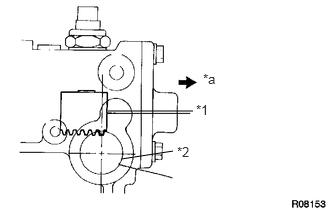
Check that the outermost rack tooth of the shift fork is approximately above the center line of the actuator installation hole.
| *1 | Shift Fork |
| *2 | Actuator Installation Hole |
| *a | Outside |
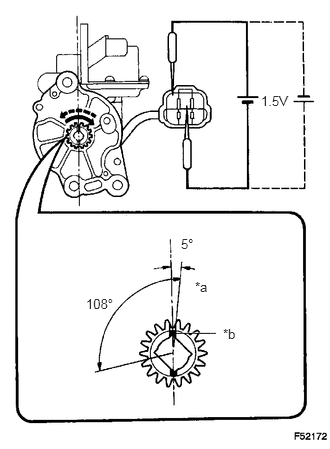
Make sure that the matchmarks on the pinion of the actuator are in the range of 0 to 5 degrees clockwise from the center line of the actuator.
| *a | Matchmark |
| *b | Groove |
- NOTICE:
- ·
If the matchmarks are not within this range, rotate the pinion.
·Do not apply positive battery voltage directly to the terminals.
·If the matchmarks move to the limit of rotation, stop applying electric current.
Install a new O-ring to the actuator.
Apply a light coat of gear oil to the O-ring.
Apply MP grease to the gear.
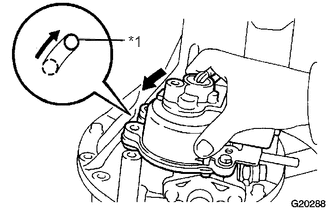
Mack sure that the outermost rack tooth of the shift fork aligns with the matchmarks on the pinion of the actuator.
Install the actuator so that the knock pin on the carrier side fits into the long hole on the actuator side.
| *a | Knock Pin |
- HINT:
-
Do not damage the O-ring of the actuator.
Rotate the actuator counterclockwise so that the knock pin slides to the end of the hole as shown in the illustration.
Install the bolts.
- Torque:
- 26.5 N*m (270 kgf*cm, 20 ft.*lbf)